Introduction
WireGuard can be used to set up a secure network or to access blocked websites and apps i.e. to route all your traffic through VPN. The problem is that it's relatively easy to block. In some places it can be blocked temporarily or permanently. How to circumvent the blocking of WireGuard protocol? Websockets to the rescue! We will use Wstunnel to wrap all networking activity of WireGuard in the Websockets, which will prevent blocking of the WireGuard protocol. This tutorial contains instructions on how to configure Wstunnel on your WireGuard server and on the various client operating systems, namely Android, Windows and Linux.
Prerequisites
-
An Ubuntu OS is installed and configured.
It's assumed that your WireGuard server and your Linux clients (if you have one) are using Ubuntu. Some commands may need to be adjusted if it's not the case.
-
WireGuard is configured on your server and clients.
You can read this WireGuard tutorial.
Example terminology
-
Public IP of your server:
203.0.113.1You must change it with your own IP.
Step 1 - Installing Wstunnel on server
Connect to your server via SSH.
Open the latest Wstunnel release on GitHub in your browser. Copy the link to the desired architecture, most of the time you need linux_amd64.tar.gz tar file.
Run the command below and replace the link with the one that you copied from GitHub:
cd ~ && curl -fLo wstunnel.tar.gz https://github.com/erebe/wstunnel/releases/download/v10.1.9/wstunnel_10.1.9_linux_amd64.tar.gzIf you want to fetch the latest release automatically
Run the command below to fetch the latest release of Wstunnel for AMD64 architecture:
latest="$(curl -sI https://github.com/erebe/wstunnel/releases/latest | tr -d '\r' | grep '^location:')" \
&& latest="${latest##*/v}" \
&& curl -fLo wstunnel.tar.gz "https://github.com/erebe/wstunnel/releases/download/v${latest}/wstunnel_${latest}_linux_amd64.tar.gz"
You can replace amd64 in the command with a desired architecture.
You need to extract wstunnel from the tar file:
tar -xzf wstunnel.tar.gz wstunnelAdd execute permissions to the file:
chmod +x wstunnelNow, you can install wstunnel system-wide:
sudo mv wstunnel /usr/local/binRun the following command to check that wstunnel is installed properly:
wstunnel --versionRun the command below to be able to bind the 443 (https) port without root privileges.
sudo setcap cap_net_bind_service=+ep /usr/local/bin/wstunnelIf you need to update wstunnel, repeat step 1 again.
Step 2 - Server configuration
You don't need to change anything in the WireGuard configuration on your server. You just need to additionally spawn wstunnel that will listen for incoming traffic, and will redirect it to WireGuard.
The command to start wstunnel on your server looks like this:
-
You need to replace
<secret>with your own secret, which is used to protect the server.You can generate it using the following command:
read -r -n 64 path_prefix < <(LC_ALL=C tr -dc "[:alnum:]" < /dev/urandom); echo $path_prefix -
You need to replace
51820with a port on which the WireGuard server listens.You can check the listen port with the following command:
sudo wg show all listen-port.
wstunnel server --restrict-http-upgrade-path-prefix "<secret>" --restrict-to localhost:51820 wss://0.0.0.0:443This command will run wstunnel server in foreground and print logs to your terminal. You can terminate it as usual by pressing Ctrl + C.
The --restrict-to option specifies the destination to which requests are accepted.
This server will listen on port 443 on all IPv4 addresses. If you have a web server running that listens on port 443 (https) already, you need to choose another port for wstunnel.
Running the wstunnel server in foreground in your terminal is impractical. If you close the terminal, it will die. We will create a systemd service to run it in the background.
First, create a separate unprivileged user for the wstunnel service:
sudo useradd --system --shell /usr/sbin/nologin wstunnelNow, create a file for the service:
sudo nano /etc/systemd/system/wstunnel.servicePast the following content:
ExecStartdirective specifies the samewstunnelcommand above. Adjust it accordingly.Restartis used to restart the server ifwstunnelexits unexpectedly.[Install]section is used to automatically start the service on system boot.
[Unit]
Description=Wstunnel for WireGuard
After=network-online.target
Wants=network-online.target

[Service]
User=wstunnel
Type=exec
ExecStart=/usr/local/bin/wstunnel server --restrict-http-upgrade-path-prefix "<secret>" --restrict-to localhost:51820 wss://0.0.0.0:443
Restart=on-failure

[Install]
WantedBy=multi-user.target
Now you can start up wstunnel and configure it to always start up on system boot:
sudo systemctl start wstunnel && sudo systemctl enable wstunnelStep 3 - Client configuration
On each WireGuard client device you need to start a wstunnel client that will act as a local WireGuard server and will tunnel the traffic to the real server.
How to do it depends on the OS of the client device. I will provide instructions for Android, Windows and Linux devices. But the basic command to start wstunnel client is the same:
<secret>is the secret you used to start thewstunnelserver.51820is the port of your WireGuard server, check it withsudo wg show all listen-port.203.0.113.1is the IP of your server, replace it with your own IP.
wstunnel client --http-upgrade-path-prefix "<secret>" -L "udp://51820:localhost:51820?timeout_sec=0" wss://203.0.113.1:443Continue with the steps for your client:
Step 3.1 - Android client
Note: This method doesn't require root on your device.
This step will show you how to configure WireGuard with Wstunnel on an Android device. You need a terminal emulator on your Android device to run Wstunnel.
You can choose between the two terminals below:
Set up Wstunnel using Termux terminal
Download and install the latest Termux apk on your Android device.
Open Termux and execute the commands below to download and extract Wstunnel:
- You need to download the
wstunnelbinary for Android, i.e.android_arm64.tar.gz. - Replace the link with the latest version of Wstunnel.
cd ~ \
&& curl -fLo wstunnel.tar.gz https://github.com/erebe/wstunnel/releases/download/v10.1.9/wstunnel_10.1.9_android_arm64.tar.gz \
&& tar -xzf wstunnel.tar.gz wstunnel
Set up Wstunnel using TermOne Plus terminal
Install the terminal TermOne Plus on your Android device.
It's needed to execute the wstunnel command.
There are two methods to install wstunnel binary on your Android device, which one to choose depends on which Linux commands are preinstalled on your device.
Check if curl and tar are available on your device. On my Xiaomi phone they are preinstalled.
Open the TermOne app installed before, and try to execute the following commands:
curl
tar
You can get errors:
/system/bin/sh: curl: not found
or
/system/bin/sh: tar: not found
Read this if you don't have curl or tar.
Use the curl command below, but run it on your PC, not on your Android device. Read the explanation below how to choose the binary to download. Then you need to copy the wstunnel binary to your device. Copy it to the root of the device storage, i.e. alongside directories like Android, DCIM, Downloads.
Open TermOne and give it file storage permissions. Now you need to copy wstunnel to internal storage of the TermOne app, run the following command to do this:
Note: You can't execute files directly in
/sdcard, because of Android restrictions. This is why you need to copy it.
cd ~ && cp /sdcard/wstunnel .You can revoke file storage permissions now. They are not needed anymore.
Now scroll to the chmod command below, and run it to give execute permissions to wstunnel.
If both commands are available, you can proceed further.
You need to download the wstunnel binary for Linux and ARM64 architecture, i.e. linux_arm64.tar.gz to your Android device.
To do this, open TermOne and execute the curl and tar commands below. You may need to replace the link in the curl command with one for the newer version of wstunnel.
cd ~ \
&& curl -Lo wstunnel.tar.gz https://github.com/erebe/wstunnel/releases/download/v10.1.9/wstunnel_10.1.9_linux_arm64.tar.gz \
&& tar -xzf wstunnel.tar.gz wstunnel
If you get an error: "tar: chown 1001:127 'wstunnel': Operation not permitted", ignore it.
If you get an error: "tar: exec gunzip: Permission denied" read this.
Note: On my older phone when I execute the command above, I get errors:
tar: exec gunzip: Permission denied
tar: read error
This is because
tartries to callgunzipwhich is not present on my phone. I have found a workaround like this:gzip -d wstunnel.tar.gz tar -xf wstunnel.tar wstunnel
You downloaded Wstunnel and extracted it using your terminal of choice. Let's look what we have now:
ls -lhOutput should be similar to this, which means wstunnel successfully downloaded and extracted.
total 13M
-rw------- 1 u0_a488 u0_a488 8.8M 2024-08-27 11:53 wstunnel
-rw------- 1 u0_a488 u0_a488 4.4M 2024-08-29 13:31 wstunnel.tar.gz
Run the following command to be able to execute wstunnel:
chmod 777 wstunnelNow, you should be able to run wstunnel:
./wstunnelThe command to start wstunnel client is long, we will put it in the script. Run the following command:
- Adjust the
wstunnelcommand as described in step 3.
echo './wstunnel client --http-upgrade-path-prefix "<secret>" -L "udp://51820:localhost:51820?timeout_sec=0" wss://203.0.113.1:443' > tunnelYou can run the script by executing:
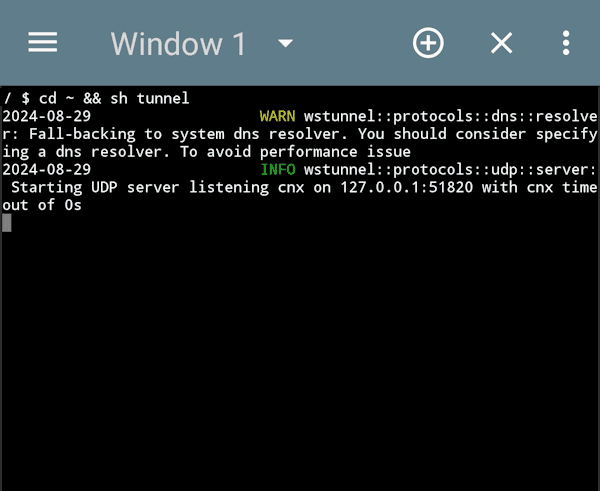
sh tunnelYou should get output similar to this:
2024-08-29 INFO wstunnel::protocols::udp::server: Starting UDP server listening cnx on 127.0.0.1:51820 with cnx timeout of 0sIf you're using TermOne, you can run the tunnel script automatically.
For additional convenience you can run the tunnel script automatically right after you open the new terminal window.
-
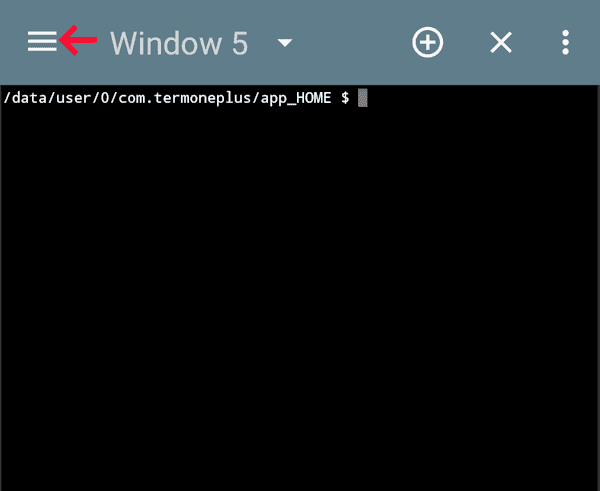
Open the TermOne menu:
-
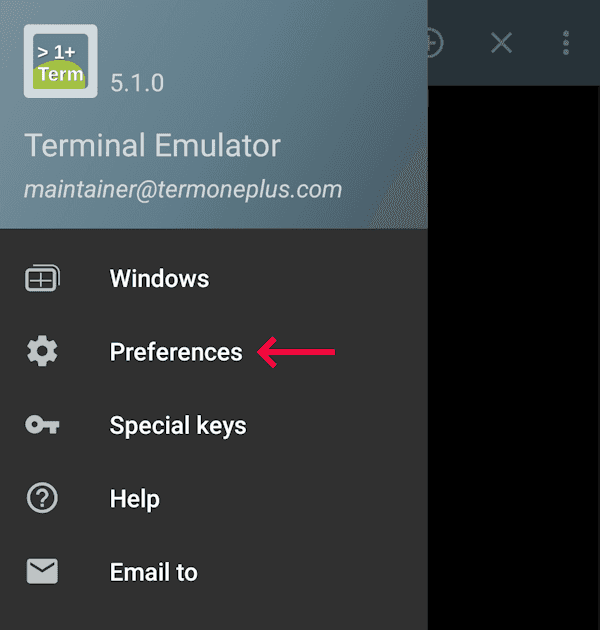
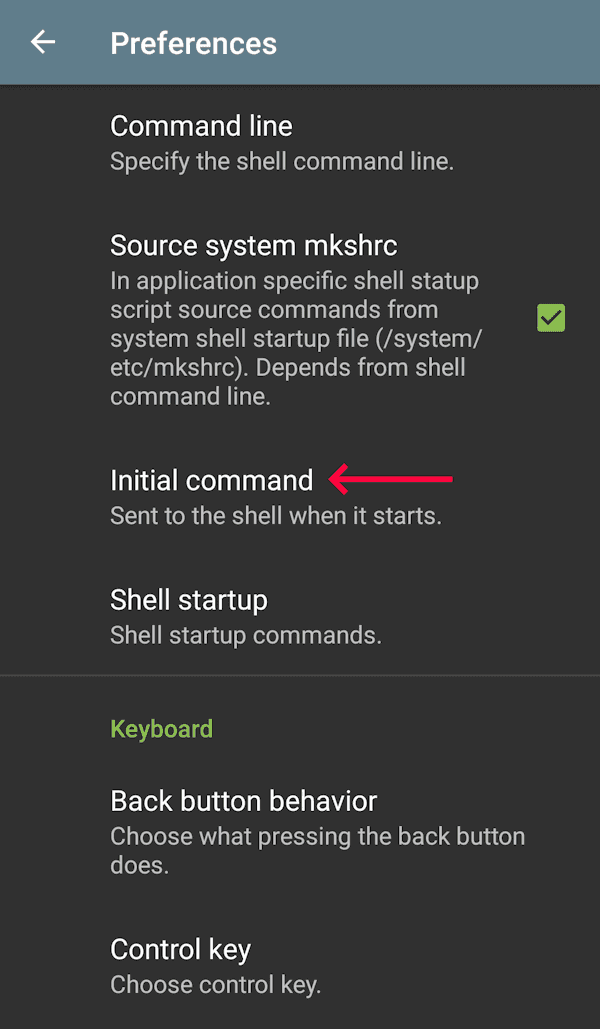
Go to the Preferences / Shell / Initial command.
-
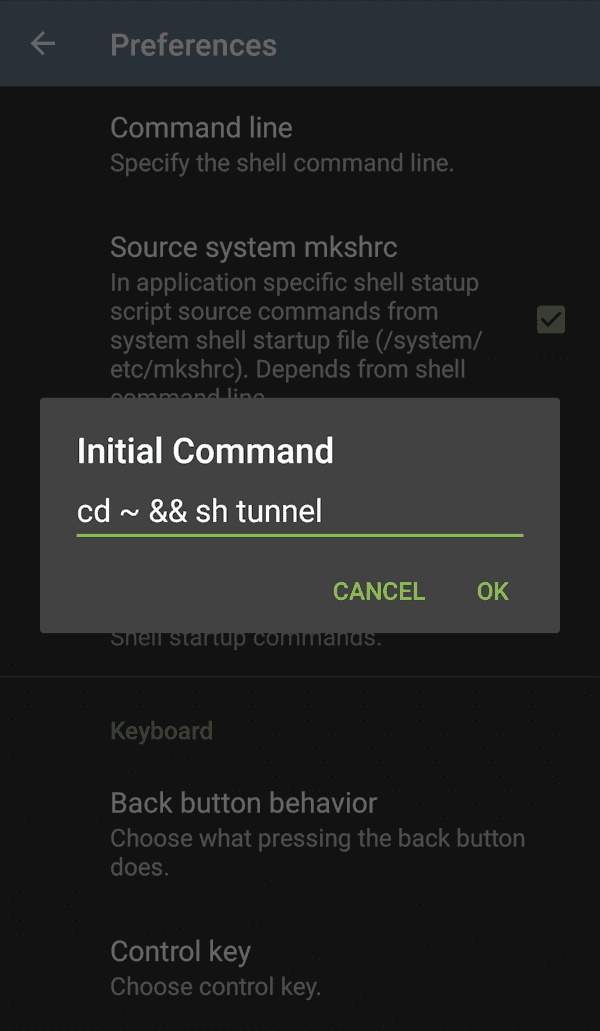
Change
cd ~tocd ~ && sh tunnel.
Now if you try to open the TermOne app, wstunnel should be started automatically.
Screenshot:
Now that wstunnel is fully working, it's time to change the settings in the WireGuard app on your device. You need to configure it to use the wstunnel client on your device as a WireGuard server instead of a remote WireGuard server directly.
-
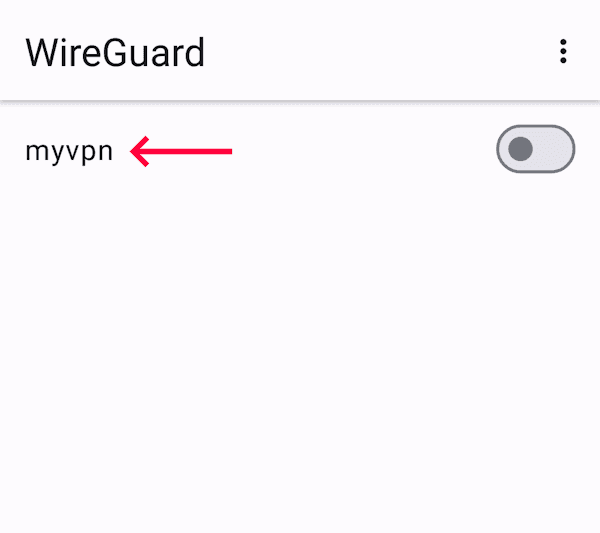
Open WireGuard and choose your VPN profile:
-
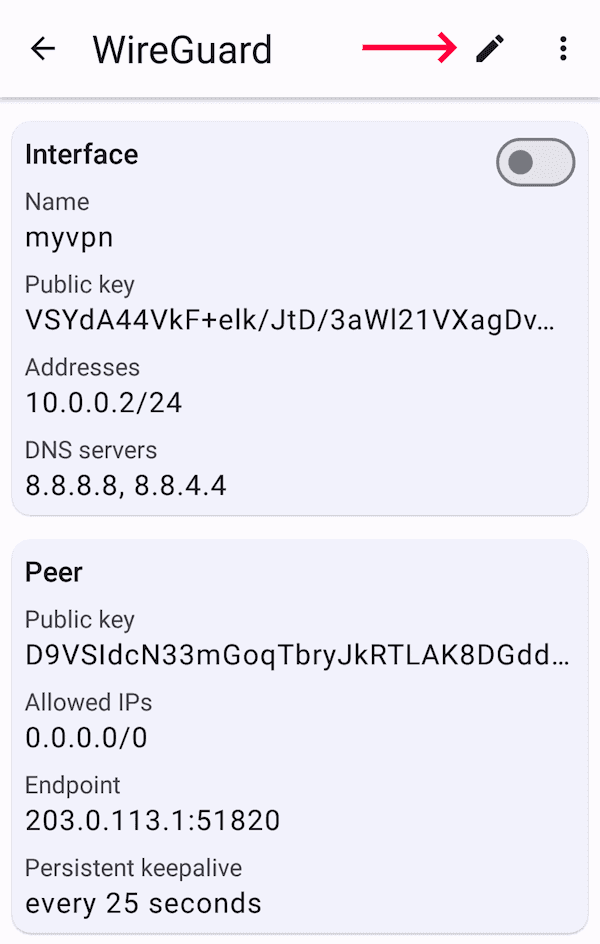
Tap the pencil to edit it:
-
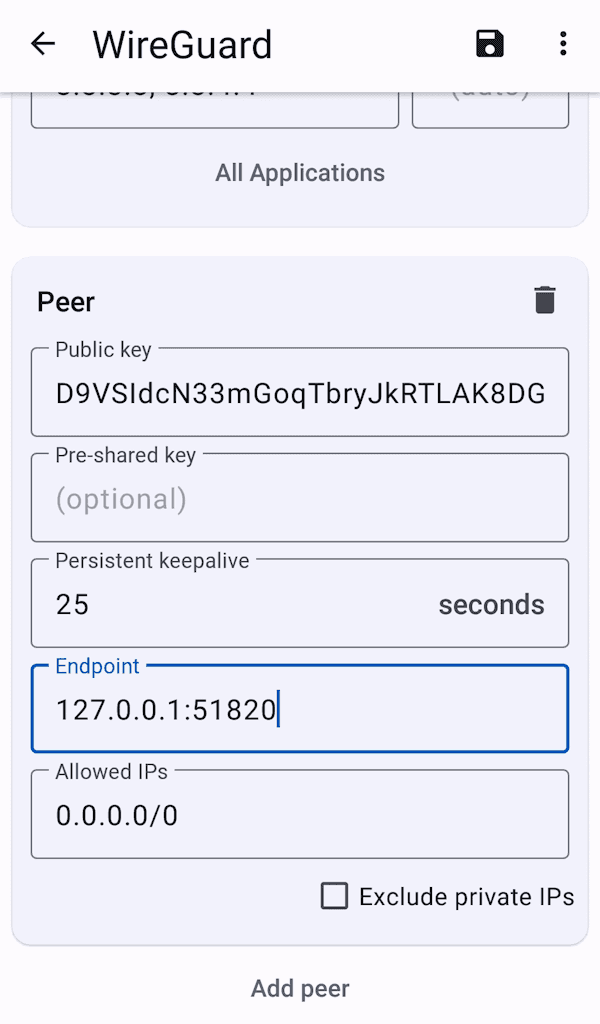
Scroll down to peer's Endpoint and change it to
127.0.0.1:51820, where51820is your WireGuard port. Don't close the WireGuard app. -
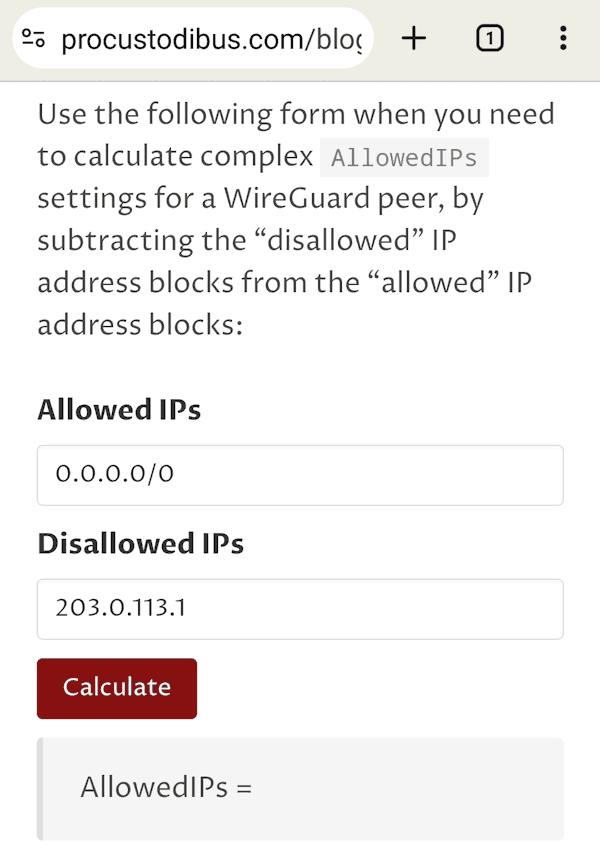
Open
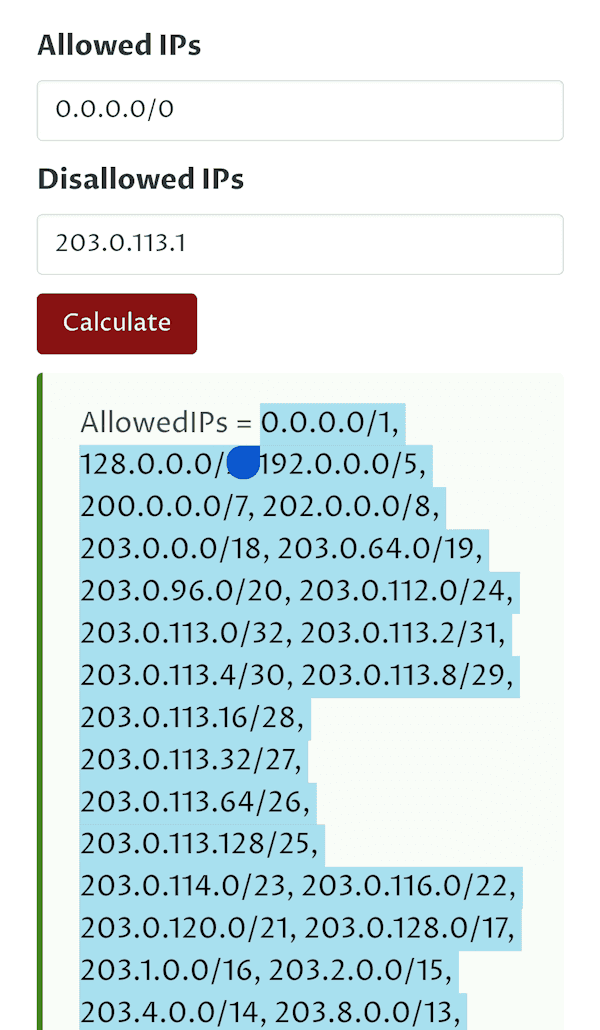
AllowedIPscalculator in your browser. For Allowed IPs, enter0.0.0.0/0. For Disallowed IPs, enter the IP address of your server. -
Click Calculate and copy the resulting IPs without the
AllowedIPs =part. -
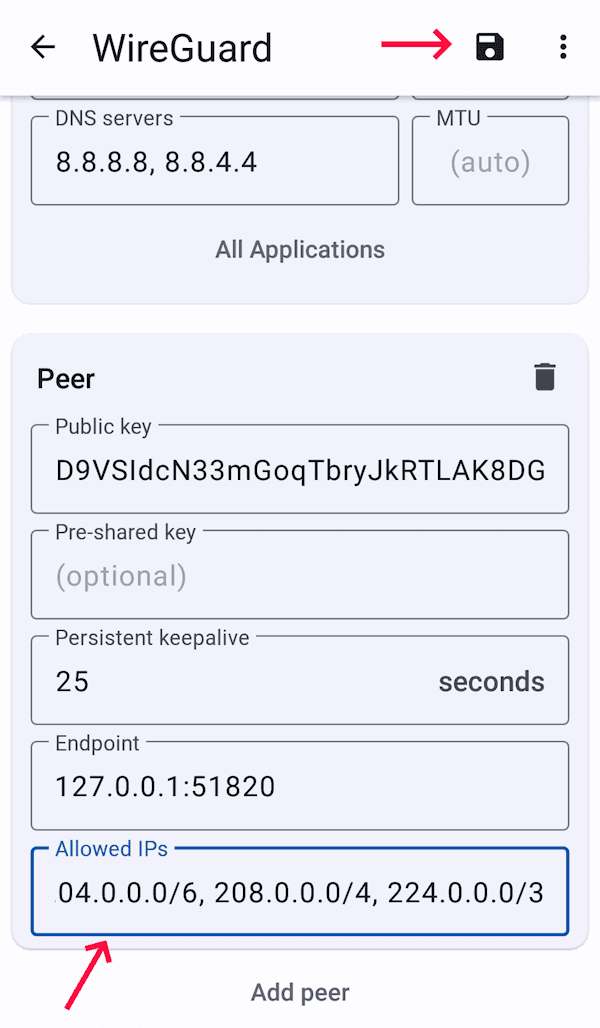
Go back to WireGuard and delete
0.0.0.0/0from the Allowed IPs field, paste the copied IP addresses, and tap save.
Enable your WireGuard VPN profile to test it. Go back to your terminal. The output should be similar to this:
- where
203.0.113.1is the IP address of your server.
2024-08-29 INFO wstunnel::protocols::udp::server: New UDP connection from 127.0.0.1:59571
2024-08-29 INFO wstunnel::protocols::tcp::server: Opening TCP connection to 203.0.113.1:443
2024-08-29 INFO wstunnel::protocols::tls::server: Doing TLS handshake using SNI IpAddress(V4(Ipv4Addr([203, 0, 113, 1]))) with the server 203.0.113.1:443
2024-08-29 INFO tunnel{id="..." remote="localhost:51820"}: wstunnel::tunnel::transport::websocket: received frame Ping
2024-08-29 INFO tunnel{id="..." remote="localhost:51820"}: wstunnel::tunnel::transport::websocket: received frame Pong
Try to access the Internet, everything should work.
Step 3.2 - Windows client
You need to download the wstunnel binary for Windows.
Execute the following commands in PowerShell to download it into the ~\wstunnel directory. You may need to replace the link in the curl command with one for the newer version of wstunnel.
mkdir ~\wstunnel
cd ~\wstunnel
curl.exe -fLo wstunnel.tar.gz https://github.com/erebe/wstunnel/releases/download/v10.1.9/wstunnel_10.1.9_windows_amd64.tar.gz
tar -xzf wstunnel.tar.gz wstunnel.exe
Execute pwd and copy the path, which needs to be added into the system PATH environment variable.
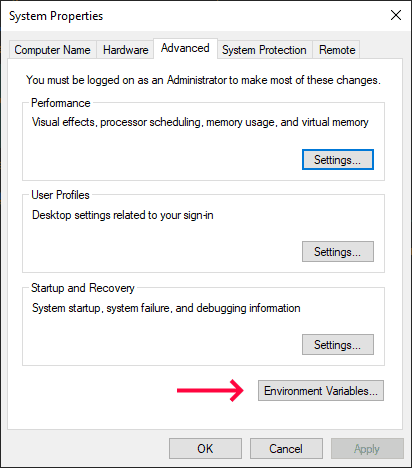
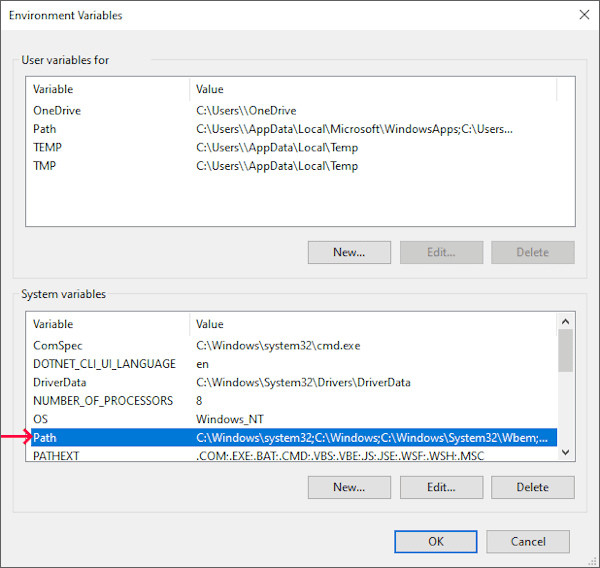
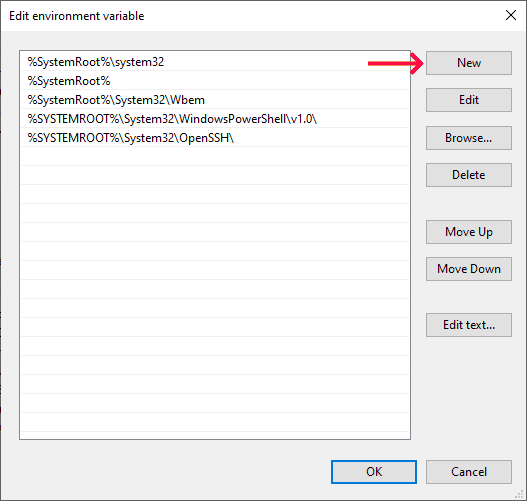
To add the wstunnel directory into the system PATH, perform the steps below:
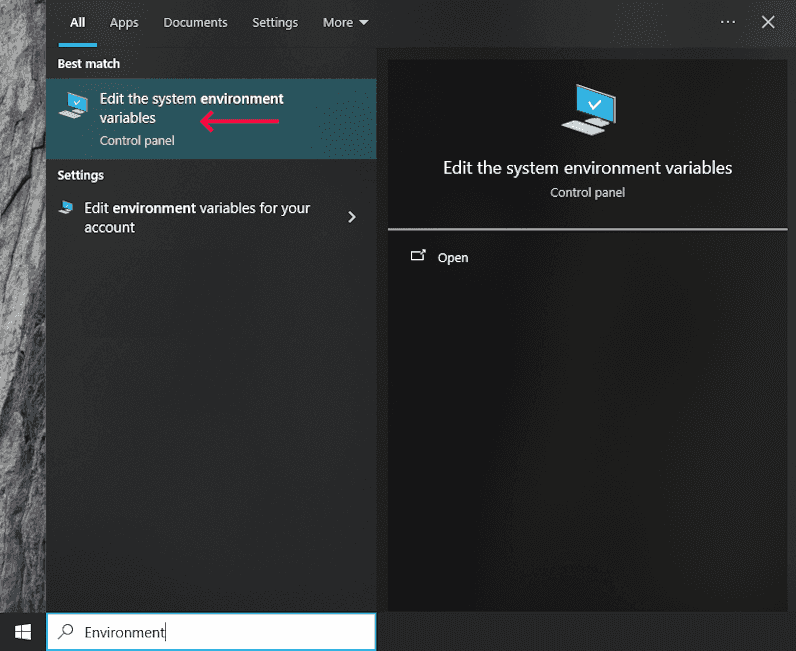
-
Type Environment into the Windows search bar and click Edit the system environment variables:
-
Click Environment Variables:
-
Edit Path in the System variables section:
-
Click New, paste the copied path to the
wstunneldirectory and click OK. -
Open a new PowerShell window and test if that PATH environment variable updated properly:
wstunnel --version
You need to adjust a setting in the registry to enable script execution inside the WireGuard configuration. Open PowerShell as an Administrator and execute the following command:
reg add HKLM\Software\WireGuard /v DangerousScriptExecution /t REG_DWORD /d 1 /fNow, it's time to change your WireGuard configuration.
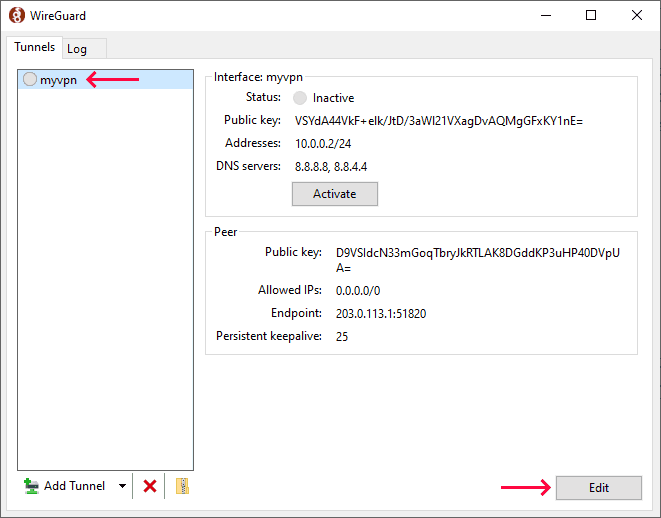
-
Open WireGuard and select the tunnel you want to edit, click Edit:
-
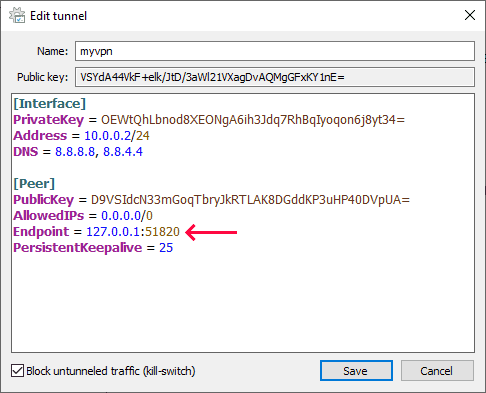
Change
EndpointIP address to127.0.0.1:- where
51820is your WireGuard port.
- where
-
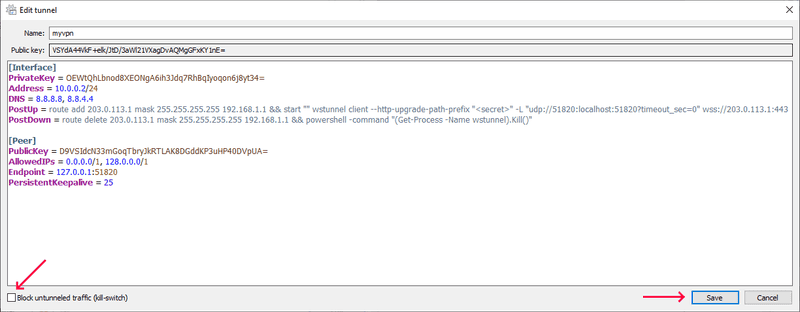
Add the
PreUpandPostDowncommand to your[Interface]section:They are needed to start
wstunnel clientwhen the WireGuard VPN is activated and stop it when the VPN is deactivated.- change
203.0.113.1to your server IP address. - change
192.168.1.1to your router IP address. - Update the
wstunnel clientcommand as described in step 3.
PreUp = route add 203.0.113.1 mask 255.255.255.255 192.168.1.1 && start "" wstunnel client --http-upgrade-path-prefix "<secret>" -L "udp://51820:localhost:51820?timeout_sec=0" wss://203.0.113.1:443 PostDown = route delete 203.0.113.1 mask 255.255.255.255 192.168.1.1 && powershell -command "(Get-Process -Name wstunnel).Kill()" - change
-
Uncheck Block untunneled traffic and click Save:
Activate your VPN and test your Internet connection, it should be working now.
Step 3.3 - Linux client
You need to install wstunnel on your Linux client, how to do it is described in step 1.
Now, you need to modify the WireGuard configuration of your client. If your interface name is wg0, the command to edit it will look like this:
sudo nano /etc/wireguard/wg0.confChange the Endpoint field in the [Peer] section. The peer here is the WireGuard server.
- Where
51820is the listen port of your WireGuard server.
Endpoint = 127.0.0.1:51820Add PreUp and PostDown commands to your [Interface] section. Adjust them as described for the Windows client.
PreUp = ip route add 203.0.113.1/32 via 192.168.1.1
PreUp = wstunnel client --http-upgrade-path-prefix "<secret>" -L "udp://51820:localhost:51820?timeout_sec=0" wss://203.0.113.1:443 &> /dev/null &
PostDown = ip route del 203.0.113.1/32 via 192.168.1.1
PostDown = killall wstunnel
Apply your changes:
- where
wg0is your interface name.
wg-quick down wg0
wg-quick up wg0
Test your Internet connection:
curl -4 https://ip.hetzner.comOutput should be 203.0.113.1, i.e. the IP address of your server.
Conclusion
Blocking of the WireGuard protocol can make your VPN unusable. Hopefully you managed to overcome this with the help of Wstunnel and WebSockets. There are other options to do the same thing, for example udp2raw, but they require root on your Android device.
