Introduction
WireGuard is a fast and secure alternative to other VPN software such as IPSec and OpenVPN. The benefit of WireGuard is that it is multithreaded and built into the kernel, meaning you can achieve symmetrical throughputs of 1Gbps even on lower end boxes, something that is not possible with OpenVPN. The server is very lightweight and easy to set up. There are clients for most operating systems including Windows.
Some other benefits of WireGuard include being able to run internal services such as SSH, FTP, and remote desktop, on the VPN IP address instead of the main IP address of the server, which reduces the possible attack vectors on your server. For example, you can enable SSH access for one user on your public IP, and all other users on the VPN IP only.
You can also tunnel part or all of your internet traffic over WireGuard as a VPN, and easily achieve speeds of over 1Gbps. If you are behind NAT and cannot port forward, a simple WireGuard server on a low end VPS is a good way to allow servers running on your computer to be accessible from the internet.
This tutorial will focus on installing WireGuard on a Debian server.
Note: You may find the "Installing WireGuard VPN on Ubuntu" tutorial useful if you want to configure a WireGuard server to provide Internet access to various client devices.
Example terminology
-
Public IP of your server:
203.0.113.1You must change it with your own IP.
-
Subnet for the WireGuard tunnel:
10.0.0.0/24
Step 1 - Installation
Connect to your server by using SSH.
Run the following command to install WireGuard:
sudo apt update && sudo apt install wireguard
wg --version
Step 2 - Server configuration
This guide will assume you have a server with a single client. WireGuard supports as many clients as needed, simply add another peer to the wg0.conf configuration file, and follow client installation steps again on the client.
First, generate the public and private keys for the server. Your public key will be printed to the terminal:
wg genkey | sudo tee /etc/wireguard/wg-private.key | wg pubkey | sudo tee /etc/wireguard/wg-public.keyYou can retrieve your keys later with the following commands:
sudo cat /etc/wireguard/wg-private.key
sudo cat /etc/wireguard/wg-public.key
This tutorial will use wg-quick for the running of the server. There are other methods, but this is the easiest to start with.
Create and edit the file /etc/wireguard/wg0.conf in your favorite text editor.
Here, 203.0.113.1 is the public IPv4 address of your server, 10.0.0.1 is the private IPv4 address used for the VPN server, and 10.0.0.2 is used for the client. If you need more clients, simply use other IPs (10.0.0.3, etc) within the subnet 10.0.0.0/24.
- The private (
10.0.0.1) IPv4 will be the VPN IP address of the server. This IP is not accessible from the public internet, and any services listening on it will only be accessible from within clients connected to the VPN. - This subnet can be changed to other private networks. Alternatively, you can use and forward public IP addresses if your server has at least 3 public IPv4, but this is outside the scope of the tutorial, and needs careful firewalling.
Add a configuration such as:
[Interface]
Address = 10.0.0.1/24
ListenPort = 51820
PrivateKey = PRIVATE KEY YOU GENERATED GOES HERE

[Peer]
PublicKey = NOTHING GOES HERE YET
AllowedIPs = 10.0.0.2/32
PersistentKeepalive = 25
To explain each configuration parameter:
-
Addressis the aforementioned private IPv4. The /24 subnet indicates that this will handle IPs10.0.0.1 - 10.0.0.254. -
ListenPortis the listening port of your server. This will need to be opened in your firewall.Take a look here for additional notes about how to configure a firewall for the WireGuard server.
-
PrivateKeyis the private key generated for the server. The public key will be given out to each client. The rule of thumb: the private key does not leave the device it was generated on, but the public key does.
Each peer (you can add multiple in the same file) has a public key which will be generated on the client, as well as:
AllowedIPs: Here we place the subnet for our clients, as well as the allowed IP address for the client. Restrict this as needed (for example, remove the10.0.0.1/24if you do not want each client to be able to talk to other clients on that subnet).PersistentKeepalive: Keeps the connection alive by sending a handshake every 25 seconds.
Step 3 - Client configuration
Repeat step 1, and step 2 up until "configuration" if you are running Linux on the client, otherwise download the WireGuard client for your device and install it.
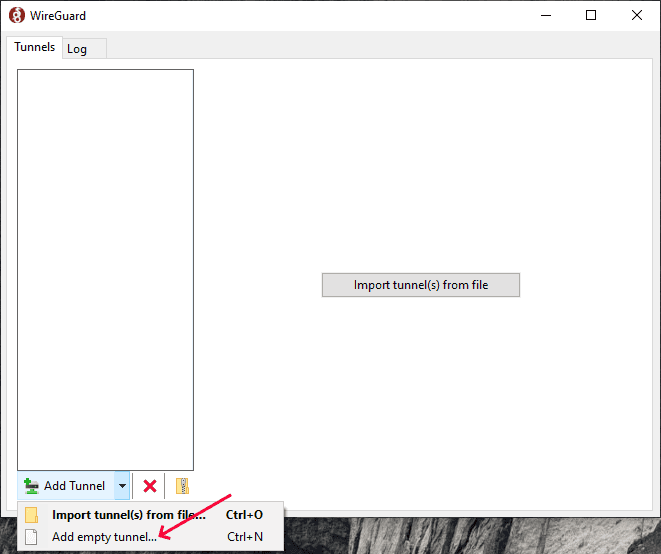
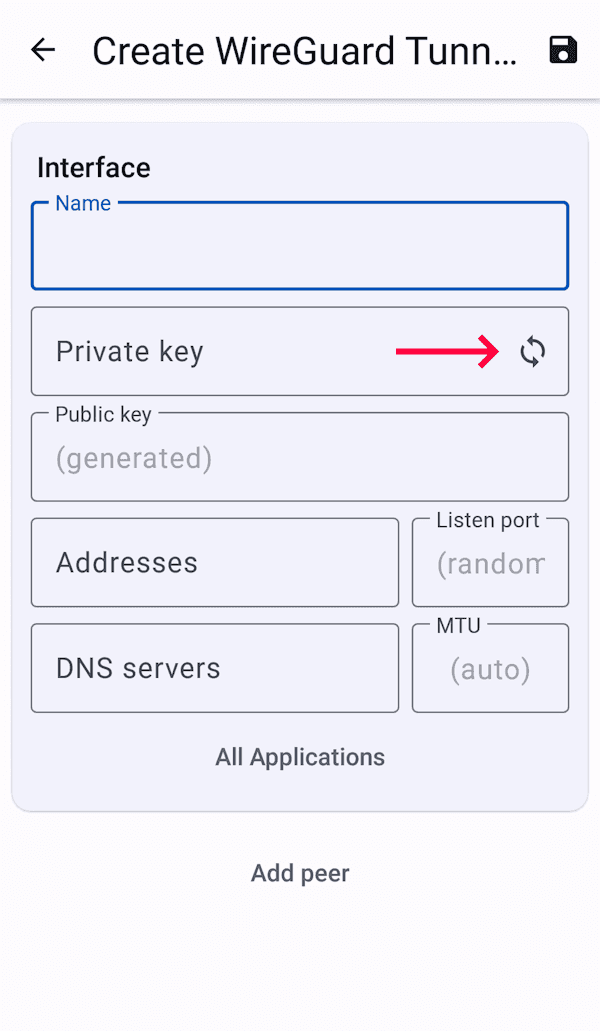
You can generate a public and private key for the client in the same way as for the server in step 2. Alternatively, you can generate them on the target device. The Windows and Android client will generate a key pair for you when you try to add a new tunnel configuration.
Generate key pair on Windows
Click triangle on the Add Tunnel button to open the menu and click Add empty tunnel.
The private and public key will be generated for you.
Generate key pair on Android
Your new key pair will be created.
Add the public key you just generated to the server /etc/wireguard/wg0.conf file in the peer's PublicKey field.
Next, you will need to configure the client. The configuration is very similar to the server. In fact, you can run a client as a server by adding a ListenPort directive, and connect multiple servers together that way.
An example client configuration, which only tunnels VPN traffic on 10.0.0.0/24, and not the entire internet of the client computer:
Replace
203.0.113.1with your server IP address.
[Interface]
Address = 10.0.0.2/24
PrivateKey = PRIVATE KEY OF CLIENT GOES HERE

[Peer]
PublicKey = PUBLIC KEY OF SERVER GOES HERE
AllowedIPs = 10.0.0.0/24
Endpoint = 203.0.113.1:51820
PersistentKeepalive = 25
An example configuration, which tunnels all traffic through the server, with IPv6 support:
Replace
203.0.113.1with your server IP address.
[Interface]
# Switch DNS server while connected
DNS = 8.8.8.8
Address = 10.0.0.2/24, 2a01:4f8:1234::2/128
PrivateKey = PRIVATE KEY OF CLIENT GOES HERE

[Peer]
PublicKey = PUBLIC KEY OF SERVER GOES HERE
AllowedIPs = 0.0.0.0/0, ::/0
Endpoint = 203.0.113.1:51820
PersistentKeepalive = 25
Remove the IPv6 addresses if you do not want IPv6 support.
If you want IPv6 support, you will also need to add the client's IPv6 address to the server configuration under the peer's AllowedIPs. Each server gets a /64, so you can allocate an individual IP in there to your client (or a smaller subnet). Keep in mind when forwarding a public IPv6 you will need to firewall it correctly, which is outside the scope of this tutorial (it can either be firewalled on the client with Windows firewall or the server with iptables, for example). It is possible to forward public IPv4 in a similar way. The benefit of doing this is you do not need NAT on the server-side for port forwarding.
Step 4 - Routing all your traffic through VPN
The AllowedIPs field in the client configuration will specify what IP ranges go through the tunnel and what do not. You will need to configure iptables on the server to enable external internet access if forwarding all traffic (that is 0.0.0.0/0 configuration).
First, run the following command to allow IP forwarding:
sudo sysctl net.ipv4.ip_forward=1If you want to preserve this change after reboot you need to edit the sysctl.conf configuration file:
sudo nano /etc/sysctl.confFind the net.ipv4.ip_forward configuration option and change it to:
net.ipv4.ip_forward = 1Now, you need add the following iptables rules:
Replace
enp1s0with the main interface (you can check it withip a).
Replace203.0.113.1with your server IP address.
sudo iptables -t nat -A POSTROUTING -s 10.0.0.0/24 -o enp1s0 -j SNAT --to-source 203.0.113.1
sudo iptables -t nat -A POSTROUTING -s 10.0.0.0/24 -j MASQUERADE
To save the rules across reboots you need to install the package iptables-persistent:
sudo apt update && sudo apt install iptables-persistentRun the following command to save the rules in file, which will be loaded at system boot:
sudo iptables-save -f /etc/iptables/rules.v4Step 5 - Port forwarding (Optional)
For example, to make a TCP service running on a VPN client at 10.0.0.2:48000 accessible from the internet at 203.0.113.1:45000 run the following command:
enp1s0is your main interface.
203.0.113.1is the IP address of your server.
10.0.0.2is the IP address of your VPN client.
sudo iptables -t nat -A PREROUTING -d 203.0.113.1/32 -i enp1s0 -p tcp -m tcp --dport 45000 -j DNAT --to-destination 10.0.0.2:48000A nginx reverse proxy may also be used as an alternative with the proxy_pass directive.
Step 6 - Start the server
To start the server, run the following command:
wg0is your interface name.
sudo systemctl start wg-quick@wg0To start the server automatically at system boot:
sudo systemctl enable wg-quick@wg0The same commands are used to start the Linux client.
To check if things are working, type sudo wg. This will display an output such as:
interface: wg0
  public key: <public key of the server>
  private key: (hidden)
  listening port: 51820

peer: <public key of the client>
  endpoint: <public IP of the client>:31844
  allowed ips: 10.0.0.2/32, 2a01:4f8:1234::1/128
  latest handshake: 11 seconds ago
  transfer: 2.16 TiB received, 1.67 TiB sent
  persistent keepalive: every 25 seconds
If your client has connected correctly, you will see last handshake and total transfer.
You can now ping your server/client through the tunnel: ping 10.0.0.1. Any services bound to 0.0.0.0 or 10.0.0.1 will also be accessible from your clients over the VPN. Finally, with the AllowedIPs = 0.0.0.0/0 configuration, all internet traffic will be tunneled over the VPN connection too.
To secure services to the VPN, either set their bind address to the VPN IP (10.0.0.1), or limit the access to 10.0.0.0/24 (for example, the AllowUsers directive in sshd_config: AllowUsers root@10.0.0.*). Avoid locking yourself completely out of the server doing this, and always leave a service open to all IPs while making changes in case something goes wrong. If you do lock yourself out, you will need to request a KVM console in robot and fix your mistakes.
Step 7 - Reloading configuration file
To reload the configuration file run the following command:
wg0is your interface name.
sudo systemctl restart wg-quick@wg0Step 7.1 - Reloading without disrupting active sessions (Optional)
You can add a client and reload configuration without disrupting active sessions. Run the following commands:
sudo su
wg syncconf wg0 <(wg-quick strip wg0)
Press Ctrl + D to close the root shell.
Step 8 - Troubleshooting
Can you connect to the server at all?
Type sudo wg. Do you see a handshake having taken place recently? If so, you are connected. If not, check your public and private keys, as well as firewall rules.
Can you connect to the server but not access the internet in a 0.0.0.0/0 configuration?
If you can ping the server itself (10.0.0.1), it may be an iptables issue. Make sure you added the rule correctly, and cat /proc/sys/net/ipv4/ip_forward returns 1.
Can't ping a Windows client?
Windows blocks ICMP by default on the 10.0.0.0/8 range, so you will need to enable it in the Windows firewall. The same applies to any service running on a Windows client.
Slow speeds?
Check your CPU usage on the client and server. If your CPU is maxing out, that is the problem, but you should have no issue with multi-gigabit speeds on a modern 4-core processor. Try killing or renicing other applications that might be using the CPU. You will not see WireGuard as a process as it runs in the kernel, but you will see its CPU usage as red bars in htop.
Can't access a service at https://10.0.0.1:PORT?
Type netstat -tulpn and check it is listening on 0.0.0.0 or 10.0.0.1, not 127.0.0.1 or 203.0.113.1.
As a client, cannot access something running on another client?
Ensure server allows FORWARD between the two clients in iptables / ufw. Also ensure /proc/sys/net/ipv4/ip_forward = 1.
Conclusion
By now you should have a working VPN server running WireGuard, congratulations!


