
Introduction
In this tutorial you will learn how to install Docker CE (Community Edition), how to create your first container and how to uninstall Docker.
When you create a new Hetzner Cloud Server, you can select the Hetzner Cloud App Docker and
docker-cewill automatically be preinstalled on the server.
Containers
With containers it is possible to run software in an isolated environment on the system. This means that in a container you could run a different version of some software that you also have on your host, for example. Because of this isolation, you can create an entire environment that includes certain software and all its dependencies and use Docker images to share this container with other Docker users without having to worry about their operating systems or software that they already have installed on their host. In Linux, this isolated environment can be achieved with cgroups and namespaces. Cgroups control which resources a process can use (e.g. CPU). Namespaces control what a process can see.
Cgroups and namespaces are already on the system even before users create their first container. Each namespace type contains information about a specific property (mount points, process ID, ...). Every running process is allocated one namespace of each type. If two namespaces of the same type are available, the user can choose which namespace to use for a certain process. This option is basically what Docker is based on. For each running Docker container, new namespaces with their own rules and configurations are created to define individual mount points and network settings, for example.
Important namespaces and their use explained:
-
PID- process ID namespaceEvery running process is allocated an individual identification. Within each PID namespace, the identification numbers go from 1 upwards. Also, only the processes that have been started within a certain PID namespace are visible to this very namespace. Creating a new PID namespace is an own process that needs to be started in an existing PID namespace. Because of this, new PID namespaces automatically become child namespaces of the PID namespace they were created in (parent namespace). Next to its own processes, a parent namespace can also see the processes that are running in its child namespaces.
A PID namespace only exists as long as it has at least one running process. Once the final process within a PID namespace stops, the PID namespace is automatically deleted by the system.
-
UTS- UNIX timesharing-system namespaceThis is used to determine the hostname which is given to a process. An own hostname can be helpful with log files, for example. Regarding Docker containers in specific, different hostnames can also be helpful to see where a command will be executed, as the command prompt also includes the hostname. If the host and the container shared the same hostname, it would not be clear if you're in a running session on the host or the container from just looking at the command prompt.
-
NET- network namespaceThis is used to give one or more processes their own network interface. Each interface (or each NET namespace) has its own firewall rules and routing tables. Different NET namespaces that are running on the same host, are not automatically connected. To communicate from one NET namespace to another, the network settings have to be changed first.
-
MNT- mount namespaceThis is used to give one or more processes their own file system and mount points.
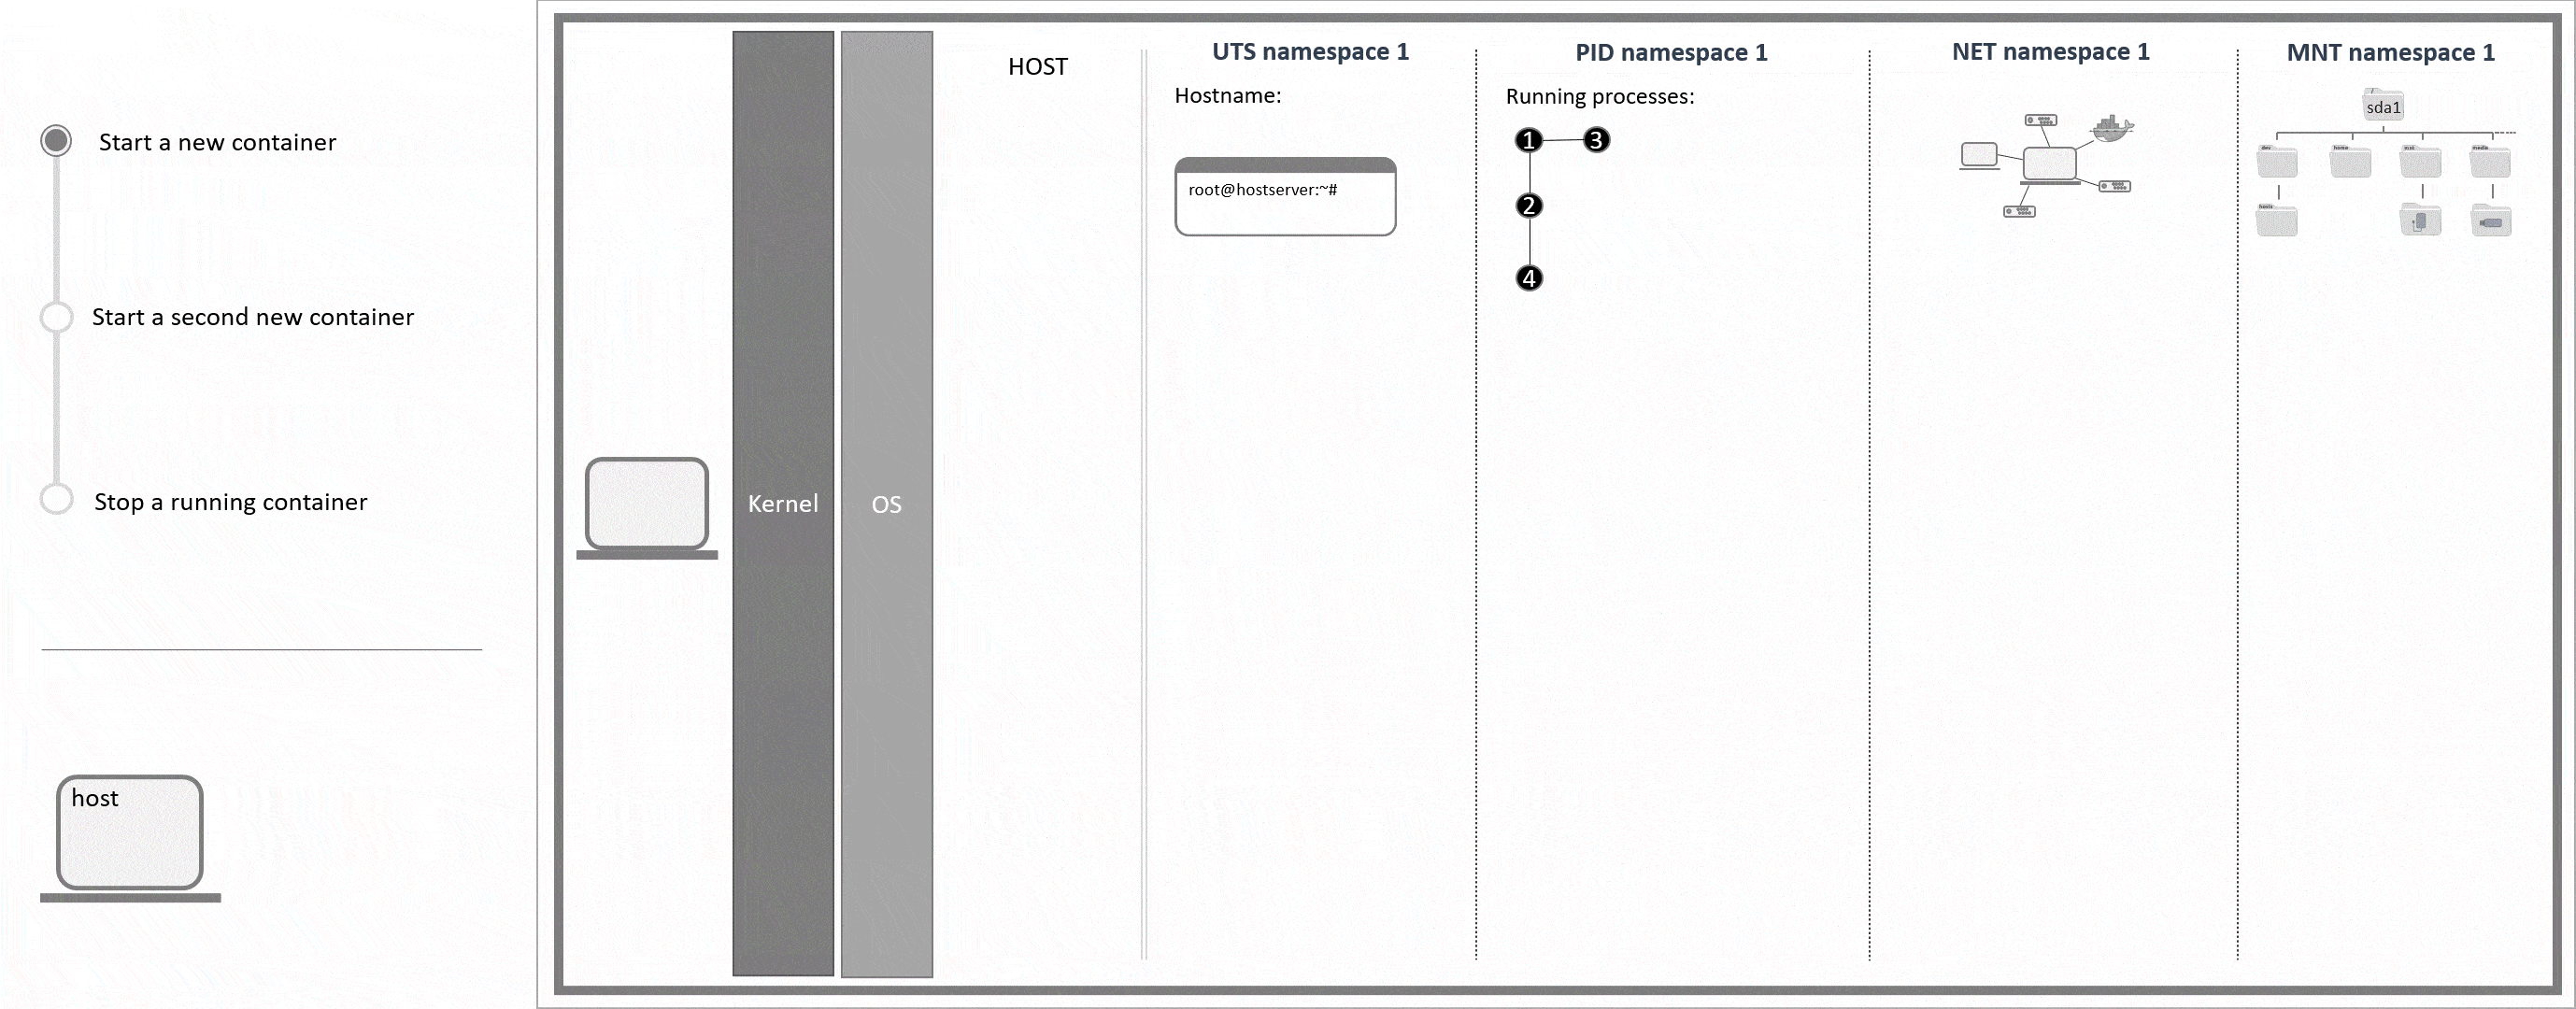
Namespaces are allocated per process. For container 1 this means that processes
6,7and8(process tree PID 1) are each allocated the namespaces UTS 2, PID 2, NET 2 and MNT 2.
You can usels -al /proc/self/nsto get the namespaces of the current process. The IDs of the namespaces should be different for the host and for a Docker container.
Prerequisites
- Basic knowledge about servers
- Access to the root user or a user with sudo permissions
- CLI tool
- This tutorial uses Ubuntu 22.04 and Debian 12, however this should also work with older versions.
Example terminology
- Username: holu
Please replace holu with your username in all example commands.
Any Docker related information is based on mid-2022.
Step 1 - Installing Docker Engine
You can install Docker via a package. Compared to the source code, packages are already compiled, and they include scripts that are used to automatically install the software and its dependencies.
Often, a software package is provided directly by the software vendor. However, packages can be provided by more than just one vendor. This is also the case with Docker. A package to install Docker Engine is provided by Docker Inc. as well as Debian and Ubuntu. The packages can be downloaded from archives, also known as package repositories. The differences between those packages are explained in more detail below.
You can use the apt command to manage your packages. This command is used to access a repository via HTTP and to then download a package from there. Once the package is on the system, a GPG key is used to verify it. If it is verified that the package was not modified by a third party, the package is used to install the software. Such as most repositories, the Debian/Ubuntu repository can be accessed via HTTP. The Docker repository, on the other hand, can only be accessed via HTTPS. apt does not automatically support HTTPS. In order to use apt to access the Docker repository, you will first have to install an additional package.
This means:
- Package is downloaded from the repository (package archive)
- Package is verified via a GPG key
- Docker is installed from the package
The following information is required to successfully perform these steps:
- URL of the repository
- Docker Debian / Ubuntu
- Debian AMD/ARM, Ubuntu AMD / ARM
- GPG key of the repository
The repository and the corresponding GPG key of Debian/Ubuntu are automatically on the system.
The repository and the corresponding GPG key of third parties such as Docker need to be added.
To install Docker Engine you can choose from docker.io (Debian/Ubuntu) and docker-ce (Docker).
Since the repository and the corresponding GPG key of Debian/Ubuntu are already on the system, the docker.io package can be installed right away. To install docker-ce, you will first have to add the missing information.
The following options are explained in more detail below:
-
Option 1 - Installing
docker.io- For a quick startSteps:
- Install Docker
-
Option 2 - Installing
docker-ceSteps:
- Add Dockers official GPG key
- Add the Docker repository
- Install HTTPS support for
apt - Install Docker
The fact that the docker.io package can be installed immediately, makes it perfect for a quick start. However, if you do intend to continue to use Docker after this tutorial, it makes sense to understand the differences between those two packages. You can find a brief explanation below.
Differences between docker.io and docker-ce
At a glance:
| docker-ce | docker.io | |
|---|---|---|
| Vendor | Official Docker Inc. |
Debian / Ubuntu |
| Source | Docker-Repository | Debian/Ubuntu Repository |
| Stream | Upstream | Downstream |
| Updates | Updates are directly available | Updates are a little bit behind |
| Packages | Third-party software is included in the containerd.io package |
Third-party software is installed via separate packages |
The table shows two main differences:
-
Vendor
-
docker-ceis the official software package provided by Docker Inc.. Docker Engine is directly installed from the Source Repository.
Updates are directly available. -
docker.iois the software package provided by Debian/Ubuntu. Docker Engine is not installed from the source repository (upstream) itself. Instead, the software package comes from its own Debian/Ubuntu package repository (downstream) which includes Docker Engine. Basically, the source code of Docker Engine was taken from the upstream and modified.
Updates of the source repository (upstream) are not directly availably in the package repository (downstream) ofdocker.io. This means it is likely going to take some time before the latestdocker-ceversion becomes available fordocker.iotoo.
You can use
apt-cache policy(Ubuntu) orapt list(Debian) to see which versions are currently available:sudo apt update apt-cache policy docker.io apt-cache policy docker-ceFor Debian, please replace
apt-cache policywithapt list. Please also note that the latest version ofdocker-ceis only shown if the docker repository has already been added, see Option 2 - Installingdocker-ce.You can use the official Docker documentation to compare the different Docker Engine versions of
docker.ioanddocker-ce. -
-
Packages
Software such as Docker is very complex. Several different tasks need to be covered and completed. For some tasks, there are already suitable solutions that have been developed, tested, and optimized by third parties. Often, it makes sense to use this third-party software and to incorporate it in the own software rather than developing an own version. This is also the case with Docker.
The approach to install third-party software differs between the
docker-ceanddocker.iopackages.-
docker.io
The package includes information about other packages that are required for the software to run without errors. These additional packages are called dependencies. In most cases, the dependencies are downloaded and installed automatically before the requested software is installed. New updates for the additional packages are directly available. -
docker-ce
Third-party software is not installed directly. Instead, the software is included in thecontainerd.iopackage by Docker. New updates for any software that is part of the package is not directly available. Instead, the newest version only comes with the next update for the entirecontainerd.iopackage.
Two examples for those different approaches are
containerdandrunc.With the Debian/Ubuntu package
docker.io, you will also automatically install thecontainerdpackage and theruncpackage. New updates forcontainerdandruncare directly available, independent of Docker updates.
Sincecontainerdandruncare separate packages, they are also available for all other packages on the server.With the Docker Inc. package
docker-ce, you will not install acontainerdpackage or aruncpackage. Instead, you will install Dockers other packagecontainerd.io.containerdandruncare part of thecontainerd.iopackage. New updates forcontainerdandruncare not immediately available. Instead, the newest version only comes with the next update for thecontainerd.iopackage.
containerdandruncare only available for Docker (docker-ce). Other software on the same system with the same dependencies have to installcontainerdorruncseparately. Therefore, you can end up installingcontainerdorruncmore than just once. This could be a good approach if several packages depend on different versions ofcontainerdorrunc, for example.At a glance:
Executable commands docker.io docker-ce runc runcpackagecontainerd.iopackagecontainerd containerdpackagecontainerd.iopackagedockerd, docker-init,
docker-proxydocker.iopackagedocker-cepackagedocker docker.iopackagedocker-ce-clipackageThe table above shows that
docker.iouses a separate package for each software that comes from a different vendor. In Debian/Ubuntu, both Docker packages are installed as one.docker-cealso uses several packages. Here, one package is used for third-party software (containerd.io), one package for Docker itself (docker-ce) and another package for the Docker command line tool (docker-ce-cli). Thecontainerd.iopackage includes software from two different vendors. If one of the vendors releases a new update, it will not be available until the entirecontainerd.iohas its next update. -
Option 1 - Installing docker.io
As mentioned before, a package's repository and the corresponding GPG key have to be on the system to install the package. The official repository of the operating system is automatically available. You can view it here:
- Repository:
cat /etc/apt/sources.list - GPG key:
ls /usr/share/keyrings
Follow the following steps to install docker.io:
sudo apt update
sudo apt install docker.io
The docker.io package should now be installed. Next, you can go to Step 2 - Adding the user to the docker group.
Option 2 - Installing docker-ce
To install the package, you will need the Docker repository from which it will be downloaded and the Docker GPG key (Debian / Ubuntu).
Follow the following steps:
-
Add Dockers official GPG key
The
aptcommand will first download the package from the repository. Then, the package will be verified via the GPG key. The GPG key consists of a private key and a public key. You will need the public key. You can use thegpgcommand to add the key. This command is part of thegnupgpackage.-
If
gnupgis not yet installed, install it now:sudo apt update sudo apt install gnupg -
Add the GPG key on Ubuntu:
curl -fsSL https://download.docker.com/linux/ubuntu/gpg | sudo gpg --dearmor -o /usr/share/keyrings/docker-archive-keyring.gpg -
Add the GPG key on Debian:
curl -fsSL https://download.docker.com/linux/debian/gpg | sudo gpg --dearmor -o /usr/share/keyrings/docker-archive-keyring.gpg
This command will download the GPG key from the docker repository at
https://download.docker.comand then save the key locally in/usr/share/keyringswith the namedocker-archive-keyring.gpg.Once the GPG key was downloaded, you can list it:
ls -al /usr/share/keyringsOutput:
drwxr-xr-x 2 root root 4096 May 17 08:49 . drwxr-xr-x 99 root root 4096 May 17 08:37 .. -rw-r--r-- 1 root root 2760 May 17 08:49 docker-archive-keyring.gpg -
-
Add the Docker repository
To give APT access to the repository, you will have to add the repository link to the directory that APT uses to manage all available repositories:
/etc/apt/sources.list.d
Add the repository:
-
Ubuntu:
echo \ "deb [arch=$(dpkg --print-architecture) signed-by=/usr/share/keyrings/docker-archive-keyring.gpg] https://download.docker.com/linux/ubuntu \ $(lsb_release -cs) stable" | sudo tee /etc/apt/sources.list.d/docker.list > /dev/null -
Debian:
echo \
  "deb [arch=$(dpkg --print-architecture) signed-by=/usr/share/keyrings/docker-archive-keyring.gpg] https://download.docker.com/linux/debian \
  $(lsb_release -cs) stable" | sudo tee /etc/apt/sources.list.d/docker.list > /dev/null
Instead of the variables, you can also state the information itself:
Enterdpkg --print-architectureorlsb_release -csin your CLI and replace the entire variable in the command above with your output.The command creates a new file called
docker.listin/etc/apt/sources.list.d. The text in quotation marks is added as the first line in the new file. The variables$(dpkg --print-architecture)and$(lsb_release -cs)are automatically replaced with the actual information.You can use
catto open the newdocker.listfile:cat /etc/apt/sources.list.d/docker.listExample output:
deb [arch=amd64 signed-by=/usr/share/keyrings/docker-archive-keyring.gpg] https://download.docker.com/linux/ubuntu jammy stableThis means the following:
<archive-type> [<architecture> <GPG-key>] <repository-URL> <version> <updates>-
Archive type: Specifies what can be downloaded from the repository (
deb,deb-src).deb-scrwould mean that you can download a tarball, for example.debmeans that you can downloaddebpackages (e.g.docker-ce). -
Architecture:
amd64orarmhfwould be some examples. If you enterdpkg --print-architecturein your CLI, you will be shown the architecture of your device. -
GPG key: The path to your GPG key.
-
Repository URL: The URL that can be used to access the repository.
-
Version: The version of the operating system. Next to the release number, each version also has a codename (e.g. Focal Fossa). This codename is given here. If you enter
lsb_release -csin your CLI, you will be shown the version of your operating system. -
Updates: You could choose
stableortest, for example. Withstableyou would get the latest releases for general availability. Withtestyou would get versions that are ready for testing but not yet in general availability.
-
Install HTTPS support for
aptThe
aptcommand is used to download packages viaHTTP. However, Docker packages are available viaHTTPS.The
sinHTTPSstands for secure and indicates that the webpage has a TLS/SSL certificate. This certificate ensures that the entire traffic between the client that tries to access the webpage and the server that hosts the webpage is encrypted. TLS/SSL certificates are issued by certificate authorities (CA). Before the connection to aHTTPSwebpage is established, the client refers to its certificate authority to verify the certificate. Often, the client is a browser. In this case, the client will be the CLI.These are the requirements for
aptto communicate via HTTPS:- Support HTTPS (
apt-transport-https) - Support HTTP/HTTPS traffic via CLI (
curl) - Have a list of known certificate authorities (
ca-certificates)
aptversions 1.5 and above do support HTTPS. For older versions, you will have to additionally install the above-mentioned packages.Install the packages mentioned above to enable
aptto download a package from an HTTPS repository:sudo apt install apt-transport-https ca-certificates curlSince
curlis also needed to download HTTP packages via the CLI, it is likely that it is already installed. In this case, the installation will automatically be skipped. - Support HTTPS (
-
Install Docker
The
aptcommand is used to download a package via HTTP and to verify the package via a GPG key.With the previous steps you have:
- Added Dockers official GPG key
- Added the Docker repository (HTTPS-URL)
- Added new packages so that
aptalso supports HTTPS
Now, you can install the Docker package:
sudo apt update
sudo apt install docker-ce docker-ce-cli containerd.io
If you don't want to follow those steps again, you can also use the following options to install docker-ce:
- Hetzner Cloud App Docker
- Docker Convenience Script Ubuntu / Debian
Step 2 - Adding the user to the docker group
Before you get started with Docker, you should add your user to the docker group. When you create or modify a docker container, you will need two things. You will need the docker command line docker, which is used by the user to execute commands, and the Docker daemon, which receives the commands and starts processes if necessary. docker and the Docker daemon do not communicate directly. Instead, the Docker daemon socket is used as a communication interface between them. This means, every docker command that is executed, first goes to the Docker daemon socket which then passes it on to the Docker daemon. You can use ls -al /var/run/docker.sock to show the permissions of the Docker daemon socket:
srw-rw---- 1 root docker 0 May 17 11:29 /run/docker.sock<permissions> <hard-link-count> <owner> <group> <bytes> <modification> <name>The third field shows the owner, in this case root. The fourth field shows the group it belongs to, in this case docker. The first field shows their permissions.
The permissions of the Docker daemon socket show that the owner root and the group docker have read and write permissions (rw-) and that any other users do not have any permissions at all (---).
If you use a non-root user who is not added to the docker group, to execute a docker command without a sudo, you will likely be prompted an error like this:
ERROR: Got permission denied while trying to connect to the Docker daemon socket at unix:///var/run/docker.sockThe docker group has read and write permission. This means, if your user is added to the docker group, this error will not be prompted. The docker group is automatically created at the Docker installation.
-
Add your user to the docker group:
sudo usermod -aG docker holuPlease replace
holuwith your own username. Also, remember to add the-a(append). This is required to prevent that your user gets removed from any other groups that are not mentioned after the-Goption. -
Check whether your user has successfully been added to the docker group:
groups holuPlease replace
holuwith your own username.Output:
holu : holu dockerIn case your group is not showing yet, you might have to end the connection and reconnect for it to update. Alternatively, you can also use this command to update it:
su - holu
As long as your user is in the docker group, you can use docker without sudo permissions.
If you do not add your user to the docker group, remember to add a sudo in front of every docker command that is used in the next steps.
Step 3 - Creating a test container
Now that your user is in the docker group, you can create your fist container without sudo permissions and test if the installation of Docker Engine was successful.
-
Test docker
First, make sure you can use the
dockercommand.docker -vThe output should show the Docker version that was installed. If this worked, you can now move on to create a container.
-
Create a container
Docker containers are created from docker images which determine the contents of the containers. You can use a Dockerfile to create your own image or you can import existing images from Docker Hub. To test if the installation of Docker Engine was successful, it will be enough to import an image from Docker Hub. In general, there are two main commands,
docker pullanddocker run.docker pull <image-name>is used to import an image from Docker Hub. This command does not create a container.docker run <image-name>is used to create a container from an image. The image specified in the command is first searched on the system. If this image does not exist, the search is then continued on Docker Hub. If this image does exist on Docker Hub, it is automatically imported. Then, this image is used to create a new container.
You can use
docker pullto import the image from Docker Hub, followed bydocker runto create a new container from this image, or you can directly usedocker runand execute both steps with one command:docker run hello-worldOutput:
Unable to find image 'hello-world:latest' locally
latest: Pulling from library/hello-world

...

Hello from Docker!
This message shows that your installation appears to be working correctly.

...
The output shows that an image called
hello-worldwas first searched on the system. When no image was found, the search was continued on Docker Hub. From there, thehello-worldimage was imported and then used to create the new container. -
List docker images and docker containers
List the imported docker image:
docker image lsList the new container:
docker container ls -aThe
-aindicates that all containers should be shown. This also includes containers that are stopped. Thehello-worldcontainer does not have any running processes. Therefore, the container was automatically stopped as explained in the introduction.
Step 4 - Uninstalling Docker Engine
-
Uninstall
docker.iosudo apt remove docker.io -
Uninstall
docker-cesudo apt purge docker-ce docker-ce-cli containerd.io
Conclusion
In the previous steps you learned how to install the docker-ce or the docker.io package, how to add your user to the docker group and how to create your first container to see if the installation was successful. Next, you can check out the tutorial "Creating a Docker image and container", for example.