
Introduction
In this tutorial you will learn how to create an image from a Dockerfile or how to import it from Docker Hub, how to create a container from an image and how to delete images and containers. For this tutorial, Docker needs to be installed (see Installing Docker on Ubuntu/Debian).
When you create a new Hetzner Cloud Server, you can select the Hetzner Cloud App Docker and
docker-cewill automatically be preinstalled on the server.
Container
To create Docker containers, images are used. The image defines everything the container should include. This could be documents, commands to be executed, or other specifications. You can either download an image from Docker Hub or create one yourself via a Dockerfile.
Dockerfile
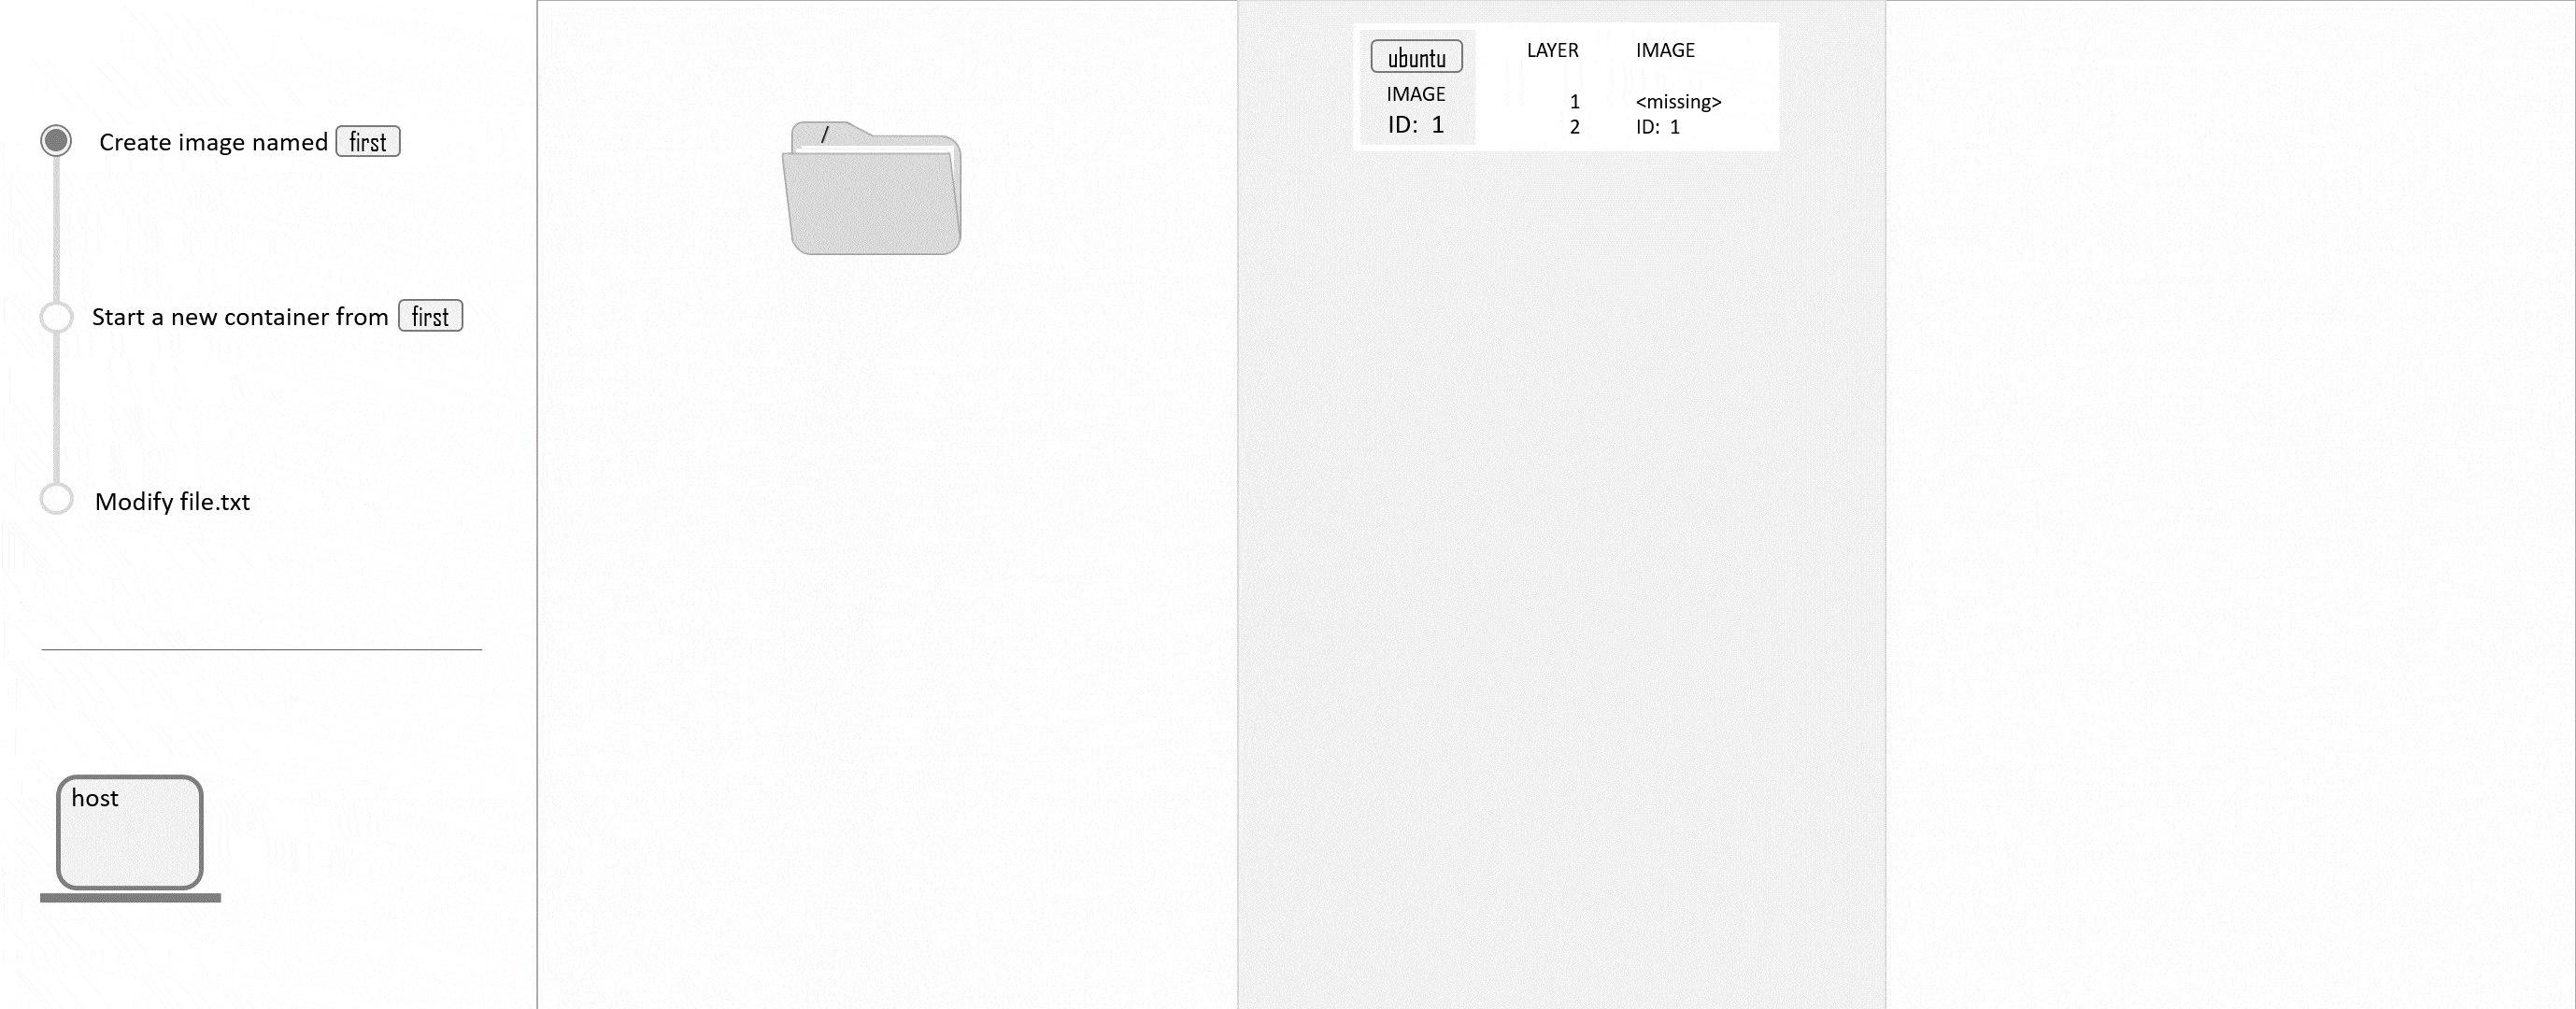
A Dockerfile is a file with instructions that define everything the container should include. Once the image is created from the Dockerfile, it can be used as basis for new containers. When you create a new image, each instruction mentioned in the Dockerfile is turned into its own image. Each image contains all the images of previous instructions within the same Dockerfile as layers. The final image, which is created with the final instruction in the Dockerfile, gets a name. All other images are intermediate images with the name <none>.
You can use docker histrory <image> to view all layers of an image. Intermediate images do not have a name, so instead the image ID is given as an identifier.
Intermediate images
A single intermediate image can be used as a layer for several other images. Let's say you create a new image called NEW and use the same first two instructions that you already used for an image called OLD, for example. The first two layers do not need to be created again. Instead, the already existing intermediate images can be added as layers via their image IDs. This way, the creation process of the new image called NEW can finish quicker and less storage is needed on the host.
Container
Docker containers mainly consist of two parts:
- Read only image layer(s)
- Read and write container layer
You can use a single image as a basis for several containers. Image layers are never affected by any changes made to the containers. Even if you perform changes that are related to one of the image layers, the changes will be saved in the writable container layer.
Images
Above, a new image is created from a Dockerfile with the following instructions:
FROM ubuntu:latest
WORKDIR /new-dir
COPY file.txt .
CMD ["sleep", "60m"]
The first instruction is FROM. It is used to specify an existing image that will be used as a basis for the new image. This image is referred to as the parent image.
The parent image is first searched on the system. In the example above, the image ubuntu is already available. If it wasn't available, the search would have been continued on Docker Hub from where it would have been automatically imported and used.
If you don't want to use a parent image, you can also write
FROM scratch. The Docker Hub imagescratchis empty and no layer will be added for theFROMinstruction in any of the intermediate images or the final image. This option is not recommended for beginners. Images that are created with the instructionFROM scratchare called base image.
Prerequisites
- Basic knowledge about servers
- Docker needs to be installed (e.g. via the Hetzner App Docker CE or the tutorial Installing Docker on Ubuntu/Debian)
- Access to the root user, a user with sudo permissions, or a user in the Docker group
- CLI tool
- This tutorial uses Ubuntu 22.04
If your user is not yet added to the Docker group, you can refer to step two in the tutorial about installing Docker.
Example terminology
- Image name/ID:
<image> - Container name/ID:
<container>
Please replace <image> with your own image name or image ID and container with your own container name or container ID in all example commands.
Step 1 - Creating a Docker image
As mentioned above, Docker images are needed to create Docker containers. To get an image, you have several options:
- Option 1 - Import image from Docker Hub
recommended - Option 2 - Create image manually from Dockerfile
- Option 3 - Create a new image from an existing container
Below, all three options are explained in detail.
Importing an image from Docker Hub as explained in option 1 is the best option for beginners.
If you want to define the container yourself, you can use option 2.
Option 1 - Import image from Docker Hub
To create a new container from a Docker Hub image, you can mainly use two commands, docker pull and docker run.
docker pull <image-name>is used to import an image from Docker Hub. This command does not create a container.docker run <image-name>is used to create a container from an image. The image specified in the command is first searched on the system. If this image does not exist, the search is then continued on Docker Hub. If this image does exist on Docker Hub, it is automatically imported. Then, this image is used to create a new container.
You can use docker pull to import the image from Docker Hub, followed by docker run to create a new container from this image, or you can directly use docker run and execute both steps with one command:
docker run hello-worldOutput:
Unable to find image 'hello-world:latest' locally
latest: Pulling from library/hello-world

...

Hello from Docker!
This message shows that your installation appears to be working correctly.

...
The output shows that an image called hello-world was first searched on the system. When no image was found, the search was continued on Docker Hub. From there, the hello-world image was exported and then used to create the new container.
You can now continue with "step 4 starting and stopping a container". If you want to start a terminal session, please note that the image hello-world does not have any continuously running processes.
Option 2 - Create image manually from Dockerfile
With this option you can decide yourself which layers the image should have and which configurations and settings you want to specify.
To give you a rough idea about the instructions, it will be explained how to create an image that contains the following:
- Install
ping - Copy a directory and a file from the host to the container
- Create a new directory and a new file in the container
- Execute a
sleepcommand
First, you should create a new directory that will contain all the files needed to create the image.
-
Create directory for the image
mkdir first-docker-image -
Create files that you want to be copied
Open the directory that you just created and add the directory and the file that you want to copy to your container.cd first-docker-image mkdir copy-dir touch copy-file -
Create a file that you don't want to be copied
In the Dockerfile, you do not need to list every single file that you want to copy. Instead, you can copy the entire contents of a specific directory. This is useful if you need to copy more than just two example files. In case certain files should not be copied, you can add them to the.dockerignorefile and they will be skipped, which means that they will not be copied to the container.
To test the.dockerignorefile, create a new file that you don't want to be copied:touch do-not-copyNext, create the
.dockerignorefile and list the files that you do not want to copy to the container.nano .dockerignoreAdd the following files:
.dockerignore
Dockerfile
do-not-copy
In the example above, individual files that should not be copied are listed. You can also use
*to specify that no file should be copied at all and then list exceptions:* !copy-dir !copy-fileThe
*specifies that no files should be copied. The!at the beginning of each line specifies that this is an exception. In this case, only the filescopy-dirandcopy-filewould be copied.Once you are done, you can use
CTRL+Xto save the file,Yto confirm andENTERto close the file. -
Create the Dockerfile
nano DockerfileAdd the following text to the file:
FROM ubuntu:latest
RUN apt update && apt install -y iputils-ping
WORKDIR /new-workdir
COPY . .
RUN touch new-file
RUN mkdir new-dir
CMD ["sleep", "60m"]
Once you are done, you can use
CTRL+Xto save the file,Yto confirm andENTERto close the file.Note: The image given after
FROMwill be the parent image. In this example, the latest version of Ubuntu is used. If this image is not yet on your system, it will automatically be imported from Docker Hub.
Next toCOPYyou have to state the file or folder that you want to be copied followed by the path under which you want it to be saved on the container. The first.indicates that the files should be copied from the path under which the command is executed. The second.indicates that the files should be saved in the work directory of the container. In this case, this would be/new-workdirwhich was set with theWORKDIRinstruction.WORKDIRin a Dockerfile is likecdin a CLI. -
Create Image from Dockerfile
Execute to following command to create a new image from your Dockerfile:docker build -t <image-name>:latest .Please replace
<image-name>with your own image name.
The option-tallows you to specify a tag, in the formatname:version. The final part of the command - the.- indicates the directory in which the Dockerfile is saved..means that the path of the Dockerfile matches the path under which the command is executed in the command prompt. -
List images
Execute the following command to list the new image:docker image lsYou can now use the image to create a new container.
-
Create a container from the image
Next, you can go to Creating a container. Note that the Dockerfile includes asleepcommand. This command will automatically be executed when you create a container. This means that after the container was created, your container will be running for 60 minutes. Once thesleepcommand finishes, the container will automatically be stopped. When you restart the container, thesleepcommand will be executed again.
Once you created a container, you can go to step 3 to start a terminal session. You can then uselsto list the documents of the container. The list should also include the copied filescopy-dirandcopy-fileand the new filesnew-fileandnew-dirthat were created during the container creation.
Option 3 - Create a new image from an existing container
You can use a single image for several containers. Changes within a container never apply to other containers. Even if you perform changes that are related to the layers of the image they are based on. To create a new container that includes all the changes that were made on a different container, you will first have to create an image from the container with the changes. You can then use the new image that has an additional layer with the changes from the container, to duplicate the old container.
-
List all containers
docker container ls -aCopy the ID or the name of the container that you would like to duplicate.
-
Create image from container
docker commit <container>Please replace
containerwith your own container name or container ID from the previous step. -
List the images
docker image lsYour new image should now also be listed. Identify your image and copy its ID. Next, give your image a name.
-
Name the image
docker tag <image-id> <name>Please replace
<image-id>with your own image ID from the previous step and<name>with an own name of your choosing.
You can now use the new image just as every other image to create new containers.
Step 2 - Creating a container
You can use a single image for several containers. Changes within a container never apply to other containers. As long as an image is used for at least one container, it is not possible to delete this image.
-
List the images
docker image lsCopy the ID or the name of the image that you want to use as a basis for your container.
-
Create the container
Existing containers can have one of two statuses: running and stopped.
Containers with at least one running process have the status "running". As soon as the final process of a container ends, the container is "stopped". This is relevant, if you want to start a terminal session on your container, as terminal sessions can only be started on "running" containers.
Following, two options for creating a container will be explained.- Option 1 can be used in most cases, and is the recommended option. This option shows how to create and start a new container from an image.
- Option 2 should only be used if you need to start a terminal session on the container, but the container does not have running processes for a longer period of time. This options shows how to start a process at container creation, so that you can start a terminal session on the container.
Option 1: Create container from image
recommended
Option 2: Create container from image and start a new process at the same timeOption 1 - Create container from image
-
Create the container
docker run -d <image>Please replace
<image>with your own image name or image ID. The option-dis used so that the container runs in the background and the container ID is printed.The image specified in the command is first searched on the system. If this image does not exist, the search is continued on Docker Hub. If this image does exist on Docker Hub, it is automatically exported. Then, this image is used to create and start a new container.
Option 2 - Create container from image and start a new process at the same time
To prevent the container from stopping after it was created, you can start a first process in the container's creation command. For this, you can choose between two options:
-
Start a temporary process
docker run -it <image>The command above starts a new terminal session in the container. This session is the process that keeps the container running.
The command prompt should now indicate the ID or the hostname of your container instead of your host's hostname. Any command executed in this command prompt will be directed at the container. To end the session, you can runexit. Unless more processes have been started during the terminal session, theexitcommand will stop the container with the session. To start the container again, you can usedocker start -ai <container>and start a new terminal session. This command only works for stopped containers that were created with the options-it, as shown above. -
Start a process that won't stopls -a
docker run -d <image> sleep infinityThe option
-dis used so that the container runs in the background and the container ID is printed.The command above will run a
sleepcommand. As long as this command runs, the container will run too.
Step 3 - Starting a terminal session in the container
To start a new terminal session in a container, the container cannot be stopped. This means that the container has to have at least one running process, as explained in step 2.
-
List all running containers
docker container lsYou can add the option
-ato list stopped containers too.Copy the ID or the name of the container that you would like to access.
-
Start terminal session in container
docker exec -it <container> /bin/bashThe command prompt should now indicate the ID or the hostname of your container instead of your host's hostname. Any command executed in this command prompt will be directed at the container. To test this, you can use
ls -alto list all files, for example, orhostname -Ito get the IP address(es) of the container. -
Stop terminal session in container
exitThe session should now have ended. The command prompt should now indicate the name of the host again.
Step 4 - Starting and stopping a container
Starting a container basically means that any processes that are part of the container or the image it uses, are started. Stopping a container means that all running processes are force stopped.
-
List all containers
docker container ls -aCopy the ID or the name of the container that you would like to start or stop.
-
Start the container
docker start <container>Please replace
containerwith your own container name or container ID. -
Stop the container
docker stop <container>Please replace
containerwith your own container name or container ID.
Step 5 - Deleting images and containers
-
List all containers or images
docker image lsdocker container ls -aCopy the ID or the name of the image or container that you would like to delete.
-
Delete a container
docker container rm <container>Please replace
containerwith your own container name or container ID. -
Delete an image
docker image rm <image>Please replace
<image>with your own image name or image ID.Note that it is not possible to delete images that are used for existing containers. You will have to delete all containers that use this image before you can delete the image itself.
Conclusion
In the previous steps you learned how to create an image from a Dockerfile or how to import it from Docker Hub, how to create a container from an image and how to delete images and containers. Next, you can use the tutorials IPv6 on Docker securely and Run multiple Docker Compose services on Debian/Ubuntu, for example.