Introduction
YugabyteDB is a highly available, distributed SQL database designed to withstand failures and ensure continuous operation. Its architecture is built upon principles of data replication and consensus, meaning that data is automatically duplicated across multiple nodes. This ensures that even if a node experiences an outage due to hardware failure, maintenance or software issues/updates, your database remains accessible with no data loss.
In this tutorial, we will setup a highly available cluster, explicitly setting our servers on different physical hosts within the same region, providing resilience against individual host's failures and ensuring our cluster remains continuously available.
Replication Factor
Simply put, the "Replication Factor" (RF) dictates how many copies of your data are maintained across your cluster. If you set your RF to 1, there's only one copy of your data. While this might seem efficient, it offers no fault tolerance — if that single node goes down or you need to do a maintenance, your data becomes unavailable. To achieve a higher availability, we need an RF of 3, at least. The general rule is that you need at least as many nodes in your cluster as your chosen RF. So, for an RF of 3, we would need a minimum of three nodes.
As per docs, if RF is n, YugabyteDB can survive floor((n - 1) / 2) failures without compromising correctness or availability of data. For the purpose of this tutorial, we will be using a replication factor of 3. This is the minimum recommended RF for a production environment, as it can tolerate the loss of 1 node.
Step 1 - Creating our servers
First, let's create our 3 cloud servers. In this tutorial, we will use Hetzner as an example. For a step-by-step guide, see this guide.
- For the location, select the same for all servers. I will be using Helsinki.
- As image, we will be using Debian.
- For our demo, we are fine with CAX11 (Arm64, 2 vCPUs, 4GB RAM). For a production workload, CAX41, CPX52, or CCX43 would be the minimum recommendations.
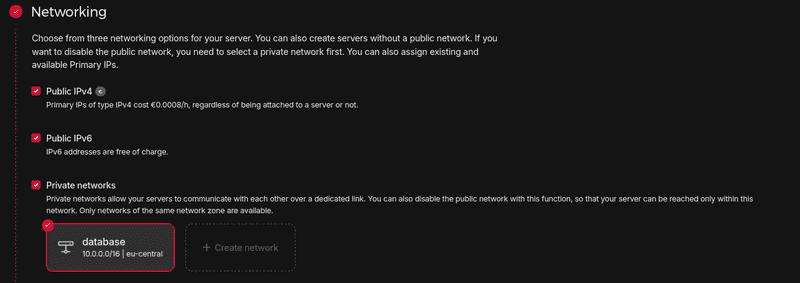
- We will keep public IPv4 and IPv6 enabled. We will also create a private network, for a more efficient connection between our servers.

- To provide resilience against individual host's failures, we will setup a Placement Group. It's limited to 10 servers, so it would not be appropriate for a larger cluster.

Once our servers are created, we can SSH into each of them. Setup a new user with sudo permissions as explained in this tutorial.
Step 2 - Installing YugabyteDB
All of these commands should be run on each server. As a best-practice, we can update our server:
sudo apt update && sudo apt upgrade -yNow, we need to tune kernel settings. We can do this running the following commands:
sudo bash -c 'sysctl vm.swappiness=0 >> /etc/sysctl.conf'
sudo sysctl kernel.core_pattern=/home/yugabyte/cores/core_%p_%t_%E
sudo sysctl -w vm.max_map_count=262144
sudo bash -c 'sysctl vm.max_map_count=262144 >> /etc/sysctl.conf'
sudo apt install sysfsutils -y
sudo nano /etc/sysfs.conf
Add the following line at the end of this file:
kernel/mm/transparent_hugepage/khugepaged/max_ptes_none = 0Save the file and exit. Reboot your server.
Python 3 is installed by default on Debian 12, but if we try to run python --version, we get the following output:
holu@server-1:~# python --version
-bash: python: command not found
holu@server-1:~#
To make this work, we need to install python-is-python3:
sudo apt install python-is-python3 -yYugabyteDB provides binaries for both x86 and Arm (aarch64) CPU architectures. As we are using CAX11, we can download and extract as follows:
wget https://software.yugabyte.com/releases/2024.2.3.2/yugabyte-2024.2.3.2-b6-el8-aarch64.tar.gz
tar xvfz yugabyte-2024.2.3.2-b6-el8-aarch64.tar.gz
The wget command above downloads a specific version of YugabyteDB (2024.2.3.2), which was the latest at the time of writing this article. For the absolute latest version or for x86 architecture binaries, please refer to the official YugabyteDB documentation.
Now let's run the post-install script:
cd yugabyte-2024.2.3.2/
./bin/post_install.sh
Let's also create a directory to store our data by creating yugabyte-data in /<your_user>/yugabyte-data:
mkdir -p $HOME/yugabyte-data/master
mkdir $HOME/yugabyte-data/tserver
Step 3 - Starting YB-Masters
The following command will be run on each server within the yugabyte-####.#.#.# directory:
./bin/yb-master \
  --master_addresses 10.0.0.2:7100,10.0.0.3:7100,10.0.0.4:7100 \
  --rpc_bind_addresses 10.0.0.2:7100 \
  --fs_data_dirs "$HOME/yugabyte-data/master" \
  --placement_cloud hetzner \
  --placement_region hel \
  --placement_zone hel \
>& $HOME/yb-master.out &master_addresses: provides the IP of our YB-Masters. We are passing the private IP of the network we created.rpc_bind_addresses: when running this command on each server, you should replace10.0.0.2with the private IP of the current server.fs_data_dirs: the directory we created previously to store our data.placement_cloud,placement_regionandplacement_zone: YugabyteDB supports multi-cloud, multi-region and multi-zone deployment. In our case, we can just passhetznerfor the cloud, andhelforplacement_regionandplacement_zone. You can of course passfsnif you're deploying in Falkenstein, or any other value for other regions.
To make sure our YB-Masters are fine, we can check the logs, which should be empty:
cat ../yb-master.outStep 4 - Starting YB-TServers
On each server, we will run the following command:
./bin/yb-tserver \
  --tserver_master_addrs 10.0.0.2:7100,10.0.0.3:7100,10.0.0.4:7100 \
  --rpc_bind_addresses 10.0.0.2:9100 \
  --enable_ysql \
  --pgsql_proxy_bind_address 10.0.0.2:5433 \
  --cql_proxy_bind_address 10.0.0.2:9042 \
  --fs_data_dirs "$HOME/yugabyte-data/tserver" \
  --placement_cloud hetzner \
  --placement_region hel \
  --placement_zone hel \
>& $HOME/yb-tserver.out &tserver_master_addrs: provides the IP of our YB-Masters. We are passing the private IP of the network we created.rpc_bind_addresses: when running this command on each server, you should replace10.0.0.2with the private IP of the current server.enable_ysql: enables YSQL API.pgsql_proxy_bind_address: specifies the IP address and port for YSQL. You should replace10.0.0.2with the private IP of the current server.cql_proxy_bind_address: specifies the IP address and port for YCQL. You should replace10.0.0.2with the private IP of the current server.fs_data_dirs: the directory we created previously to store our data.placement_cloud,placement_regionandplacement_zone: Just like YB-TServers, we can just passhetznerfor the cloud, andhelforplacement_regionandplacement_zone.
To make sure our YB-TServers are fine, we can check the logs:
cat ../yb-tserver.outIf you are using a firewall, make sure it allows ports 7000, 7100, 9100, 9042 and 5433 (e.g. sudo ufw allow 7000).
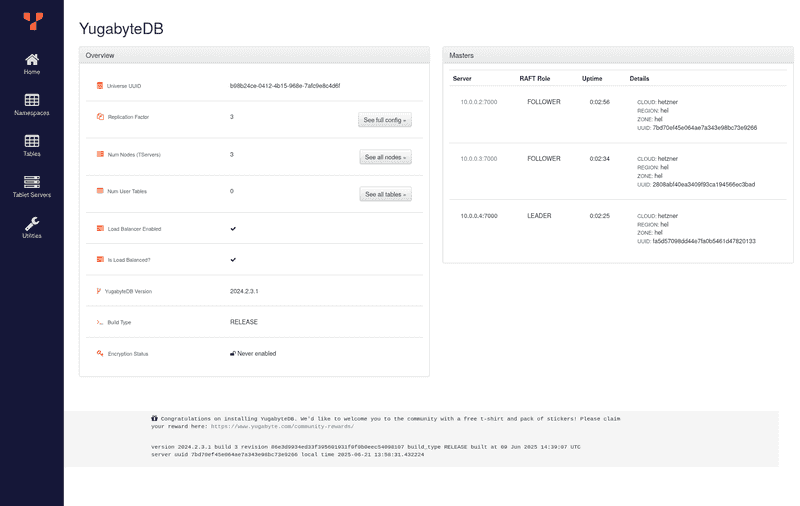
Now our cluster is up and running. We can access our dashboard by setting up an SSH Tunnel, as the dashboard is only accessible from inside the servers:
ssh -L 7000:<private_ip>:7000 root@<public_server_ip>As YB-Masters is running on all 3 servers, the dashboard is available on any of them.
Now open your browser on http://localhost:7000:
Step 5 - Additional considerations
-
Multi-region
While deploying servers on different hosts within the same Hetzner data center provides excellent availability against single node and host failures, even higher availability can be achieved through a multi-region deployment. For example, we could setup our cluster with nodes in Nuremberg, Falkenstein, and Helsinki. This would ensure that even if an entire data center became unavailable, our database would still be accessible.
However, it's crucial to understand a key trade-off with this setup: performance. YugabyteDB utilizes synchronous replication for strong consistency, so we would have significantly slower writes operations due to network latency between data centers.
-
Data durability
Worth mentioning that Hetzner volumes are highly available and reliable. However, YugabyteDB is designed with its own distributed replication mechanism. Because YugabyteDB handles data replication at the application layer to achieve high availability and fault tolerance (as discussed with the replication factor), it does not require any form of RAID at the operating system or hardware level. In fact, YugabyteDB runs optimally on a JBOD (Just a Bunch Of Disks) setup. This means you can simply present individual disks to the YugabyteDB nodes, and the database will manage its own data distribution and redundancy across disks and nodes. This is particularly beneficial when using Hetzner's dedicated servers, where you have direct control over the physical disks.
Conclusion
Now we have a YugabyteDB cluster on Hetzner that's tolerant to single node and host failures. From now on, you can configure backups, firewalls, automated server updates, and more on.
