

Introduction
The previous tutorial left you with a fully unattended Proxmox VE node on a Hetzner dedicated server — one flat bridge, everything visible to the internet. That is fine for a single homelab VM, but the moment you run several machines you want what any real office has: a private network, a firewall, DHCP, DNS, and a way in from the outside that is not "SSH open to the world".
This tutorial builds exactly that — a virtual office network — on top of the node from the previous tutorial:
- Harden the host: close every port that does not need to be public.
- Replace the flat Linux bridge with Open vSwitch and create a separate private LAN bridge.
- Install an OPNsense firewall VM — without VNC and without clicking through a web wizard. The installer runs over SSH, and the final configuration is written directly into the guest's
config.xmlbefore first boot. - Move Proxmox management off the public internet onto the LAN.
- Set up WireGuard on OPNsense so your own devices get full access to the office network.
- Prove the whole thing works with a disposable test guest.
The result is the foundation every future service will sit on — and the same pattern scales from one dedicated server to a small fleet.
Note: Everything here is done from an SSH session on the host. You never need Hetzner's LVM/KVM console, noVNC, or a browser tab to the Proxmox UI. Where a graphical step would be customary, we do it with
qm,pvesh, and plain config files.
Prerequisites
- A Proxmox VE node installed per tutorial 1 — in particular a public bridge
vmbr0attached to your physical NIC (pinned asnic0), root SSH with key auth, and no-subscription repositories. - A second public IP for the OPNsense WAN interface. On Hetzner Robot: Servers → IP → Order IP address, order a single IP and then assign it a separate MAC address (IP → Assign MAC address → "Virtual MAC (Hetzner)"). Note both values — Hetzner's switches only deliver traffic for this IP to that exact MAC.
- An SSH key on your local machine.
- Roughly an hour.
Example terminology
This tutorial uses the following placeholder values — replace them everywhere:
| Placeholder | Meaning | Example from tutorial 1 |
|---|---|---|
203.0.113.10/26 |
Server's main public IP | cidr from tutorial 1, Step 6 |
203.0.113.1 |
Public gateway | gateway from tutorial 1 |
203.0.113.20/26 |
Second public IP for OPNsense WAN | ordered in Robot |
00:00:5e:00:53:42 |
Hetzner-assigned MAC for the second IP | from Robot |
2222 |
SSH port chosen in Step 1 | any free port |
The private ranges used throughout are generic RFC1918 ranges and are safe to keep as-is: LAN 172.16.10.0/24, WireGuard overlay 10.13.13.0/24.
Architecture
The end state looks like this:
                        internet
                           │
              ┌────────────┴─────────────┐
              │  vmbr0 (OVS) — WAN       │  203.0.113.10/26  ← host mgmt stays reachable
              │    │ nic0 ── uplink      │
              │    │                     │
              │    └── tap100i0 ── WAN   │  203.0.113.20/26, MAC 00:00:5e:00:53:42
              │           OPNsense VM    │
              │    ┌── tap100i1 ── LAN   │  172.16.10.254/24 (gateway, DHCP, WireGuard)
              │    │                     │
              │  vmbr1 (OVS) — LAN       │  172.16.10.1/24  ← Proxmox Web UI (pveproxy)
              │    ├── veth… (LXC)       │
              │    └── tap…   (VMs)      │
└──────────────────────────┘| Segment | Bridge | Address | Purpose |
|---|---|---|---|
| WAN | vmbr0 (OVS) |
203.0.113.10/26 (host), 203.0.113.20/26 (OPNsense) |
Public transit only |
| LAN | vmbr1 (OVS) |
172.16.10.0/24, OPNsense = .254, host = .1 |
All real workloads |
| WireGuard | OPNsense wg0 |
10.13.13.0/24, OPNsense = .254 |
Your devices reach the office |
Three decisions are worth spelling out before touching anything:
- Both bridges are Open vSwitch. OVS is what PVE itself uses for SDN, it supports tracing (
ovs-vsctl,ovs-ofctl) and it keeps VM firewall/SDN options open later. The cost is a small config syntax change — and one trap during conversion, see Step 2. - The host keeps its default route on
vmbr0. It is tempting to point the host's default gateway at OPNsense once the LAN exists. Don't: your public SSH session would then flow in throughvmbr0and try to answer throughvmbr1— asymmetric routing, and the connection dies the moment OPNsense's firewall sees it. The host gets management on the LAN, but its transit stays where it is. - OPNsense owns the second public IP, so it must own the MAC. Hetzner delivers the additional IP to the MAC you assigned in Robot. That MAC goes into the VM's
net0before the first boot — the VM never sees a random Proxmox-generated MAC on its WAN side.
Step 1 - Harden the Host
A fresh Proxmox node answers on more ports than most people expect. Check what is listening right now:
ss -tlnpTypical offenders on a Hetzner box: pveproxy on :8006 (bound to all interfaces), rpcbind on :111, and sshd on :22. The web UI and SSH are about to change anyway; rpcbind is simply not needed on a standalone node — it exists for NFS and is a well-known amplifier for port scanners.
Step 1.1 - Disable rpcbind
systemctl stop rpcbind.service rpcbind.socket
systemctl disable rpcbind.service rpcbind.socket
Step 1.2 - SSH: custom port, keys only
Proxmox ships sane defaults (PermitRootLogin prohibit-password is already the default), but make the intent explicit with drop-in files instead of editing sshd_config:
cat > /etc/ssh/sshd_config.d/10-dns.conf << 'EOF'
UseDNS no
EOF
cat > /etc/ssh/sshd_config.d/20-port.conf << 'EOF'
Port 2222
EOF
cat > /etc/ssh/sshd_config.d/30-root-login.conf << 'EOF'
PermitRootLogin prohibit-password
EOF
cat > /etc/ssh/sshd_config.d/40-password-auth.conf << 'EOF'
PasswordAuthentication no
EOF
systemctl restart sshd
Replace 2222 with any port you like. Keep your current session open and verify a second connection works before moving on:
ssh -p 2222 root@203.0.113.10Step 1.3 - Web UI: localhost for now
Until the LAN exists (Step 6), bind the Proxmox web UI to loopback. It stays reachable through an SSH tunnel, but vanishes from the internet:
echo 'LISTEN_IP="127.0.0.1"' > /etc/default/pveproxy
systemctl restart pveproxy spiceproxy
ss -tlnp | grep 8006        # → 127.0.0.1:8006
From your local machine, reach it through the tunnel:
ssh -p 2222 -L 8006:127.0.0.1:8006 root@203.0.113.10
# then open https://localhost:8006
Step 1.4 - Proxmox firewall: default DROP
Enable the datacenter firewall with a default-drop input policy, then punch exactly two holes: SSH and ICMP.
Create /etc/pve/firewall/cluster.fw:
[OPTIONS]
enable: 1
policy_in: DROP
policy_out: ACCEPT
Add host rules with pvesh (this validates the rule syntax for you):
pvesh create /nodes/$(hostname)/firewall/rules -type in -action ACCEPT -proto tcp -dport 2222 -enable 1 -comment "SSH"
pvesh create /nodes/$(hostname)/firewall/rules -type in -action ACCEPT -proto icmp -enable 1 -comment "ICMPv4"
pvesh create /nodes/$(hostname)/firewall/rules -type in -action ACCEPT -proto icmpv6 -enable 1 -comment "ICMPv6"
pve-firewall status
Two rules of thumb that will save you an hour of debugging:
pvesh createdefaults to-enable 0. If you forget-enable 1, the rule is stored but never active.- If you ever edit
/etc/pve/*/host.fwby hand: a line starting with|(e.g.|IN ACCEPT ...) parses as a disabled rule. The pipe prefix is the disable toggle, not decoration.
Verify from your local machine (install nmap there if needed) that only what you allowed is left:
nmap -Pn -p 22,111,8006,2222 203.0.113.10
# 2222/tcp open, everything else filtered
Note: Per-NIC firewalling (
firewall=1on a NIC) generates host-side rules per guest tap interface. In this architecture we keep the filtering policy in exactly one place — OPNsense — and setfirewall=0on guest NICs so scattered host rules can never shadow the central policy.
Step 2 - Switch to Open vSwitch
Tutorial 1 left a classic Linux bridge. Convert it to OVS and add the LAN bridge in the same edit — one reload, one risk window.
For reference, this is the baseline being replaced (the installer wrote it in tutorial 1):
auto vmbr0
iface vmbr0 inet static
    address 203.0.113.10/26
    gateway 203.0.113.1
    bridge-ports nic0
    bridge-stp off
    bridge-fd 0
Install OVS:
apt update && apt install -y openvswitch-switch
systemctl enable --now openvswitch-switch
ovs-vsctl --version
Replace /etc/network/interfaces with:
Replace
203.0.113.10/26with your server's main public IP and203.0.113.1with the gateway IP.
auto lo
iface lo inet loopback

iface lo inet6 loopback

auto nic0
iface nic0 inet manual
    ovs_type OVSPort
    ovs_bridge vmbr0

auto vmbr0
iface vmbr0 inet static
    address 203.0.113.10/26
    gateway 203.0.113.1
    ovs_type OVSBridge
    ovs_ports nic0

auto vmbr1
iface vmbr1 inet manual
    ovs_type OVSBridge

source /etc/network/interfaces.d/*
The differences from the Linux-bridge version: the physical port becomes an OVSPort bound to ovs_bridge vmbr0, and the IP configuration lives on vmbr0 itself, which is an OVSBridge (an OVS bridge always has an internal port that carries its own IP). If you carry an IPv6 stanza on the bridge, keep it — it survives the conversion unchanged.
Before applying, arm a safety net: a rollback that restores the Linux-bridge config after 5 minutes unless you cancel it. If the reload locks you out, the server fixes itself. The steps are chained with ; on purpose — the final ifreload -a must run even if a del-br fails (for example when the broken config never created the bridge at all):
cp /etc/network/interfaces /etc/network/interfaces.bak
systemd-run --unit=net-rollback --on-active=300 \
  sh -c 'cp /etc/network/interfaces.bak /etc/network/interfaces; ovs-vsctl del-br vmbr0 || true; ovs-vsctl del-br vmbr1 || true; ifreload -a'
Now apply:
ifreload -aConfirm SSH still works (new session, not just the old one), then disarm the safety net:
systemctl stop net-rollback.timer net-rollback.serviceCheck the bridge topology:
ovs-vsctl showYou should see vmbr0 with nic0 attached and an empty vmbr1 waiting for guests.
Note: The reverse direction — converting an OVS bridge back to a Linux bridge — cannot be done with
ifreload -aalone. ifupdown2 applies Linux→OVS transparently, but OVS→Linux needsovs-vsctl del-br vmbrXfirst. Keep this in mind if you ever roll back manually.
Step 3 - Create the OPNsense VM
Download the ISO (see release index for latest version) onto the host and verify it:
cd /var/lib/vz/template/iso
curl -sO https://pkg.opnsense.org/releases/26.7/OPNsense-26.7-dvd-amd64.iso.bz2
bunzip2 -f OPNsense-26.7-dvd-amd64.iso.bz2
Create the VM. This is the whole definition — no wizard:
Replace
00:00:5e:00:53:42with the MAC address for the second IP.
qm create 100 --name opnsense --machine q35 --bios ovmf \
  --efidisk0 local-zfs:1,efitype=4m,pre-enrolled-keys=0 \
  --agent enabled=1 \
  --cpu host --cores 4 --sockets 1 --memory 4096 \
  --ostype l26 --scsihw virtio-scsi-single \
  --virtio0 local-zfs:16,cache=writeback,iothread=1,discard=on \
  --net0 virtio=00:00:5e:00:53:42,bridge=vmbr0,firewall=0 \
  --net1 virtio=BC:24:11:00:00:10,bridge=vmbr1,firewall=0 \
  --serial0 socket --vga serial0 \
  --cdrom local:iso/OPNsense-26.7-dvd-amd64.iso \
  --boot order='ide2;virtio0'
Details that matter:
--net0carries the Hetzner-assigned MAC from Prerequisites. The WAN side of this VM is the additional IP — a wrong MAC here means Hetzner's switch silently drops the traffic.--net1's MAC is arbitrary (BC:24:11:…is Proxmox's own OUI). Pin it anyway: it gives every LAN device a stable identifier for DHCP reservations later.firewall=0on both NICs — see the note in Step 1.4: per-NIC Proxmox firewalling does not work on OVS bridges, and filtering is OPNsense's job anyway.--serial0 socket --vga serial0makes the serial console the VM's primary display. Combined with OPNsense's serial console support (Step 5), you can always reach this firewall withqm terminal 100— no VNC, even if the network is broken.--boot order='ide2;virtio0'boots the CD first, disk second. Do not put a NIC first in the boot order: with OVMF, a UEFI network boot silently spins for minutes with no console output and looks exactly like a hung VM.
Step 4 - Install OPNsense over SSH
The OPNsense live system starts an SSH server on its default LAN address 192.168.1.1, and the installer can be driven from there — no VNC needed. Start the VM and give the host a temporary address in the live system's network (its LAN comes up on vtnet0, which is our vmbr0):
qm start 100
ip addr add 192.168.1.2/24 dev vmbr0
The live system takes a minute or two to boot. Watch it come up on the serial console — the boot banner also confirms which interface got the LAN role:
qm terminal 100LAN (vtnet0) -> v4: 192.168.1.1/24
WAN (vtnet1) ->
...
Welcome! OPNsense is running in live mode from install media. Please
login as 'root' to continue in live mode, or as 'installer' to start the
installation.Detach from the console with Ctrl+O, confirm the live system answers, then open the installer inside tmux (the ncurses installer needs a real terminal, and tmux protects the session if your SSH drops):
ping -c 3 192.168.1.1
apt install -y tmux sshpass
tmux new -s opnsense-install
sshpass -p opnsense ssh -o StrictHostKeyChecking=no installer@192.168.1.1
opnsense is the factory default password of the installer user on the live ISO — not something you chose.
Walk through the installer:
- Keymap Selection → Continue with default keymap.
- Choose Install (ZFS) → Stripe (single disk) → select vtbd0 (the 16 GB VirtIO disk).
- Last Chance! — the dialog's default button is NO. Press Left, then Enter to accept.
- Set the root password when prompted — this is your recovery credential for the serial console, so make it strong.
- When the file copy finishes, choose Complete Install, then Reboot now.
Note: The Last Chance dialog is the one place where muscle memory (Enter-Enter) wipes nothing but your own progress — the default answer is NO, and pressing Enter alone simply does nothing. Arrow-left, then Enter.
Do not eject the ISO from a running OPNsense session. The live system's root filesystem is the CD. Eject only with the VM stopped (next step).
Log out of the installer SSH session, then stop the VM and remove the CD:
exit                                     # leave the installer session
qm stop 100
qm set 100 --ide2 none,media=cdrom --boot order='virtio0'
ip addr del 192.168.1.2/24 dev vmbr0     # the temporary installer address is no longer needed
Step 5 - Configure OPNsense Before First Boot
A fresh OPNsense boots into a configuration wizard with DHCP on 192.168.1.1, its WAN/LAN roles taken from whatever the live environment guessed, and SSH disabled. Instead of clicking through a wizard, we write the final configuration directly into the guest's config.xml while the VM is stopped — the same mechanism OPNsense's own "Import Config" uses, minus the USB stick.
The guest's root is ZFS, so the host can simply import the pool:
zpool import -f -R /mnt/opnsense zroot
zfs mount zroot/ROOT/default    # the boot environment is not always auto-mounted on import
ls /mnt/opnsense/conf/config.xml
The host also needs an address on the LAN to reach OPNsense once it boots — add it now (Step 6 makes it permanent):
ip addr add 172.16.10.1/24 dev vmbr1Now patch config.xml. First, make sure the host has an SSH key to use for the firewall (tutorial 1 installed your laptop's key on the host; the host needs its own pair to talk to OPNsense):
[ -f /root/.ssh/id_ed25519 ] || ssh-keygen -t ed25519 -N "" -f /root/.ssh/id_ed25519
cat /root/.ssh/id_ed25519.pub
The changes the patch makes:
- remove
<trigger_initial_wizard/>so the first boot applies the config instead of launching the wizard; - map
wan→vtnet0(onvmbr0) andlan→vtnet1(onvmbr1) — the installer's guesses are usually the other way around; - WAN: static
203.0.113.20/26with gateway203.0.113.1via a gateway item; - LAN:
172.16.10.254/24; - SSH: enabled, root login by key only — the host's public key is injected into the root user, password authentication stays off;
- serial console as primary console — OPNsense regenerates
/etc/ttysand the loader config from this on every boot.
Save the following as /root/patch-opnsense.py and set the four values at the top:
import re, base64

WAN_IP    = "203.0.113.20"     # second public IP
WAN_MASK  = "26"               # its prefix length
WAN_GW    = "203.0.113.1"      # public gateway
SSH_KEY   = "ssh-ed25519 AAAA... root@pve.example.com"   # /root/.ssh/id_ed25519.pub of THIS host

p = "/mnt/opnsense/conf/config.xml"
s = open(p).read()

def sub1(pat, repl):
    global s
    s2 = re.sub(pat, repl, s, count=1, flags=re.S)
    assert s2 != s, "no match: " + pat
    s = s2

# 1. no first-boot wizard
s = re.sub(r"\s*<trigger_initial_wizard/>", "", s, count=1)

# 2. NIC roles: WAN on vtnet0 (vmbr0), LAN on vtnet1 (vmbr1)
sub1(r"(<wan>.*?<if>)vtnet1(</if>)", r"\g<1>vtnet0\g<2>")
sub1(r"(<lan>.*?<if>)vtnet0(</if>)", r"\g<1>vtnet1\g<2>")

# 3. WAN static + gateway item
sub1(r"(<wan>.*?<ipaddr>)dhcp(</ipaddr>)", r"\g<1>%s\g<2>" % WAN_IP)
sub1(r"(<wan>.*?)<subnet/>",  r"\g<1><subnet>%s</subnet>" % WAN_MASK)
sub1(r"(<wan>.*?)<gateway/>", r"\g<1><gateway>WAN_GW</gateway>")

# 4. LAN address
s = s.replace("<ipaddr>192.168.1.1</ipaddr>", "<ipaddr>172.16.10.254</ipaddr>")

# 5. SSH: enabled, root by key only (presence of <passwordauth/> would enable
#    password auth — its absence disables it)
sub1(r"(<ssh>\s*<group>admins</group>)",
     r"\g<1>\n      <enabled/>\n      <permitrootlogin/>")

#    the host's public key goes into the root USER block, not the <ssh> section;
#    it is stored BASE64-encoded — OPNsense decodes it into /root/.ssh/authorized_keys
#    on every boot, a plain-text key would turn into garbage after that decode.
#    <uid>0</uid> is a stable anchor in every config shape.
s = re.sub(r"\s*<authorizedkeys/>", "", s)
sub1(r"(<uid>0</uid>)", r"\g<1>\n      <authorizedkeys>%s</authorizedkeys>"
     % base64.b64encode(SSH_KEY.encode()).decode())

# 6. serial console as primary console
s = s.replace("<dnsallowoverride>1</dnsallowoverride>",
              "<primaryconsole>serial</primaryconsole>\n"
              "    <serialspeed>115200</serialspeed>\n"
              "    <dnsallowoverride>1</dnsallowoverride>")

# 7. gateway item referenced by the WAN interface — the name WAN_GW must match
#    the <gateway>WAN_GW</gateway> reference set in change #3 above
s = s.replace("</interfaces>", """</interfaces>
  <gateways>
    <gateway_item>
      <interface>wan</interface>
      <protocol>inet</protocol>
      <gateway>%s</gateway>
      <name>WAN_GW</name>
      <descr>Public gateway</descr>
      <defaultgw>1</defaultgw>
      <weight>1</weight>
    </gateway_item>
  </gateways>""" % WAN_GW, 1)

# validate before writing — a malformed config.xml will not boot
import xml.dom.minidom
xml.dom.minidom.parseString(s)
open(p, "w").write(s)
print("config.xml patched and valid")
python3 /root/patch-opnsense.pyThen hand the pool back:
zfs unmount zroot/ROOT/default
zfs unmount zroot
zpool export zroot
qm start 100
Note: Details worth knowing, all learned the hard way:
<authorizedkeys>stores the key base64-encoded. On every boot OPNsense decodes it into/root/.ssh/authorized_keys(which sshd reads). A plain-text key in the config silently becomes garbage after that decode — which is exactly why the script encodes it.- The
zfs unmountcalls are not optional.zpool exportunmounts datasets itself, but insists on doing it in its own order and fails withcannot unmount '/mnt/opnsense/zroot'unless the boot environment and pool root are unmounted by name first.- OPNsense schema keys are presence-based.
<enable>1</enable>does nothing for sshd — the check isisset()on<enabled/>.<passwordauth/>enables password login by existing; omit it and SSH is keys-only.- The patch is all-or-nothing. Every regex asserts on a match and the file is written only after XML validation — if OPNsense's factory config ever changes shape, the script aborts without touching anything instead of producing a half-patched config.
Watch the first boot on the serial console:
qm terminal 100You will see the loader, the kernel, the OPNsense banner and finally:
LAN (vtnet1)    -> v4: 172.16.10.254/24
WAN (vtnet0)    -> v4: 203.0.113.20/26
...
FreeBSD/amd64 (OPNsense.internal) (ttyu0)

login:
Detach with Ctrl+O. Because <primaryconsole>serial</primaryconsole> was set, OPNsense regenerated its own ttyu0 entry with the console menu attached — this serial login survives reboots and is your out-of-band recovery path if you ever break the network config.
SSH into the firewall from the host — no password prompt, because the host's key is already inside config.xml:
ssh root@172.16.10.254 'uname -a'Then install the QEMU guest agent so Proxmox can see the VM's addresses and shut it down cleanly:
ssh root@172.16.10.254 'pkg install -y os-qemu-guest-agent && sysrc qemu_guest_agent_enable="YES" && service qemu-guest-agent start'
qm agent 100 ping        # on the host — must answer
Fix the DHCP range. OPNsense 26.x serves DHCP through dnsmasq, and a factory-default range (192.168.1.100–199) is created on first boot and does not follow your LAN re-addressing. Update it via the API — create an API key first.
-
One-time — the UI tunnel for this single visit is easiest via:
ssh -p 2222 -L 28443:172.16.10.254:443 root@203.0.113.10 -
Open in browser to access OPNsense web UI:
https://localhost:28443/Login with
rootand the password you set. -
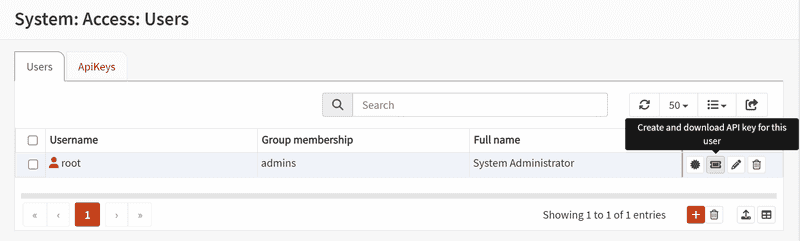
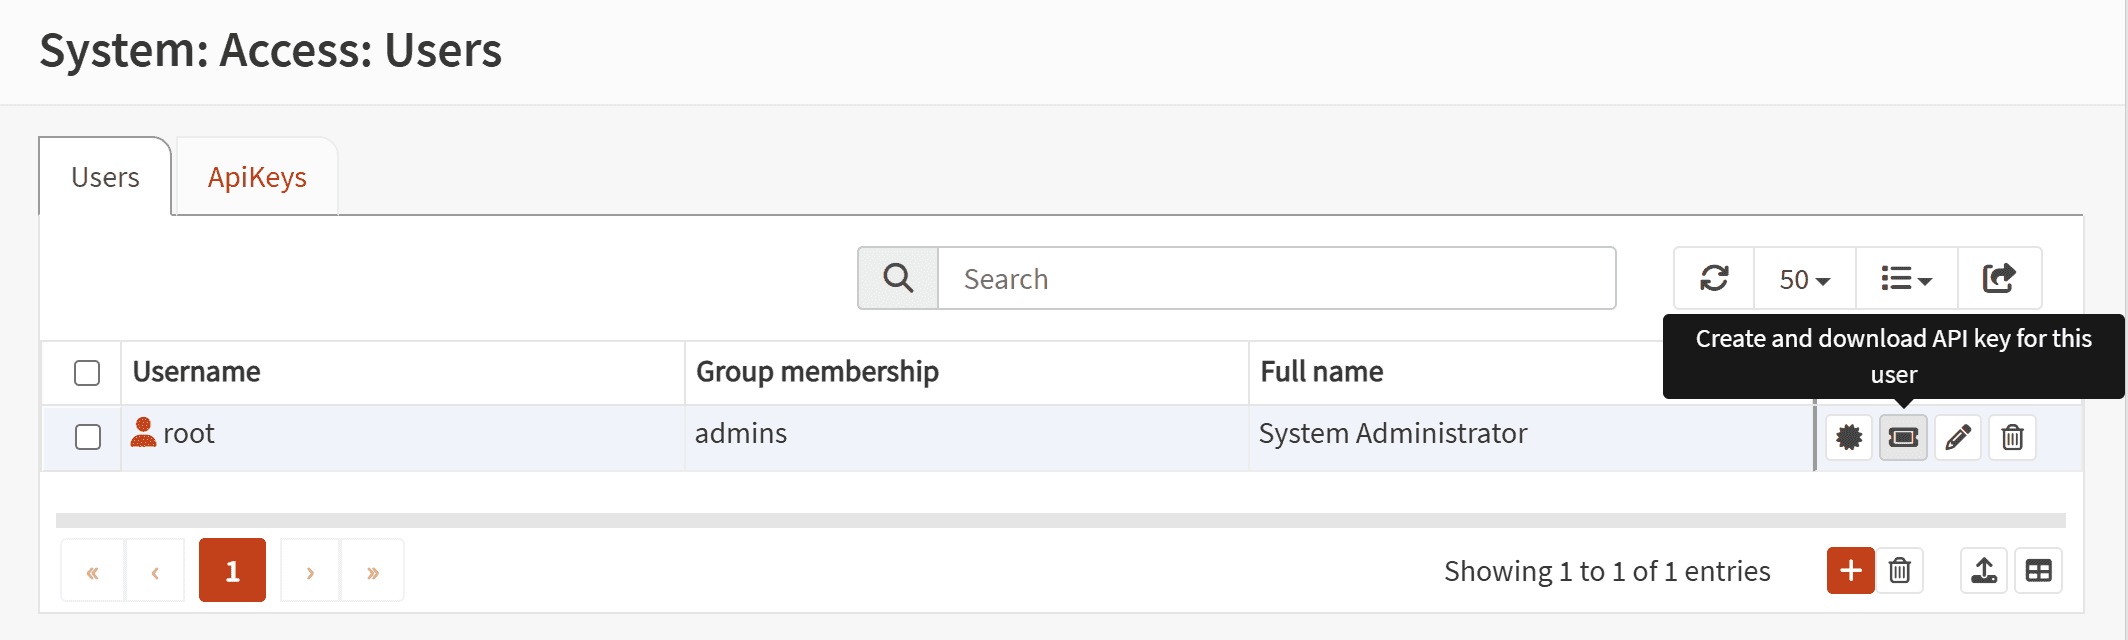
In the OPNsense web UI, open System → Access → Users → root and create an API key
Then, from any machine that reaches the LAN:
OPN=https://172.16.10.254
export AUTH="<api-key>:<api-secret>"      # the file the UI downloads has both

# find the stale range's uuid
curl -sk -u "$AUTH" https://172.16.10.254/api/dnsmasq/settings/search_range/
curl -sk -u "$AUTH" -H 'Content-Type: application/json' -X POST \
  -d '{"range":{"start_addr":"172.16.10.100","end_addr":"172.16.10.200"}}' \
  https://172.16.10.254/api/dnsmasq/settings/set_range/<uuid>
curl -sk -u "$AUTH" -X POST https://172.16.10.254/api/dnsmasq/service/reconfigure/
Note: The OPNsense API documentation describes
Key:/Secret:request headers. Current OPNsense ignores those and expects HTTP Basic auth with the API key as username and the secret as password —curl -uas above. If you get a302redirect, your credentials were not accepted.
Step 6 - Move Proxmox Management to the LAN
Give the host a permanent address on the LAN bridge in /etc/network/interfaces:
auto vmbr1
iface vmbr1 inet static
    address 172.16.10.1/24
    ovs_type OVSBridge
    post-up ip route replace 10.13.13.0/24 via 172.16.10.254
The post-up route pre-loads the WireGuard overlay route used in Step 7 — it is harmless now and saves an asymmetric-routing surprise later.
ifreload -a
ip -br a show vmbr1        # 172.16.10.1/24
Point pveproxy at the LAN address and allow the web UI through the host firewall — from the LAN only:
echo 'LISTEN_IP="172.16.10.1"' > /etc/default/pveproxy
systemctl restart pveproxy spiceproxy
ss -tlnp | grep 8006       # → 172.16.10.1:8006, nothing on 0.0.0.0

pvesh create /nodes/$(hostname)/firewall/rules -type in -action ACCEPT \
  -proto tcp -dport 8006 -source 172.16.10.0/24 -enable 1 -comment "PVE Web UI from LAN"
Reach it from your machine over an SSH tunnel (until WireGuard exists):
ssh -p 2222 -L 8006:172.16.10.1:8006 root@203.0.113.10
# https://localhost:8006
Public exposure of the host is now: SSH on your custom port, ICMP, nothing else. The web UI answers only to the LAN.
Step 7 - WireGuard on OPNsense
OPNsense 26.x ships WireGuard as a core feature — no plugin. Everything below uses the REST API with the key pair you created in Step 5 (export AUTH="<api-key>:<api-secret>" if the variable is not still set in your shell).
Generate the server and client key pairs (the client key belongs to your laptop/phone — run wg genkey there if you prefer, or generate on the server and move the private key once). wg genkey comes from the wireguard-tools package — install it on the host (apt install -y wireguard-tools) or run these two lines on your own machine:
SERVER_KEYPAIR=$(curl -sk -u "$AUTH" https://172.16.10.254/api/wireguard/server/key_pair/)
echo "$SERVER_KEYPAIR"
# {"privkey":"...","pubkey":"...","status":"ok"}

CLIENT_PRIV=$(wg genkey)
CLIENT_PUB=$(echo "$CLIENT_PRIV" | wg pubkey)
CLIENT_PSK=$(wg genpsk)
Register the server instance — WAN side, port 51820, overlay 10.13.13.0/24:
Replace
<privkey>and<pubkey>with your actual keys.echo "$SERVER_KEYPAIR"
curl -sk -u "$AUTH" -H 'Content-Type: application/json' -X POST \
  -d '{"server":{"enabled":"1","name":"wg-office","privkey":"<privkey>","pubkey":"<pubkey>","port":"51820","mtu":"1420","tunneladdress":"10.13.13.254/24","disableroutes":"0","debug":"0"}}' \
  https://172.16.10.254/api/wireguard/server/add_server/
Register your client (its tunneladdress is also the server-side AllowedIPs — one field, two roles; the /32 is exact-host routing on the server side, and the client's AllowedIPs in the config file below is what steers the overlay and LAN subnets into the tunnel). The preshared key is optional in WireGuard but cheap insurance — always set one:
Replace
<CLIENT_PUB>and<CLIENT_PSK>with your actual keys.echo -e "CLIENT_PUB: $CLIENT_PUB\nCLIENT_PSK: $CLIENT_PSK"
curl -sk -u "$AUTH" -H 'Content-Type: application/json' -X POST \
  -d '{"client":{"enabled":"1","name":"laptop","pubkey":"<CLIENT_PUB>","psk":"<CLIENT_PSK>","tunneladdress":"10.13.13.3/32","keepalive":"25"}}' \
  https://172.16.10.254/api/wireguard/client/add_client/
Link the client to the server (peers is a comma-separated list of client UUIDs from the responses above), enable the service and apply:
Replace
<client-uuid>and<server-uuid>with your actual UUIDs. You can find the server UUID with:curl -sk -u "$AUTH" https://172.16.10.254/api/wireguard/server/search_server/
curl -sk -u "$AUTH" -H 'Content-Type: application/json' -X POST \
  -d '{"server":{"peers":"<client-uuid>"}}' \
  https://172.16.10.254/api/wireguard/server/set_server/<server-uuid>/
curl -sk -u "$AUTH" -H 'Content-Type: application/json' -X POST \
  -d '{"general":{"enabled":"1"}}' \
  https://172.16.10.254/api/wireguard/general/set/
curl -sk -u "$AUTH" -X POST https://172.16.10.254/api/wireguard/service/reconfigure/
Firewall rules — one for the WireGuard handshake on the WAN, one for traffic arriving from the tunnel (OPNsense exposes all WireGuard instances as a WireGuard interface group):
curl -sk -u "$AUTH" -H 'Content-Type: application/json' -X POST \
  -d '{"rule":{"enabled":"1","action":"pass","quick":"1","interface":"wan","direction":"in","ipprotocol":"inet","protocol":"UDP","source_net":"any","destination_net":"any","destination_port":"51820","description":"WireGuard handshake"}}' \
  https://172.16.10.254/api/firewall/filter/add_rule/
curl -sk -u "$AUTH" -H 'Content-Type: application/json' -X POST \
  -d '{"rule":{"enabled":"1","action":"pass","quick":"1","interface":"wireguard","direction":"in","ipprotocol":"inet","protocol":"any","source_net":"10.13.13.0/24","destination_net":"any","description":"WireGuard clients"}}' \
  https://172.16.10.254/api/firewall/filter/add_rule/
curl -sk -u "$AUTH" -X POST https://172.16.10.254/api/firewall/filter/apply/
On the client machine, create /etc/wireguard/wg0.conf (path differs per platform; the WireGuard app accepts the same fields):
Replace
<CLIENT_PUB>,<CLIENT_PSK>, and<server pubkey>with your actual keys.echo -e "CLIENT_PRIV: $CLIENT_PRIV\nCLIENT_PSK: $CLIENT_PSK\nserver pubkey: $SERVER_KEYPAIR"
[Interface]
PrivateKey = <CLIENT_PRIV>
Address = 10.13.13.3/32
DNS = 10.13.13.254

[Peer]
PublicKey = <server pubkey>
PresharedKey = <CLIENT_PSK>
Endpoint = 203.0.113.20:51820
AllowedIPs = 10.13.13.0/24, 172.16.10.0/24
PersistentKeepalive = 25
Note: The client
Addressuses a/32on purpose — the exact host route. Routing for the overlay and LAN subnets comes fromAllowedIPs, whichwg-quickinstalls as routes pointing into the tunnel. A/24interface address is redundant here and only invites route overlap between peers.
Bring it up and confirm you can see the office:
wg-quick up wg0
ping -c 3 172.16.10.254    # OPNsense
ping -c 3 172.16.10.1      # Proxmox host
https://172.16.10.1:8006 now works over the tunnel — but only because of two host-side details that are easy to miss:
- The host learned the route back into the tunnel from the
post-upline added in Step 6. Without it, OPNsense forwards your packets to the host, the host answers through its default route, and the reply dies on the internet — asymmetric routing, silent packet loss, and a tunnel that "connects but nothing works". - The PVE firewall from Step 1 would still drop the web UI: add it explicitly for the overlay.
pvesh create /nodes/$(hostname)/firewall/rules -type in -action ACCEPT \
  -proto tcp -dport 8006 -source 10.13.13.0/24 -enable 1 -comment "PVE Web UI from WireGuard"
Step 8 - Prove It With a Test Guest
Create a disposable Alpine Linux container on the LAN and let OPNsense give it an address:
pveam update
pveam available --section system | grep alpine
pveam download local <alpine-amd64-template-from-the-list>

pct create 999 local:vztmpl/<alpine-amd64-template-from-the-list> \
  --hostname wgtest --memory 256 --cores 1 \
  --root local-zfs:1 \
  --net0 bridge=vmbr1,firewall=0,name=eth0,ip=dhcp \
  --unprivileged 1 --password <temp-password>
pct start 999
Note: Match the template architecture to your host (
amd64here).pveam availablelists both architectures and the highest version number is not always the one you want.
pct exec 999 -- ip -4 addr show eth0     # 172.16.10.100–200, handed out by dnsmasq
pct exec 999 -- ping -c 3 1.1.1.1        # internet via OPNsense NAT
pct exec 999 -- ping -c 3 172.16.10.1    # the host, now a LAN peer
The guest got its address from OPNsense's DHCP, reaches the internet through OPNsense's outbound NAT, and can talk to the host on the LAN — while remaining invisible from the WAN, because nothing on vmbr0 forwards into vmbr1 unless OPNsense explicitly allows it.
Delete the test guest when you are satisfied:
pct stop 999 && pct destroy 999 --purgeStep 9 - Verification and Lockout Recovery
Final state check from outside the network:
sudo nmap -Pn -sU -sT -p T:22,T:111,T:8006,T:2222,U:51820 203.0.113.10
# only 2222/tcp should answer on the main IP
sudo nmap -Pn -sU -sT -p T:22,T:80,T:443,T:2222,U:51820 203.0.113.20
# only 51820/udp should answer on the OPNsense IP
On the host, ss -tlnp should show pveproxy bound to 172.16.10.1 only. ovs-vsctl show shows both bridges with the expected taps and veths. qm terminal 100 gives you the firewall console from the host even with the network in pieces.
When a network change goes wrong, resist fixing it in the same SSH session that is about to die. The pattern from Step 2 scales to any risky change — arm a rollback first, apply, test from a new connection, then disarm:
cp /etc/network/interfaces /etc/network/interfaces.bak
systemd-run --unit=net-rollback --on-active=300 \
  sh -c 'cp /etc/network/interfaces.bak /etc/network/interfaces; ifreload -a'
If the window closes before you verified: the server reverts itself, you reconnect, nothing is lost. Cancel with systemctl stop net-rollback.timer net-rollback.service.
The escalation ladder if you are truly locked out:
- Serial console of a VM —
qm terminal 100from the host, or the OPNsense console menu onttyu0. - Hetzner Rescue System — boot the rescue image, import the host ZFS pool, fix
/etc/network/interfaces, reboot. - Hetzner KVM console (Robot: Servers → KVM) — the physical last resort; with this tutorial's serial consoles you should never need it.
Conclusion
One dedicated server is now a small office: hardened Proxmox host, OVS bridges separating WAN from LAN, an OPNsense firewall owning the public second IP, DHCP and DNS for the private segment, WireGuard for your own devices, and a management UI that answers only to the LAN — all built without a single click in a VNC window. The steps that carry most of the result:
- Closing everything first (
policy_in: DROP) and reopening by explicit, verified rules — including the-enable 1detail that silently disabled rules otherwise. - Converting the flat bridge to OVS under a timed rollback, so a mistake costs five minutes, not a rescue-system session.
- Installing OPNsense through its own SSH installer and writing the final
config.xmlbefore first boot — reproducible, diffable, and free of wizard drift. - Making the serial console the VM's primary display before it was needed.
- Keeping the host's default route on the WAN bridge, and adding the tunnel return route explicitly — the two decisions that keep asymmetric routing out of your life.
Tip: Keep the API-key pattern. Every OPNsense change made in this tutorial is a
curlcall, which means the entire network is now scriptable — compare, diff and re-apply it the way you would any other infrastructure code.
Next steps:
The network is the foundation; nothing is published yet. The next tutorial in this series puts services behind OPNsense:
[Publishing Services Through OPNsense: Port Forwards and Firewall Rules] (coming soon)
It covers exposing self-hosted services to the internet through clean DNAT rules and per-service firewall policies — everything this tutorial deliberately left out of the public path.