Introduction
"Setting up an SSH key" is a detailed tutorial about SSH keys and setup with the ~/.ssh/authorized_keys file.
In this tutorial, we will explore a further option to secure the SSH login of your server with the verification of the client key by using a Certificate Authority (CA).
With this verification, it is possible to log in to your server without copying your public SSH key to the ~/.ssh/authorized_keys file.
This means that the issued certificates can be time-limited, or revoked prematurely. This is useful if many servers are managed by several users.

In this tutorial, only one server will be managed. For bigger setups, a naming scheme for client keys is recommended.
This tutorial was tested with Ubuntu 22.04 and OpenSSH 8.9.
Prerequisites
- Root access to the server
sshdinstalled on a serversshclient installed on a client computer- SSH key on a client computer
ssh-keygenon both client and server (basically provided together with ansshclient)
Example terminology
- Client key:
id_ed25519&id_ed25519-cert.pub - CA key:
ca_user_key&ca_user_key.pub
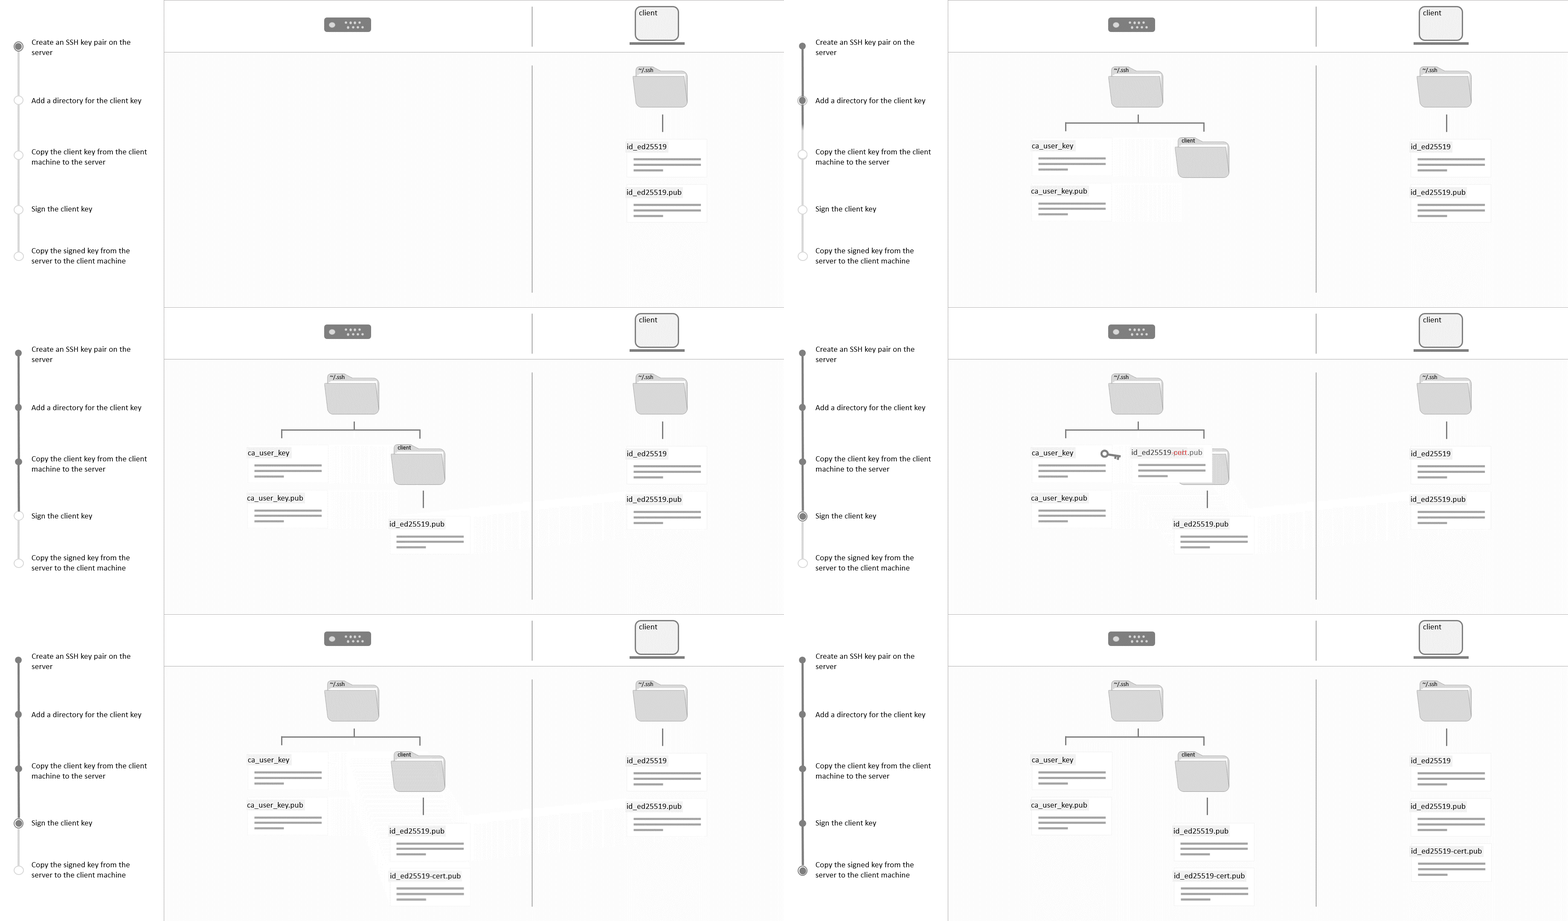
Step 1 - Create an SSH Certificate Authority
This step consists of two substeps. Both of them are performed on server.
Step 1.1 - Create a New SSH Key Pair
We will use a separate key pair for CA. This key pair is used for signing the user public keys only.
Create a new key:
ssh-keygen -f ~/.ssh/ca_user_key -t ed25519The key pair was saved in
~/.ssh.
Step 1.2 - Change SSH Server Settings
In order to keep the sshd configuration clean, we create an additional configuration file /etc/ssh/sshd_config.d/ca.conf.
Put the following line into that file:
TrustedUserCAKeys /root/.ssh/ca_user_key.pubAnd also make sure that /etc/ssh/sshd_config has the following line:
Include /etc/ssh/sshd_config.d/*.confStep 1.3 - Apply New Settings
Once you have changed sshd configuration, validate it with the following command:
sshd -tThis command shows nothing if the configuration is correct. Otherwise, it shows an error message.
Now reload sshd configuration via systemctl:
systemctl reload sshdStep 2 - Sign the Client Key
Now the public SSH user key for the client needs to be signed.
We will store client keys in ~/.ssh/clients/ directory on server.
Create it with the following command:
mkdir -v ~/.ssh/clients/After that, copy a client's public key into that directory.
Let's say you saved it in ~/.ssh/clients/id_ed25519.pub file.
For signing this key, use the following command:
ssh-keygen \
  -s ~/.ssh/ca_user_key \
  -I example_client \
  -n holu,root \
  -V +10h \
  ~/.ssh/clients/id_ed25519.pub
-s ~/.ssh/ca_user_key— Specify signing CA key.-I example_client— Key identifier for client's certificate.-n holu,root— Which usernames (comma separated list) the client can use to log in to the host.-V +10h— Validity of certificate, 10 hours starting from now (optional).~/.ssh/clients/id_ed25519.pub— Path to the key to be singed.
If this was successful, you should find the client certificate at ~/.ssh/clients/id_ed25519-cert.pub.
Step 3 - Establish the Client Certificate on the Client Side
Now the client certificate must be copied to the client machine.
In this tutorial it is copied to /home/client/.ssh/id_ed25519-cert.pub.
It may be necessary to adjust the file permissions of the certificate. This is possible with the following command:
chown -v client:client /home/client/.ssh/id_ed25519-cert.pubNow the client can connect to the server:
ssh -l holu <server address>Step 4 - Revoke Certificates Manually (optional)
We will use the Key Revocation List (KRL) file for revocation purposes.
To revoke certificates, you have to create a revoked_keys file and adjust the sshd configuration.
In this tutorial, the revoked_keys file is located in /etc/ssh/revoked_keys.d/.
Create a directory and an empty file with the following commands:
mkdir -v /etc/ssh/revoked_keys.d
touch /etc/ssh/revoked_keys.d/revoked_keys
Also, add the following line into /etc/ssh/sshd_config.d/ca.conf file:
RevokedKeys /etc/ssh/revoked_keys.d/revoked_keysThe sshd configuration should be tested and activated as shown in Step 1.3 - Apply New Settings.
To fill the KRL file with the first revoked certification, execute the following command.
ssh-keygen -k -f /etc/ssh/revoked_keys.d/revoked_keys ~/.ssh/clients/id_ed25519.pub-k— Tellsssh-keygenthat it works with KRL file format.-f <path>— Path to KRL file.<path>— Final argument is a public key to revoke.
To revoke additional certificates, add the -u argument, which means updating the KRL with the additional key.
ssh-keygen -k -u -f /etc/ssh/revoked_keys.d/revoked_keys ~/.ssh/clients/id_ed25519.pubConclusion
The standard configuration is finished. Now the client can log in to the host by using the certificate and the client SSH key.
To deploy this configuration setup automatically you can use Puppet or Ansible.