Introduction
Creating a VPS server to centralize and manage multiple file storage systems can simplify tedious tasks such as moving files, syncing folders, updating versions, merging drives, consolidating files, etc. A fast VPS or dedicated server with a gigabit connection can dramatically speed up these tasks.
Rclone is a powerful tool that can be used to manage multiple directories, filesystems, local files and remote drives such as FTP servers, cloud servers, S3 buckets, Dropbox accounts, etc. Below is a starter’s guide to rclone, broken up so it can be used by anyone, new users and experienced users alike.
Rclone functions on any OS and versions are available for both 32 and 64 bit systems. When running on a server we will be using the Linux versions via SSH.
Step 1 - Installing
Download it. The rclone site breaks this down very well and if you are on a Linux VPS or dedicated server you don’t even need to visit the homepage. Simply connect via SSH to your server and paste:
curl https://rclone.org/install.sh | sudo bashOnce this installation is complete, we can start using rclone.
Step 2 - Startup
With rclone, we can begin to check out the features:
rclone configRclone Getting Started
From here we are greeted with the config menu. My advice is to create a Config Password immediately and make a note of it, as we will need this when running commands. If you choose to go without a password, that is fine, it is only a suggestion. If you lose a password, you can remove config file ~/.config/rclone/rclone.conf and setup up your remotes again.
Step 3 - Setting Up a Remote
Rclone has integrations with many of the major and minor cloud storage providers and the interface guides you through the steps. There are traditional integrations and some other useful encrypted and mounted options also. For this tutorial, I will sync files from my Dropbox to my Google Drive.
Note: When we set up remotes, we set them up as a remote / headless machine.
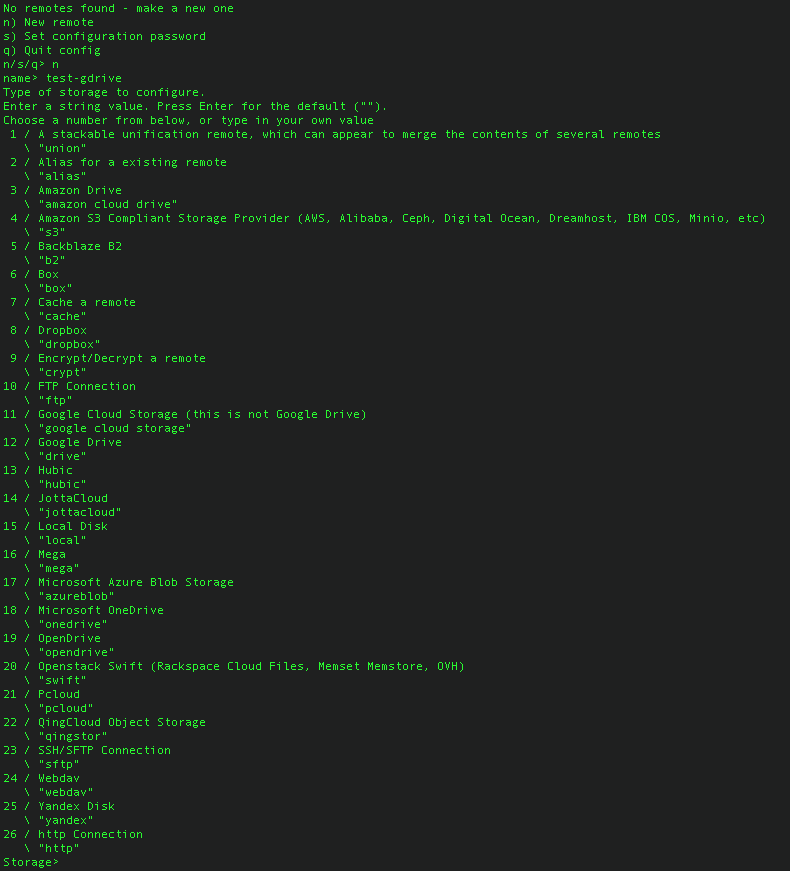
Picking Your Remote
Pick your remote by typing the name of the service, “dropbox” in my case. From here we are guided through the setup of each remote. Rclone has fantastic docs on the setup of each remote and they do example walk-throughs on all of them.
Following are walk-throughs of Google Drive and Dropbox.
Step 3.1 - Google Drive
Picking Drive
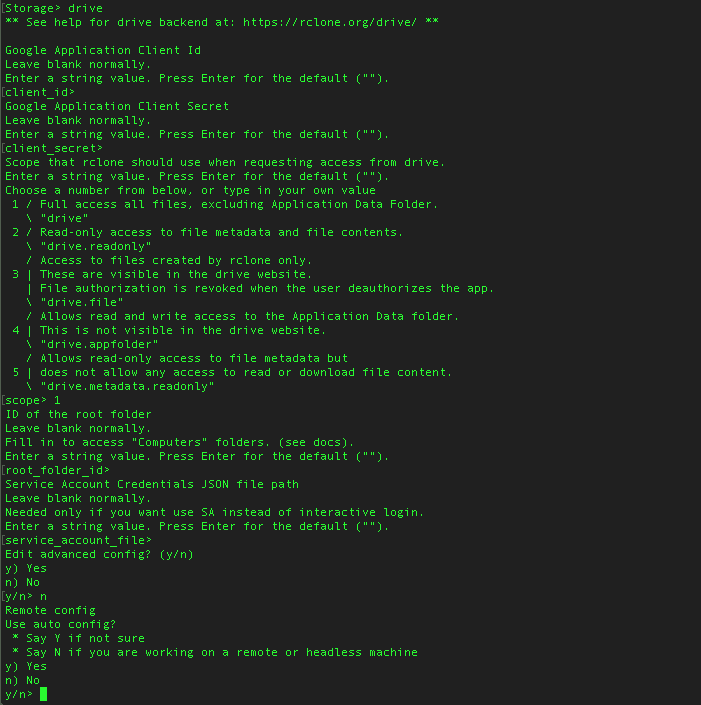
We can see above, that we must choose which config to use.
Use auto config?
 * Say Y if not sure
 * Say N if you are working on a remote or headless machine
We are selecting N in this case, as we are working on a headless server.
Setting Up Headless Drive
Setting Up Access to Drive
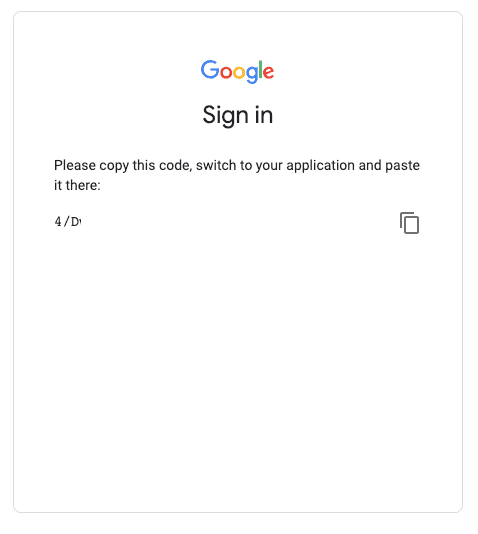
Getting GDrive Token
Step 3.2 - Dropbox
Dropbox has a small nuance where you must have rclone on your local machine. If you are on a MAC, then you can install it with this simple command:
curl https://rclone.org/install.sh | sudo bashOnce this is complete, the setup of dropbox (and any other remote) is straightforward.
Dropbox Setup
Getting Dropbox Token
We have now set up 2 remote controls on our server.
Current remotes:

Name                 Type
====                 ====
test-dropbox         dropbox
test-gdrive          drive
Step 4 - Managing Files Using Rclone
I set up 2 remotes for this tutorial. From here we quit (q) and we can begin to use the features of rclone. Exit the config (q) and we can begin to move files between remotes using the gigabit speeds of Hetzner.
Note 1: Likely if you are unable to list files or have ERROR messages, you may have set up your remote drives incorrectly in rclone. If you have done this, go to 'rclone config', select the 'Delete remote — d' option and remove the remote to start again.
Note 2: When accessing a drive, some remotes take a few moments to establish a connection. Don’t worry if you are waiting 10-15 seconds for the remote to respond.
Note 3: If you need to see logs of what is happening for any command in rclone add '-vv' (very detailed) or '-v' (normal details) to the end of the command. This will generate messages and display any errors. Errors are normal depending on the remote you are using (e.g. Google Drive Generates errors).
Step 4.1 - Listing Files Using Rclone
Some example commands used to explore folders and files in rclone:
rclone lsd [remote name]:/[Optional - Specify Remote Folder]
(List the directories of the top level folder or specific folder)

rclone ls [remote name]:/[Optional - Specify Remote Folder]
(List all the files in the remote or specific folder)

rclone lsl [remote name]:/[Optional - Specify Remote Folder]
(List location / size / of all files in remote or specific folder)
We can see the output of the ls below.
Getting Fill Files List
All the commands are listed in the Docs here.
Note above 2 things:
-
Running the ls command on the whole remote will produce a long list of files, it’s better to specify a specific folder and run the command there.
-
If your folder has spaces in its name, use quotation markets to bind it together. Example: Temp folder → ‘Temp Folder’
Step 4.2 - Moving Files Using Rclone
Moving files and folders is easy once you understand the structure of rclone commands. These are broken down below with definitions for each action.
Below are the steps required to transfer files between 2 providers, Google Drive and Dropbox. Remember to be careful when using some of these commands as they can be destructive. I can’t help if you move files and they get lost or deleted.
The most basic command is:
rclone copy [Source]:/[Folder] [Destination]:/[Folder]
rclone copy This is the copy command that Copy files from source to dest, skipping already copied. Use this one for first sync as files won’t be deleted when used.
[Source]:/[Folder] Source is the remote containing the files. And if you are only syncing a specific folder, then ensure you specify this folder or you will sync the whole remote.
[Destination]:/[Folder] Destination is the remote receiving the files. And if you are putting the files in specific folder, then ensure you specify this folder or you end up with a messy remote.
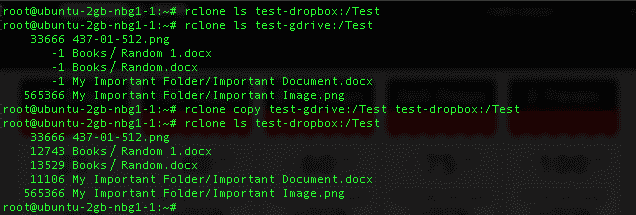
Moving Files Between Remotes
You can see that the files are mirrored from my Google Drive to my Dropbox.
Note: A bonus to using rclone is that file metadata is preserved. If a file is dated in the past on Remote1, the same date is seen on Remote2. Very handy when transferring large sets of files.
Additionally, we could use a command like sync, to move files between remotes.
Note: Destructive use of SYNC. If we want to exactly mirror 2 remotes, this can be very useful. If we want to backup 2 remotes this is not useful as all changes are copied from the source remote to the destination remote, including any files deleted will be deleted in the destination remote.
Step 5 - Bonus: Flags
Getting fine control on rclone can unlock many benefits such as increased speed, updating, and more. Below are some of my favorite flags and an explanation for what they do:
rclone copy [Source]: [Dest]: -v -c --bwlimit 8M --transfers=3 --stats=30s --dry-run-v Using the -v flag, rclone will produce Error, Notice and Info messages.
-c By default rclone looks modification time and size of files to see if they are equal. If you set this flag then rclone will check the file hash and size to determine if files are equal.
--bwlimit 8M Taking up all the bandwidth is rude. If you need to limit the speed of the transfers use this flag. Example: Google Drive limits daily transfers to 750GB, or ~9MB/s.
--transfers=3 Specify the number of files being transferred parallel. The default is 4, but I have gone up to 20 without any issues.
--stats=30s Rclone will produce an update for stats every X seconds or minutes to show you the rate or transfer and other key details.
--dry-run Before committing to a transfer and potentially regretting it, run the command with this flag. It will show you what will happen when you run a copy/sync/etc without performing it. Once you are confident, remove this flag and repeat the command.
Some more useful flags:
Update Remotes:
--update Rclone will be forced to skip any files which exist on the destination and have a modified time that is newer than the source file.
Progress Block:
--progress Rclone updates the stats in a static block in the terminal providing a real-time overview of the transfer. This would be used in place of --stats.
Immutable
--immutable Rclone treat the source and destination files as immutable and won't allow any modification. This does NOT stop files being deleted, existing files will only never be updated.
Conclusion
Rclone is a powerful tool. When combined with Hetzner Gigabit speeds, it can be used to manage huge quantities of information quickly and efficiently. I always advise on testing out moving files first, before attempting large data migrations to ensure the commands and flags are as expect. In order to test this, I have a small CX23. When moving large sets of files, i scale up the instance to 2-4 vCPUs and begin the transfer.


