Introduction
If you're using Prisma ORM with MongoDB, you may encounter an unexpected blocker: Prisma requires MongoDB to be part of a replica set — even if you're only running a single-node deployment. This requirement is non-negotiable, and without a replica set, Prisma simply won't work with MongoDB.
In this article, we’ll walk you through how to enable a single-node replica set on a MongoDB instance hosted via Coolify on your VPS. This is the simplest workaround for Prisma’s replica set dependency when you're not running a full production-ready MongoDB cluster.
Why Prisma Requires a Replica Set
Prisma uses features like transactions and change streams, which require MongoDB to be deployed as a replica set — even if you’re using just one node. This doesn’t mean you have to set up multiple MongoDB instances; you can configure a replica set on a single-node MongoDB server to satisfy Prisma’s requirements.
Prerequisites
- Coolify is already installed (see this tutorial)
- You've deployed a MongoDB database
- Your app uses Prisma
Step 1 - Access Your Coolify Dashboard
Log into your Coolify instance.
You should have a project with a MongoDB resource and a server where Coolify is running on.
Step 2 - Generate a Secure Keyfile
The replica set requires a shared keyfile for internal authentication, even if it's just one node.
-
In the dashboard, select the server where Coolify itself is running.
-
Switch to the terminal tab.
-
Run the following command to generate a 741-byte base64 key:
openssl rand -base64 741 -
Create a new file:
nano keyfile-mongo -
Paste the generated key and save the file.
-
Secure the keyfile with proper permissions:
chmod 400 keyfile-mongo chown 999:999 keyfile-mongo -
Create a directory to store the keyfile and move it there:
mkdir -p /root/replica
mv keyfile-mongo /root/replica/replica.key
Step 3 - Mount the Keyfile in Your MongoDB Instance
-
In the Coolify dashboard, select the project with MongoDB and open your MongoDB instance.
-
Go to Persistent Storage.
-
Click + Add to add a new volume:
- Name:
replica - Source Path:
/root/replica - Destination Path:
/tmp/mongodb
- Name:
This mounts your keyfile inside the MongoDB container.
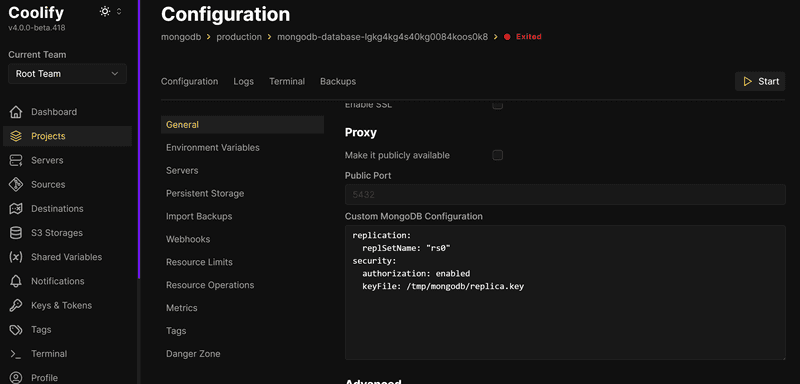
Step 4 - Update the MongoDB Configuration
-
Go to the General tab for your MongoDB instance.
-
Scroll down to Custom MongoDB Configuration, and enter:
replication:
  replSetName: "rs0"
security:
  authorization: enabled
  keyFile: /tmp/mongodb/replica.key
Step 5 - Enable Replica Set Initialization
-
Start your MongoDB instance.
-
Go to the Terminal tab for your MongoDB instance.
-
Connect to the MongoDB server:
mongosh -u root -p <mongodb_password> --authenticationDatabase admin -
Now run:
Replace
27017with the port of your MongoDB instance.rs.initiate({ _id: "rs0", members: [{ _id: 0, host: "localhost:27017" }], }); -
Save and restart your MongoDB service.
Step 6 - Testing the Setup
After restarting MongoDB:
-
Connect to the MongoDB server:
mongosh -u root -p <mongodb_password> --authenticationDatabase admin -
Run:
rs.status(); -
Confirm that the replica set is active.
-
Test your Prisma application to ensure the connection works.
Step 7 - Production Considerations (Optional)
This tutorial sets up a single-node replica set to satisfy Prisma’s requirements. For high availability and production-grade environments, consider setting up a three-node replica set across separate containers or servers.
Conclusion
You've now configured MongoDB with a single-node replica set in Coolify, ensuring full compatibility with Prisma ORM — without the complexity of managing multiple MongoDB instances. This setup is ideal for local development, staging, or lightweight production use cases.
When you're ready to scale, transitioning to a true multi-node replica set will be straightforward.


