Introduction
This tutorial shows the simplest way to deploy a Kubernetes cluster on Hetzner using Edka.
You’ll not only create a cluster but also turn it into your own Platform-as-a-Service (PaaS), ready for your applications.
Edka simplifies Kubernetes operations by organizing them into layers:
- Layer 1: Cluster provisioning – A simple UI to provision a k3s-based cluster. You can create a cluster in one click using the default values.
- Layer 2: Add-ons - One-click deploy for metrics-server, cert-manager, and various operators; preconfigured for Hetzner, no extra setup required.
- Layer 3: Applications - Minimal config UIs for apps built on top of add-ons. - Example: Need PostgreSQL? Fill a few fields → platform installs CloudNativePG → provisions HA PostgreSQL with PITR → gives ready to use endpoints. Backups can be restored to any point in time with a single click.
- Layer 4: Deployments - Connect your CI to push container images to a public/private registry. - Edka updates deployments automatically (with semantic versioning rules), supports instant rollbacks, autoscaling, persistent volumes, secrets/env imports, and quick public exposure.
Prerequisites
- A Hetzner Cloud account
- A Hetzner Cloud API token with read/write permissions
- A free Edka account
- kubectl (optional if you want to access your cluster from the command line, for advanced operations)
- A domain name to link it to your cluster ingress (optional)
What you will learn
- How to deploy a Kubernetes cluster on Hetzner using Edka and extend it with add-ons and applications
- How to provision an HA PostgreSQL cluster with point-in-time recovery
- How to connect, deploy, update, and auto-scale your applications
Step 1 - Create your cluster in Edka
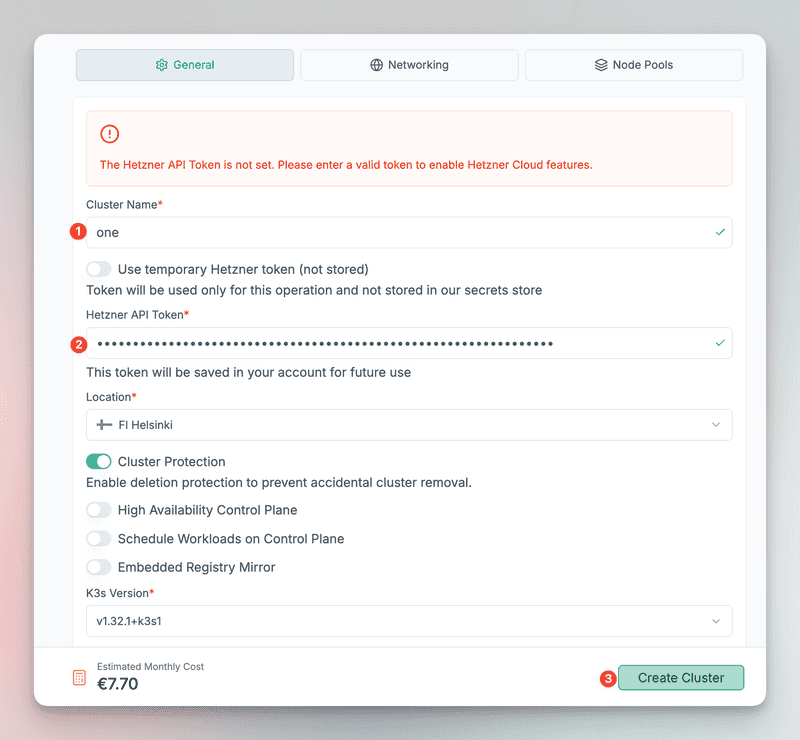
Go to Edka and create a new cluster:
- Set a cluster name
- Provide your Hetzner API token
- Optionally adjust location, size, node type, etc.
- Click Create Cluster
Note: If you choose not to store the Hetzner API token, you’ll need to re-enter it whenever making changes (including deletion).
A 3 node cluster is usually ready in 2–3 minutes.
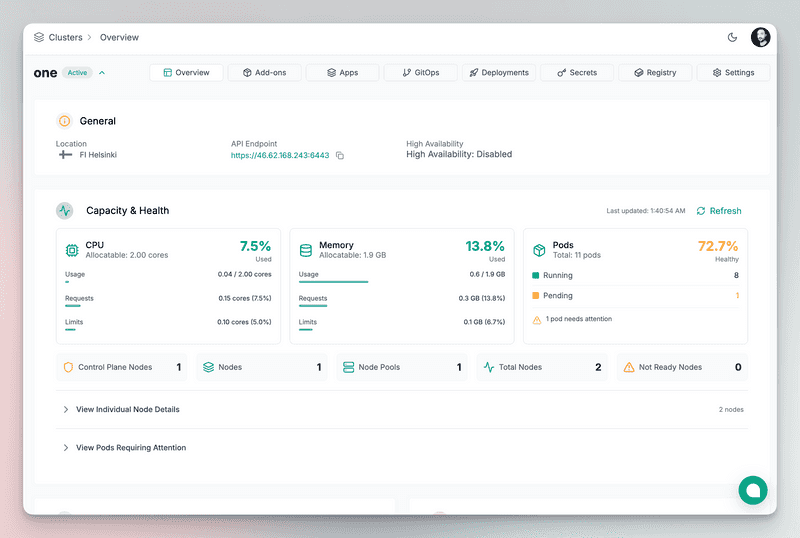
Once ready, access it from the Edka dashboard:
To use the cluster via kubernetes CLI, download the kubeconfig file under Settings → Access.
Important: for security reasons, kubeconfig can only be downloaded once.
Step 2 - Install the required add-ons
For this tutorial, install:
- cert-manager – automatically provision and manage TLS certificates
- ingress-nginx – expose applications to the internet
- letsencrypt-issuer – use Let’s Encrypt as the certificate authority
After installing ingress-nginx, get the Load Balancer’s public IP from the "Cluster Overview" and set it as a DNS record for your domain or subdomain. We recommend using a wildcard A record, if you plan to serve multiple subdomains. You can link any number of domains or subdomains to it.
Step 3 - Deploy a PostgreSQL cluster
Edka provides a UI to deploy PostgreSQL with high availability and PITR.
Configure name, node count, storage size, etc.
Important: Copy the user and superuser passwords; you’ll need them to connect your apps and manage the database.
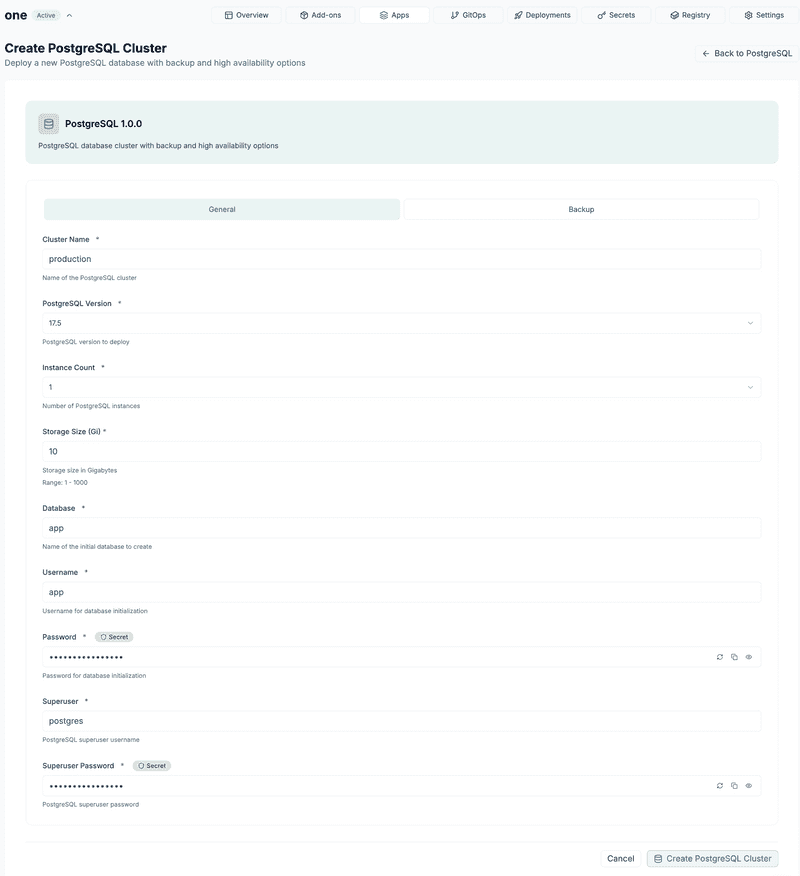 Credentials are injected into the cluster, never stored in Edka.
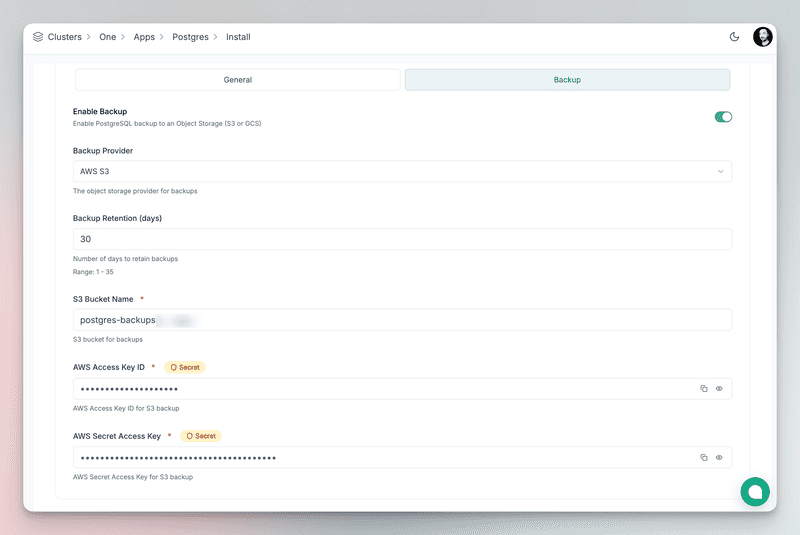
External backups: Enable automatic backups to external providers like S3 and GCS and set the retention period from 1 to 35 days.
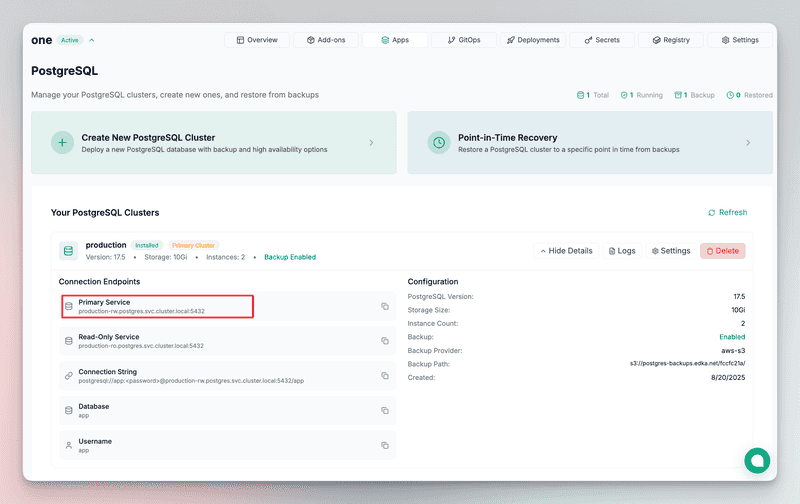
Once the PostgreSQL cluster is ready, you can retrieve the endpoints and connect your application to the database.
If you require to access the database directly, you can use the kubectl command to forward the port to your local machine. Make sure you set the service name correctly, as displayed in the PostgreSQL cluster details. In this example, the service name is production-rw.
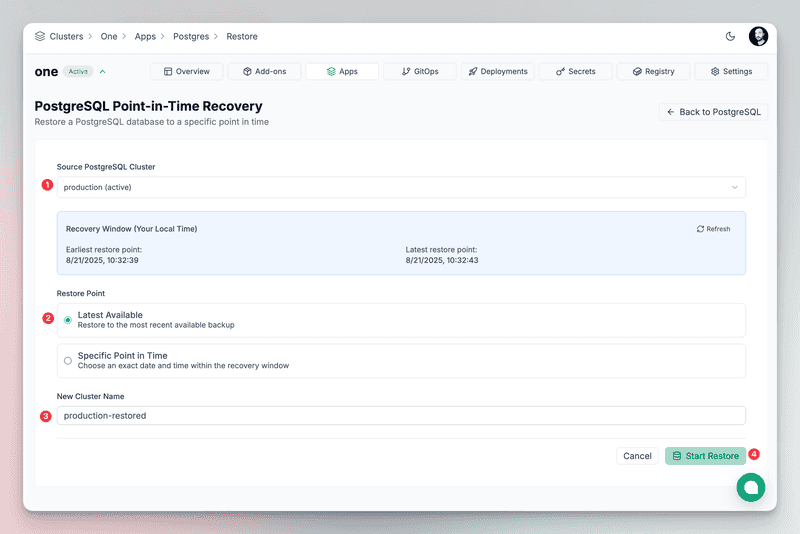
kubectl port-forward -n postgres svc/production-rw 5432:5432Restore from backup You can restore a backup to any point in time with a single click. It will create a new PostgreSQL cluster with the restored data and the same configuration as the original cluster, including backups enabled.
Step 4 - Deploy your application
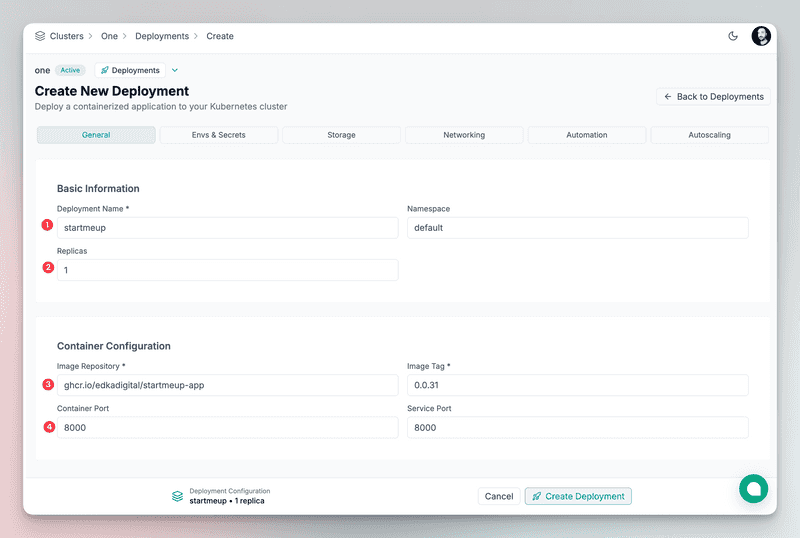
We’ll deploy a sample Go app, available on GitHub. Go to the "Deployments" section and click on "Create Deployment".
Container image We have to provide the following information:
- The name of the deployment:
startmeup - The container image URL and tag:
ghcr.io/edkadigital/startmeup-app:0.0.31 - The container port:
8000
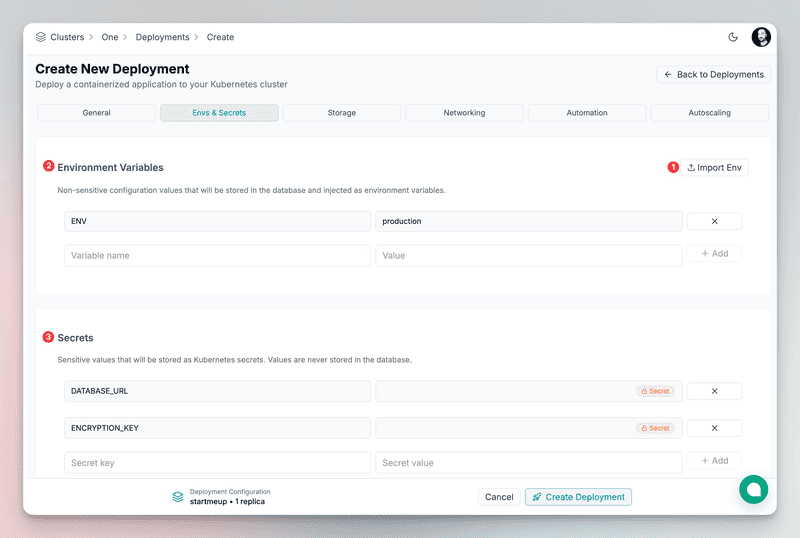
Environment variables and secrets This app requires a PostgreSQL connection string to connect to the database and an encryption key to encrypt the data. It also requires setting the environment as a non sensitive value.
ENV=production
DATABASE_URL=postgresql://app:YOUR_POSTGRES_PASSWORD@production-rw.postgres.svc.cluster.local:5432/app?sslmode=require
ENCRYPTION_KEY=a1b2c3d4e5f6g7h8i9j0k1l2m3n4o5p6q7r8s9t0u1v2w3x4y5z6
>- Variables can be stored as plain values or Kubernetes secrets
- Imported from .env, JSON, or YAML files
- Directly provisioned into your cluster (not stored in Edka)
Storage Persistent volumes can be attached if needed (omitted in this example).
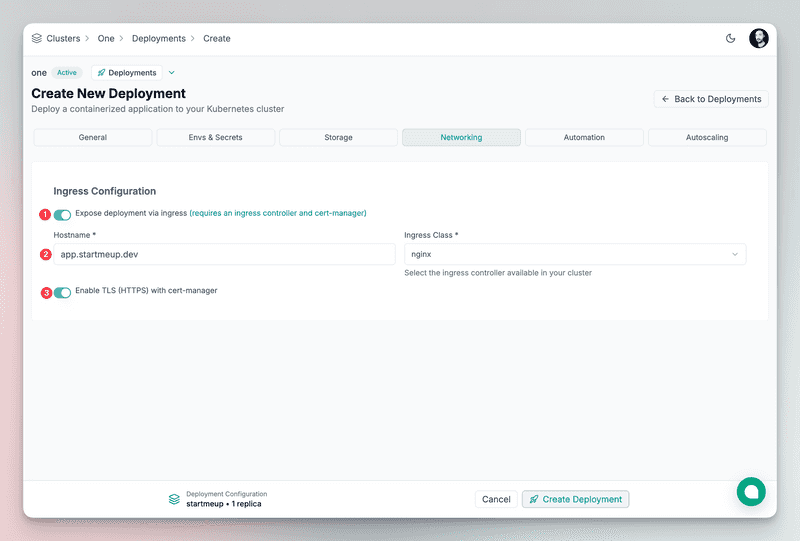
Networking We'll expose the application to the internet using the ingress-nginx controller with a TLS certificate provided by Let's Encrypt.
Automatic Updates
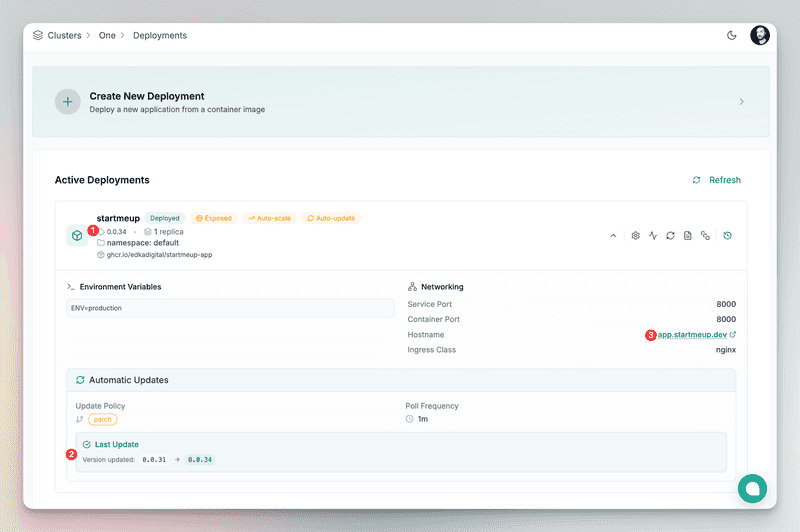
Edka supports automatic updates for your deployments. You can set the desired update strategy to "SemVer" to automatically update your deployment when a new version is released. In this example, we'll set the update strategy to "Patch version only" and the scan frequency to "Every minute".
Note: If you want to deploy from a private registry, you'll need to set the integration first, in the "Integrations" section and apply the registry as default in the cluster settings.
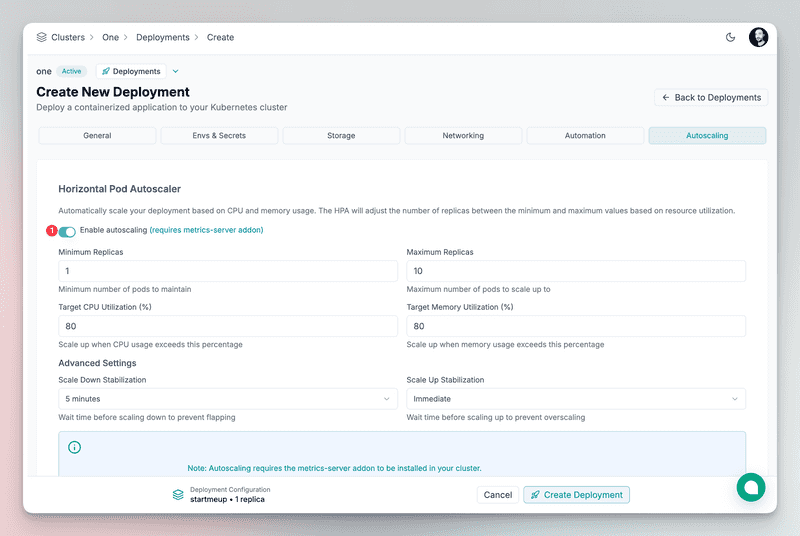
Auto-scaling
Edka supports auto-scaling based on CPU or memory usage. Your deployment will scale automatically once usage exceeds the configured threshold.
Deploy your application
Once you've filled all the fields, you can deploy your application by clicking on "Create Deployment".
In the deployment dropdown details, you can see the status of the deployment, the exposed endpoint, the number of replicas, latest updates, stream realtime logs, and more.
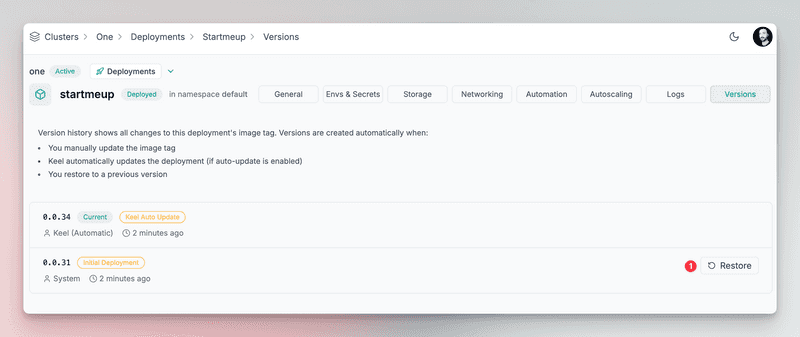
Rollbacks
All updates are audited and you can rollback to any previous version.
Step 5 - Clean up
- Delete the PostgreSQL cluster from the Apps section.
- Uninstall the ingress-nginx add-on to deprovision the Hetzner Load Balancer.
- Delete the cluster from the Settings section.
- Make sure all resources were deleted from your Hetzner Cloud account, including volumes, networks, etc.
Conclusion
In this tutorial, we walked through the process of deploying a Kubernetes cluster on Hetzner Cloud and transforming it into your own Platform-as-a-Service, ready to run your applications.
Next Steps
- Edka provides more capabilities, including GitOps deployments, various apps and add-ons easy to deploy and manage.
- Check out the Edka website for more information.
