Introduction
This tutorial guides you though the setup of a high-availability Kubernetes cluster with kubeadm.
We will create 4 cloud servers (3 control planes and 1 dedicated worker node). Furthermore we will use a Hetzner Cloud Load Balancer for the cluster API.
Prerequisites
- Hetzner Cloud account
- Basic knowledge of the core concepts of Kubernetes
Step 1 - Creation of Cloud Resources
First, we will set up the servers and the Load Balancer in the Hetzner Cloud Console.
-
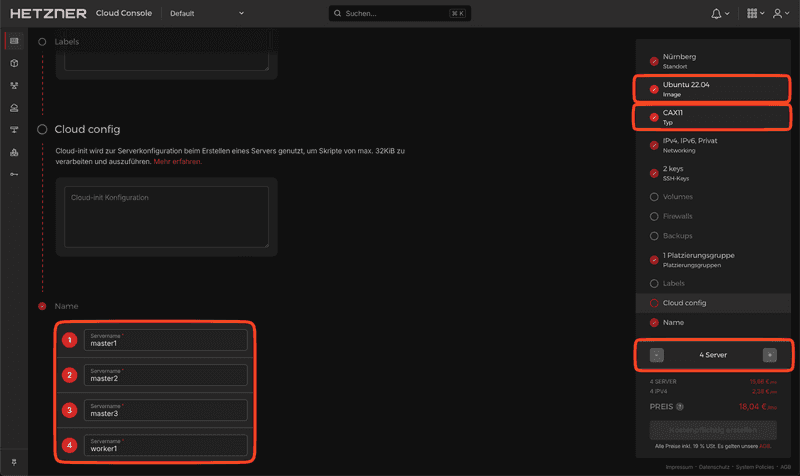
Create the servers
We will use Ubuntu as our base OS and the CAX11 as the host type to meet the minimum requirements for Kubernetes (2 CPUs and 2GB RAM for the master nodes). If you depend on AMD64 architecture, you can also use those or mix and match them as you like.
Please ensure you give your nodes unique names. To maximize availability, feel free to add the servers to the same Placement Group.
-
Create the Load Balancer
-
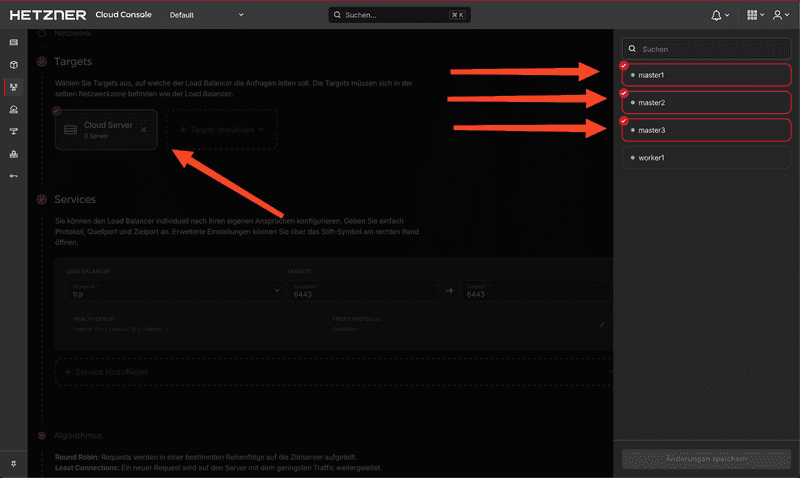
Targets
We specify that the Load Balancer will use our three control plane nodes as targets.
-
Service
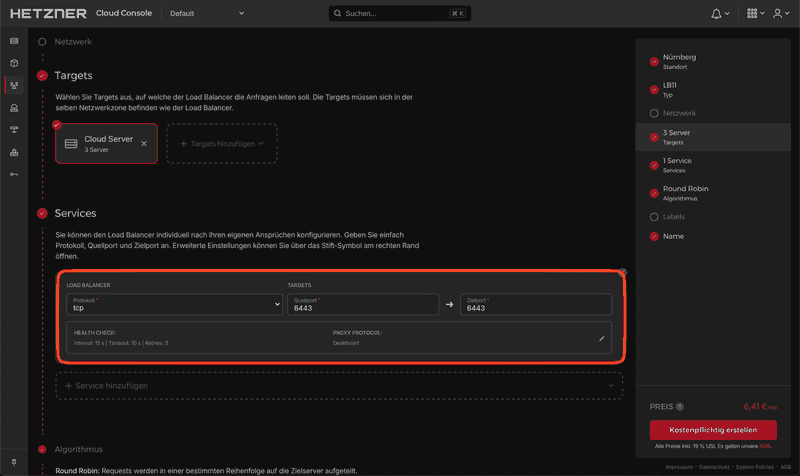
Use the following settings:
Protocol: TCP
Port: 6443 ➔ 6443The server will listen on port
6443for, e.g., new nodes. Thanks to the built-in health checks of the Load Balancer, we can be sure that the traffic will be forwarded to a ready server. This is especially useful when adding the remaining servers to the cluster later.
-
Step 2 - Host preparation
Now, we will connect to the first node via SSH and go through the setup line by line. This process will be the same for every master and worker node. You are welcome to use the provided script in Step 2.5 for the rest of the nodes.
Step 2.1 - Load modules
In this step, we are loading two necessary kernel modules for Kubernetes: overlay and br_netfilter.
cat <<EOF | sudo tee /etc/modules-load.d/k8s.conf
overlay
br_netfilter
EOF

modprobe overlay
modprobe br_netfilter
By adding these modules to
/etc/modules-load.d/k8s.conf, we make sure that they are loaded at system startup. Themodprobecommands load the modules immediately without requiring a reboot.
Step 2.2 - Setup networking
Following, we are setting up the networking for Kubernetes by creating a configuration file under /etc/sysctl.d . Finally, we apply these settings with the command sysctl --system.
cat <<EOF | sudo tee /etc/sysctl.d/k8s.conf
net.bridge.bridge-nf-call-iptables  = 1
net.bridge.bridge-nf-call-ip6tables = 1
net.ipv4.ip_forward                 = 1
EOF

sysctl --system
These settings ensure that packet forwarding at the operating system level is enabled. They allow our network plugin to use iptables to route network traffic to and from Pods. IP forwarding allows an operating system to receive packets intended for other hosts and forward them to these.
Step 2.3 - Container runtime
In this step, we are installing Docker as our container runtime for Kubernetes in order to run containers:
apt-get update && apt-get install -y docker.ioNext, we are configuring containerd, to manage container lifecycles. We create a new directory for its configuration files, generate a default configuration file, and modify it to use systemd for cgroup management:
mkdir /etc/containerd
containerd config default > /etc/containerd/config.toml
sed -i 's/ SystemdCgroup = false/ SystemdCgroup = true/' /etc/containerd/config.toml
The
SystemdCgroup = truesetting ensures that containerd and Kubernetes use the same cgroup manager.
Finally, we restart containerd to apply the changes:
systemctl restart containerdStep 2.4 - Installation of kublet, kubectl and kubeadm
In this step, we are installing three key components of a Kubernetes cluster: kubelet, kubectl, and kubeadm.
-
kubelettakes a set of PodSpecs and ensures that the containers described in them are running and healthy. -
kubectlis a command line interface for running commands against Kubernetes clusters. -
kubeadmis a tool built for creating Kubernetes clusters.
We follow the official instructions:
apt-get update
apt-get install -y apt-transport-https ca-certificates curl gpg
mkdir -p -m 755 /etc/apt/keyrings
curl -fsSL https://pkgs.k8s.io/core:/stable:/v1.29/deb/Release.key | gpg --dearmor -o /etc/apt/keyrings/kubernetes-apt-keyring.gpg

echo 'deb [signed-by=/etc/apt/keyrings/kubernetes-apt-keyring.gpg] https://pkgs.k8s.io/core:/stable:/v1.29/deb/ /' | tee /etc/apt/sources.list.d/kubernetes.list

apt-get update
apt-get install -y kubelet kubeadm kubectl
apt-mark hold kubelet kubeadm kubectl
The
apt-mark hold kubelet kubeadm kubectlcommand is used to prevent the packages from being automatically updated, which could potentially disrupt the cluster.
Finally, we enable the kubelet service to start on boot:
systemctl enable --now kubeletStep 2.5 - Configuration of remaining nodes
You can use the following script to configure the rest of the nodes, as the setup process is identical. Simply save the script in a new file (e.g. setup.sh), give the file execution permissions (chmod +x setup.sh), and run the script (./setup.sh).
cat <<EOF | sudo tee /etc/modules-load.d/kubernetes.conf
overlay
br_netfilter
EOF

modprobe overlay
modprobe br_netfilter


cat <<EOF | sudo tee /etc/sysctl.d/kubernetes.conf
net.bridge.bridge-nf-call-ip6tables = 1
net.bridge.bridge-nf-call-iptables = 1
net.ipv4.ip_forward = 1
EOF

sysctl --system


apt-get update && apt-get install -y docker.io
mkdir /etc/containerd
containerd config default > /etc/containerd/config.toml
sed -i 's/ SystemdCgroup = false/ SystemdCgroup = true/' /etc/containerd/config.toml
systemctl restart containerd


apt-get update
apt-get install -y apt-transport-https ca-certificates curl gpg
mkdir -p -m 755 /etc/apt/keyrings
curl -fsSL https://pkgs.k8s.io/core:/stable:/v1.29/deb/Release.key | gpg --dearmor -o /etc/apt/keyrings/kubernetes-apt-keyring.gpg

echo 'deb [signed-by=/etc/apt/keyrings/kubernetes-apt-keyring.gpg] https://pkgs.k8s.io/core:/stable:/v1.29/deb/ /' | tee /etc/apt/sources.list.d/kubernetes.list

apt-get update
apt-get install -y kubelet kubeadm kubectl
apt-mark hold kubelet kubeadm kubectl
systemctl enable --now kubelet
Step 3 - Kubernetes installation
We return to one of the master nodes and log in via SSH to start our cluster. For simplicity, we'll use the CIDR from the example Calico files.
Calico is the network plugin we will be installing later. It uses the subnet
192.168.0.0/16
The following command initializes the first control plane
kubeadm init --upload-certs \
  --pod-network-cidr=192.168.0.0/16 \
  --control-plane-endpoint=<ip_of_load_balancer>:6443
Now we have to copy the kubectl config to the right place:
mkdir -p $HOME/.kube
cp -i /etc/kubernetes/admin.conf $HOME/.kube/config
chown $(id -u):$(id -g) $HOME/.kube/config
Step 4 - Install pod network add-on
We are going to use Calico as outlined in their documentation. To do this, log into one of the master nodes via SSH and apply the example files.
kubectl create -f https://raw.githubusercontent.com/projectcalico/calico/v3.27.3/manifests/tigera-operator.yaml
kubectl create -f https://raw.githubusercontent.com/projectcalico/calico/v3.27.3/manifests/custom-resources.yaml
Step 5 - Join the remaining nodes
As we move forward, we need the join token from the output of the initialization step or you can generate a new join token by running the following command on the master node:
kubeadm token create --print-join-command
kubeadm init phase upload-certs --upload-certs
The output will look something like this:
root@master1:~# kubeadm token create --print-join-command
kubeadm join <ip_of_load_balancer>:6443 --token cv4j9u.n3pc3qafv9tiba2l --discovery-token-ca-cert-hash sha256:4b256ee04455a8265ee6ef9597fcecc483dafec8c07fcff04dd10ee98c64164b

root@master1:~# kubeadm init phase upload-certs --upload-certs
[upload-certs] Storing the certificates in Secret "kubeadm-certs" in the "kube-system" Namespace
[upload-certs] Using certificate key:
a18bca2c94281986f070342c3400c81660cf36dfe8bc48383d43a32ae69deb7d
Step 5.1 - Join the two master nodes
Now we copy the join command and add the flag --control-plane with the --certificate-key to the nodes we want to use as master nodes.
kubeadm join <ip_of_load_balancer>:6443 --token cv4j9u.n3pc3qafv9tiba2l \
--discovery-token-ca-cert-hash sha256:4b256ee04455a8265ee6ef9597fcecc483dafec8c07fcff04dd10ee98c64164b \
--control-plane --certificate-key a18bca2c94281986f070342c3400c81660cf36dfe8bc48383d43a32ae69deb7d
Step 5.2 - Join the worker node(s)
The process is the same here, but WITHOUT the --control-plane flag.
kubeadm join <ip_of_load_balancer>:6443 --token cv4j9u.n3pc3qafv9tiba2l \
--discovery-token-ca-cert-hash sha256:4b256ee04455a8265ee6ef9597fcecc483dafec8c07fcff04dd10ee98c64164b
Conclusion
At this point, you should have a functioning Kubernetes cluster running in the cloud.
root@master1:~# kubectl get nodes
NAME      STATUS   ROLES           AGE     VERSION
master1   Ready    control-plane   5m13s   v1.29.3
master2   Ready    control-plane   81s     v1.29.3
master3   Ready    control-plane   70s     v1.29.3
worker1   Ready    <none>          28s     v1.29.3

