Introduction
Joomla is a powerful and versatile Content Management System (CMS).
It is ideal for creating websites, blogs, online portals, or intranets – all without deep programming knowledge.
More information: https://www.joomla.org
Step 1 - Download Joomla
You can get Joomla onto your webspace in two ways:
-
Option 1 – Via SSH connection
For this option, at least Webhosting L is required.
-
Download ZIP file
After establishing an SSH connection, the ZIP file can be downloaded directly into the public_html folder.joomlagg@<wwwXXX>:~/public_html$ wget https://downloads.joomla.org/de/latest -
Unzip ZIP file
Once the Joomla_-Full_Package.zip file has been downloaded, you can unzip it. joomlagg@<wwwXXX>:~/public_html$ unzip Joomla_<version>_Stable-Full_Package.zip -
After extraction, all Joomla files should be located in the public_html folder.
-
-
Option 2 – Via FTP
- Download the ZIP file to your PC
- Visit: https://downloads.joomla.org/de/latest
- Choose the appropriate package and click "Download Now"
- Unzip the file
- On Windows: Right-click → "Extract All"
- On Linux/macOS: Unzip via file manager or terminal
- Upload files
- Transfer the content of the extracted folder via FTP (e.g., with FileZilla) into the public_html directory on your server.
- Download the ZIP file to your PC

Step 2 - Install Joomla in the browser
-
Open your subdomain, for example:
https://joomla.example.com -
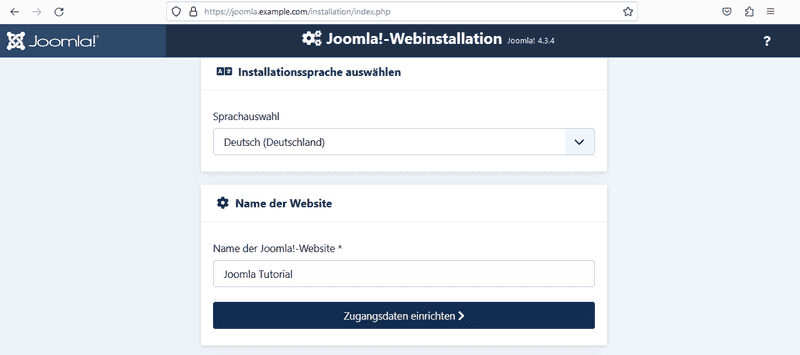
Choose installation language & name your website
-
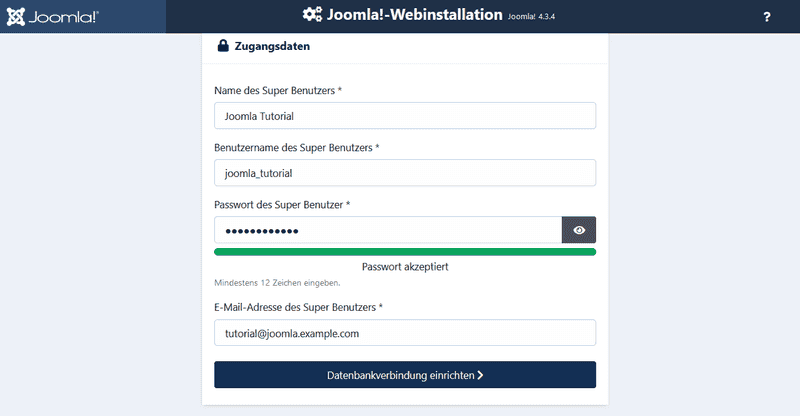
Set up access credentials
-
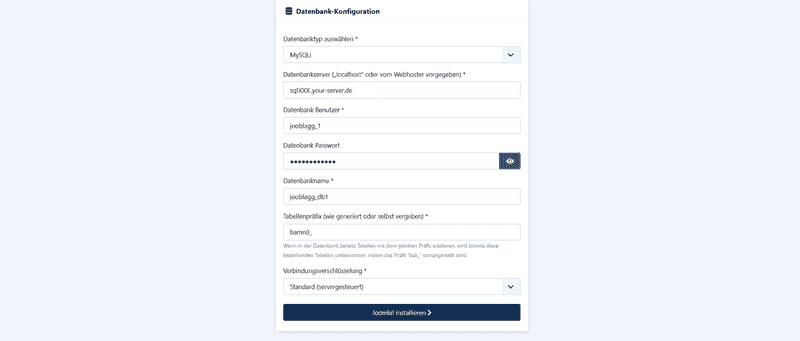
Configure database connection
- Enter your MySQL database connection details
-
Authorize installation
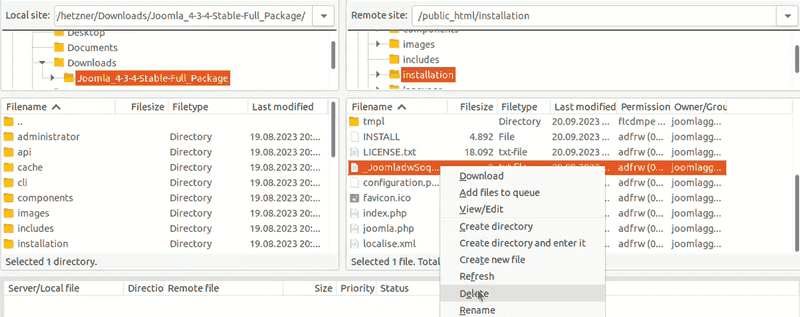
For security reasons, Joomla requires you to delete a specific file from the
installation/folder. The file has a random name such asremove_me_abc123.txt.You have two options:
- Option 1 - Via SSH:
joomlagg@<wwwXXX>:~/public_html$ cd installation/
joomlagg@<wwwXXX>:~/public_html/installation$ rm <file-name>.txt
- Option 1 - Via SSH:
Step 3 - Complete installation
- Once the file has been deleted, click on “Install Joomla!”
- Finally, you will see the message:
Congratulations – Joomla has been successfully installed!
Conclusion
Once you have completed the steps described above, Joomla will be successfully installed on the Hetzner web hosting environment and ready to use. The basic server configuration, database connection, and Joomla installation have been completed, meaning that the system can now be accessed and administered via your browser.
Next, you can do the following, for example:
- Access backend (administrator area) – manage your website here
- Frontend (public website) – how visitors see your site
- Extend functionality – add extra features to your site
- Manage designs (templates) – choose a design for your site


