Introduction
This tutorial shows how to setup a generic NAT gateway for Cloud Servers via private Cloud Networks. It explains how to create the Network and Cloud Servers, how to setup the routing, and how to achieve a persistent configuration.
By the end of this tutorial, you will be able to access the public network from your private-network-only server (client server) by routing traffic via a server with a public IP address (NAT server). Both servers have to be in the same private Cloud Network.
If you are specifically interested in using pfSense, you can use this tutorial.
Prerequisites
-
This tutorial is written for:
- Ubuntu 18.04, 20.04, 22.04, and 24.04
- Debian 10, 11, 12 and 13
On Debian 12, please install
systemd-resolvedbefore you follow this tutorial. - CentOS 7
- CentOS Stream 8, 9 and 10
- Fedora 36, 37, 41 and 42
- Rocky Linux 8, 9 and 10
Example terminology
- Network:
10.0.0.0/16 - Gateway:
10.0.0.1 - NAT server:
10.0.0.2
Please replace 10.0.0.0/16 with your own network, 10.0.0.1 with your own network gateway IP, and 10.0.0.2 with the private IP of your own NAT server in all example commands.
Step 1 - Creating the Network and servers
Open the Hetzner Console and select your project.
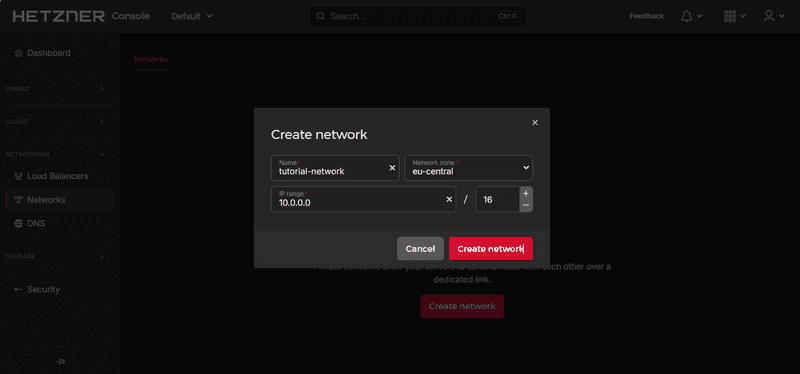
You can create your Network first or, alternatively, together with your servers at server creation.
-
Create the servers
In your project, select:
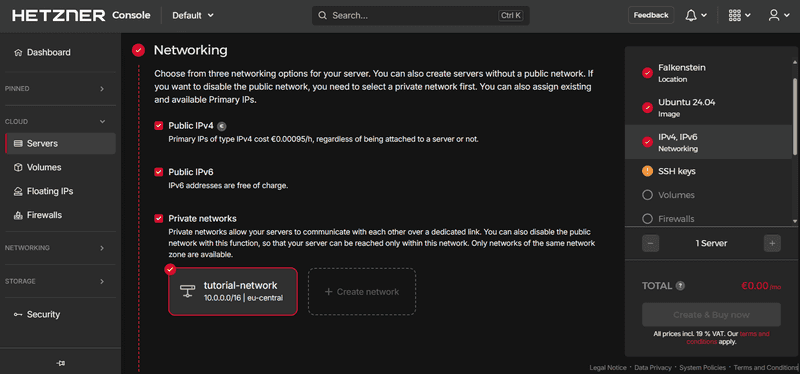
Servers>Add ServerYou need at least two servers. The NAT server needs an IPv4 address, the other servers don't.
Under
Networking, you have to select the network you just created.If you don't want to setup the routes manually as explained in the steps below, you can use cloud-init as explained in "Step 6 - Cloud-init" instead.
Step 2 - Adding the route to the Network
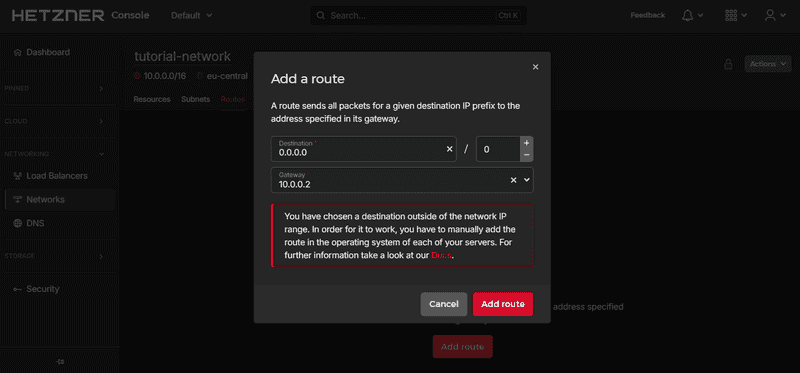
In order for our setup to work properly, we need to add the following route to the Network:
Destination: 0.0.0.0/0
Gateway: 10.0.0.2
The gateway should be the IP address of the NAT server on which you configure masquerading.
Step 3 - Configuring NAT
To configure the NAT server, we will use the following commands:
-
Enable IP forwarding, since it is disabled by default
echo 1 > /proc/sys/net/ipv4/ip_forward -
Add a rule to the 'nat' table
iptables -t nat -A POSTROUTING -s '10.0.0.0/16' -o eth0 -j MASQUERADELet's look at the second command in more detail:
iptables➜ the program we are using-t nat➜ choose the table 'nat'-A POSTROUTING➜ add a rule to postrouting-s '10.0.0.0/16'➜ target packets from the source '10.0.0.0/16'-o eth0➜ output at 'eth0'-j MASQUERADE➜ masquerade the packages with the 'routers' IP
To configure the client servers, we only need to add a default route.
To avoid issues with the DHCP client, make sure
hc-utilsis disabled or deinstalled as explained here.
-
For example, like this:
ip route add default via 10.0.0.1Click here, if you get RTNETLINK answers: File exists
If you get the error
RTNETLINK answers: File exists, run this command to check if you already have a default route:ip routeExample output:
default via 172.31.1.1 dev eth0
10.0.0.0/16 via 10.0.0.1 dev enp7s0
10.0.0.1 dev enp7s0 scope link
172.31.1.1 dev eth0 scope link
You can remove the existing default route with this command:
ip route del defaultAfter it was removed, you can try adding the new route again:
ip route add default via 10.0.0.1
Step 4 - Achieving a persistent configuration
The example commands below for Debian and Ubuntu use vim, which can be installed using: apt install vim
The next steps depend on the OS of your server:
Debian 10 / 11 / 12 / 13, and Ubuntu 18.04
-
Update
First, the system needs to be updated:
apt update && apt upgrade -yUbuntu 22.04 additionally requires:
apt install ifupdown
-
On the NAT server
To make everything persistent, we open the following file:
vim /etc/network/interfacesTo enter the insert mode in
vim, pressiand append the following to the file:auto eth0 iface eth0 inet dhcp post-up echo 1 > /proc/sys/net/ipv4/ip_forward post-up iptables -t nat -A POSTROUTING -s '10.0.0.0/16' -o eth0 -j MASQUERADETo save the file, press
escto escape the insert mode, then type:xor:wqand hit ENTER.
-
On the client servers
To avoid issues with the DHCP client, make sure
hc-utilsis disabled or deinstalled as explained here.Since we also want the route to be persistent, we edit the following file:
vim /etc/network/interfacesAnd append:
Run
ifconfigto check the interface name and replaceenp7s0withens10if needed.auto enp7s0 iface enp7s0 inet dhcp post-up ip route add default via 10.0.0.1 dns-nameservers 8.8.8.8 1.1.1.1
Ubuntu 22.04 / 24.04
-
Update
First, the system needs to be updated:
apt update && apt upgrade -y
-
On the NAT server
To make everything persistent, we open the file in
/etc/netplan:vim /etc/netplan/50-cloud-init.yamlCheck the following information. If everything looks fine, press
escfollowed by:qand ENTER to close the file. To enter the insert mode invim, pressi.network: version: 2 ethernets: eth0: dhcp4: trueTo save the file, press
escto escape the insert mode, then type:xor:wqand hit ENTER.Now create a new file in
/etc/networkd-dispatcher/routable.d:vim /etc/networkd-dispatcher/routable.d/10-eth0-post-upTo enter the insert mode in
vim, pressiand add the following to the file:#!/bin/bash echo 1 > /proc/sys/net/ipv4/ip_forward iptables -t nat -A POSTROUTING -s '10.0.0.0/16' -o eth0 -j MASQUERADETo save the file, press
escto escape the insert mode, then type:xor:wqand hit ENTER.Now add execute permissions:
chmod +x /etc/networkd-dispatcher/routable.d/10-eth0-post-up
-
On the client servers
To avoid issues with the DHCP client, make sure
hc-utilsis disabled or deinstalled as explained here.Since we also want the route to be persistent, we edit the following file:
Run
ifconfigto check the interface name and replaceenp7s0withens10if needed.vim /etc/systemd/network/10-enp7s0.networkAnd add:
[Match]
Name=enp7s0

[Network]
DHCP=yes
Gateway=10.0.0.1
Ubuntu 20.04
-
Update
First, the system needs to be updated:
apt update && apt upgrade -yUbuntu 20.04 uses
netplaninstead of/etc/interfacesby default. To achieve persistent configuration, the networkd-dispatcher is being used.As mentioned in the netplan FAQ, the
networkd-dispatcherequivalent ofpost-upis placing a script in/etc/networkd-dispatcher/routable.d/. In this tutorial, we call the script50-masqbut the name doesn't matter.
-
On the NAT server
Create the file:
vim /etc/networkd-dispatcher/routable.d/50-masqTo enter the insert mode in
vim, pressiand append the following to the file:#!/bin/sh /bin/echo 1 > /proc/sys/net/ipv4/ip_forward /sbin/iptables -t nat -A POSTROUTING -s '10.0.0.0/16' -o eth0 -j MASQUERADETo save the file, press
escto escape the insert mode, then type:xor:wqand hit ENTER.The following command is required to make the script executable, otherwise it will not work:
chmod +x /etc/networkd-dispatcher/routable.d/50-masq
-
On the client servers
To avoid issues with the DHCP client, make sure
hc-utilsis disabled or deinstalled as explained here.Create the file:
vim /etc/networkd-dispatcher/routable.d/50-masqAnd append:
#!/bin/sh /sbin/ip route add default via 10.0.0.1Finally, make it executable:
chmod +x /etc/networkd-dispatcher/routable.d/50-masq
CentOS 7, CentOS Stream 8 / 9, Rocky Linux 8 / 9, Fedora 36 / 37
-
Update
First, the system needs to be updated:
yum update -y && yum upgrade -yWe use the
NetworkManager'sdispatcher.dto run our scripts automated on start. This is done by placing the script into the folder/etc/NetworkManager/dispatcher.d/. Here, the name determines the execution condition of the script. More information can be found here.In this tutorial we use the name
ifup-localwhereifupis the condition for the script to get executed.
-
On the NAT server
Fedora 36 / 37 additionally require:
yum install iptables -yCreate the file:
vi /etc/NetworkManager/dispatcher.d/ifup-localAnd append:
#!/bin/sh /bin/echo 1 > /proc/sys/net/ipv4/ip_forward /sbin/iptables -t nat -A POSTROUTING -s '10.0.0.0/16' -o eth0 -j MASQUERADEThe following command is required to make the script executable, otherwise it will not work:
chmod +x /etc/NetworkManager/dispatcher.d/ifup-local
-
On the client servers
To avoid issues with the DHCP client, make sure
hc-utilsis disabled or deinstalled as explained here.Create the file:
vi /etc/NetworkManager/dispatcher.d/ifup-localAnd append:
#!/bin/sh

/sbin/ip route add default via 10.0.0.1
Finally, make it executable:
chmod +x /etc/NetworkManager/dispatcher.d/ifup-local
Step 5 - Adding nameservers
To add nameservers on the client server, edit the file /etc/systemd/resolved.conf. In the section [Resolve], there should be the line #DNS=. Un-comment this line by removing the # and add some DNS servers or use the DNS servers by Hetzner:
[Resolve]
DNS=185.12.64.2 185.12.64.1
Save the file and restart the server.
Step 6 - Cloud-init
If you don't want to setup the routes manually, you can use cloud-init and add the scripts below in the cloud config text box when you create new servers in Hetzner Console.
Debian 11 / 12 / 13
-
NAT server
Replace
10.0.0.0/16as needed.#cloud-config write_files: - path: /etc/network/interfaces content: | auto eth0 iface eth0 inet dhcp post-up echo 1 > /proc/sys/net/ipv4/ip_forward post-up iptables -t nat -A POSTROUTING -s '10.0.0.0/16' -o eth0 -j MASQUERADE append: true runcmd: - reboot -
Client server
Replace
10.0.0.1as needed.Run
ifconfigto check the interface name and replaceenp7s0withens10if needed.#cloud-config write_files: - path: /etc/network/interfaces content: | auto enp7s0 iface enp7s0 inet dhcp post-up echo "Waiting..." post-up ip route add default via 10.0.0.1 dns-nameservers 8.8.8.8 1.1.1.1 append: true - path: /etc/systemd/resolved.conf content: | [Resolve] DNS=185.12.64.2 185.12.64.1 FallbackDNS=8.8.8.8 append: true runcmd: - apt remove -y hc-utils - reboot
Ubuntu 22.04 / 24.04
-
NAT server
Replace
10.0.0.0/16as needed.#cloud-config write_files: - path: /etc/networkd-dispatcher/routable.d/10-eth0-post-up content: | #!/bin/bash echo 1 > /proc/sys/net/ipv4/ip_forward iptables -t nat -A POSTROUTING -s '10.0.0.0/16' -o eth0 -j MASQUERADE permissions: '0755' runcmd: - reboot -
Client server
Replace
10.0.0.1as needed.Run
ifconfigto check the interface name and replaceenp7s0withens10if needed.#cloud-config write_files: - path: /etc/systemd/network/10-enp7s0.network content: | # Custom network configuration added by cloud-init [Match] Name=enp7s0 [Network] DHCP=yes Gateway=10.0.0.1 append: true - path: /etc/systemd/resolved.conf content: | [Resolve] DNS=185.12.64.2 185.12.64.1 FallbackDNS=8.8.8.8 append: true runcmd: - apt remove -y hc-utils - reboot
CentOS Stream 9 / 10, Rocky Linux 8 / 9 / 10, Fedora 41 / 42
-
NAT server
Replace
10.0.0.0/16as needed.#cloud-config packages: - iptables - iptables-services write_files: - path: /etc/NetworkManager/dispatcher.d/ifup-local content: | #!/bin/sh /bin/echo 1 > /proc/sys/net/ipv4/ip_forward /sbin/iptables -t nat -A POSTROUTING -s '10.0.0.0/16' -o eth0 -j MASQUERADE permissions: '0755' runcmd: - reboot -
Client server
Replace
10.0.0.1as needed.#cloud-config write_files: - path: /etc/NetworkManager/dispatcher.d/ifup-local content: | #!/bin/sh nm-online -q --timeout=30 if ! ip route show default | grep -q "via 10.0.0.1"; then /sbin/ip route add default via 10.0.0.1 fi permissions: '0755' - path: /etc/systemd/resolved.conf content: | [Resolve] DNS=185.12.64.2 185.12.64.1 FallbackDNS=8.8.8.8 append: true runcmd: - dnf remove -y hc-utils - reboot
After the servers are created, you can use iptables -t nat -L on the NAT server and ip route show on the client server to check if the rules were added as expected.
Next, add the route mentioned in step 2 to your private Network and you're done!
Conclusion
If you followed all these steps, you have successfully configured your system to behave as a NAT router in your private Cloud Network. If you have an active firewall on your NAT server, make sure to allow the necessary connections for traffic forwarding.
For example, using ufw on the NAT server, you can allow traffic that enters through the private interface enp7s0 and is forwarded via the public interface eth0 with the following command:
sudo ufw route allow in on enp7s0 out on eth0

