Introduction
CyberPanel is the next generation web hosting Control Panel developed by Usman Nasir. Lightweight, superfast OpenLiteSpeed as a web server with a help of the LScache WordPress plugin, your websites becomes superfast.
Features
- Secure (free SSL by Let's Encrypt).
- High Performance.
- Ready to go within 1 minute.
- Supports all major clouds.
- Easy to use Linux control panel for beginner.
Prerequisites
For installing CyberPanel, you will need a server with root access. CyberPanel needs very minimal system requirements for setup.
-
Fresh server with Ubuntu 20.04 / 22.04 (see "Requirements for Installation).
-
You must have root access or access to a user with sudo privileges.
-
CPU: 2 vCores
-
RAM: 2 GB
-
Space: 20 GB
-
MobaXterm SSH Client with SFTP browser for Windows user or you can use your favorite one. MobaXterm is an all-in-one SSH client with many more features.
Note: Later you can rescale your server both downgrade and upgrade depending on the websites traffic.
Example terminology
- Username:
root(any root privileges user). - Hostname:
cyberpanel.1337xda.me(you can set as you like). - Domain:
cyberpanel.1337xda.me(you can set as you like). - Cyberpanel Username:
admin.user(you can set as you like).
Step 1 - Configure DNS server of domain
-
Login to your domain provider dashboard
-
Change DNS to Hetzner DNS (see this guide)
You can see as below:
DNS propagation after changing DNS can take anywhere from several minutes up to 48-72 hours or longer to take effect. You can check with DNS propagation tool. After DNS is propagated successfully, proceed to step 2.
Step 2 - Create project and add server
- Login to Hetzner Console
- Create a project, enter a project name of your choice.
Step 2.1 - Add server
For a guide, see "Creating a Server".
- Choose a location
- OS images or apps (in this tutorial we use OS only with Ubuntu 22.04)
- Type Standard or Dedicated (in this tutorial we use Standard CX23 plan)
After creating the server, it will look like this:
Step 3 - Create DNS Zone
When you are done with creating a cloud server, you are ready to add relative DNS records to DNS in Hetzner Console.
-
In the left menubar in Hetzner Console, navigate to DNS
-
Add New Zone.
-
Enter your domain (in this tutorial I already setup proper DNS records for my domain).
-
Add A records for
@,wwwandmail. Copy your server IPv4 Address and paste in to A record and set TTL. TTL stands for "Time To Live" in seconds. (eg. TTL 3600 = 1 hours) -
You will see the zone records as below:
Step 4 - Connect server with SSH client
-
As we mention above in Prerequisites, we will connect to the server using the MobaXterm SSH Client.
-
Click Session and choose SSH.
-
Enter the server IPv4 address in "remote host".
-
Default Port 22
-
Click OK and you will see login as: in terminal
-
Username and password is in your email (send from Hetzner)
-
Enter the username. Copy the password from your email and paste it within the Moba terminal using the shortcut key SHIFT + Insert and enter.
-
Now you will see a message to change your password (first time login). change as you like.
-
Reboot the server
sudo reboot -
Reconnect to the server
Step 5 - Configure server and install CyberPanel
Set the hostname
hostnamectl set-hostname cyberpanel.1337xda.meTo check the hostname
hostnamectlÝou can see an output as below:
root@cyberpanel:~$ hostnamectl
 Static hostname: cyberpanel.1337xda.me
       Icon name: computer-vm
         Chassis: vm 🖴
      Machine ID: d806e973efd5435ba8ae41d1520e26e1
         Boot ID: ff17170201f5479a87ca0f30127a11a8
  Virtualization: kvm
Operating System: Ubuntu 22.04.5 LTS
          Kernel: Linux 5.4.0-117-generic
    Architecture: x86-64
Now, we will update our server using the below command.
sudo apt update && sudo apt -y upgradeInstall Wget and Curl
sudo apt -y install curl wgetServer update & upgrade steps are completed, and now we will start the CyberPanel installation.
Install the latest version of CyberPanel
To start the CyberPanel installation, run the following command as root:
sh <(curl https://cyberpanel.net/install.sh || wget -O - https://cyberpanel.net/install.sh)During the installation, CyberPanel will ask you a series of prompts as shown below.
Checking virtualization type...

Initialized...

                CyberPanel Installer v2.3.9

1. Install CyberPanel.

2. Exit.


  Please enter the number[1-2]:
Select 1 to start CyberPanel installation.
                CyberPanel Installer v2.3.9

RAM check : 163/3815MB (4.27%)

Disk check : 1/38GB (5%) (Minimal 10GB free space)

1. Install CyberPanel with OpenLiteSpeed.

2. Install Cyberpanel with LiteSpeed Enterprise.

3. Exit.


  Please enter the number[1-3]:
We will Select 1 again to install CyberPanel with OpenLiteSpeed (free version)
Install Full service for CyberPanel? This will include PowerDNS, Postfix and Pure-FTPd.

Full installation [Y/n]: y
Type Y for full installation.
Do you want to setup Remote MySQL? (This will skip installation of local MySQL)

(Default = No) Remote MySQL [y/N]: N

Local MySQL selected...

Press Enter key to continue with latest version or Enter specific version such as: 1.9.4 , 2.0.1 , 2.0.2 ...etc

Branch name set to v2.3.9

Please choose to use default admin password 1234567, randomly generate one (recommended) or specify the admin password?
Choose [d]fault, [r]andom or [s]et password: [d/r/s] r
For remote MySQL, type N for skip.
CyberPanel will request a password for admin account. We will select r for random password.
Now proceed with on screen instructions. The script will take care of the rest for you after you answer every question in the installation wizard. CyberPanel installation will take some time like 15-30 minutes because it requires a lot of packages to be compiled and installed. You can drink coffee or a cup of beer and wait for it to finish.
When the installation is done, you will see the output below:
###################################################################
                CyberPanel Successfully Installed

                Current Disk usage : 8/38GB (25%)

                Current RAM  usage : 398/3815MB (10.43%)

                Installation time  : 0 hrs 18 min 0 sec

                Visit: https://<your_ip>:8090
                Panel username: admin
                Panel password: <your_password>

             Run cyberpanel help to get FAQ info
             Run cyberpanel upgrade to upgrade it to latest version.
             Run cyberpanel utility to access some handy tools .

              Website : https://www.cyberpanel.net
              Forums  : https://forums.cyberpanel.net
              Wikipage: https://docs.cyberpanel.net
              Docs    : https://cyberpanel.net/docs/

            Enjoy your accelerated Internet by
                CyberPanel & OpenLiteSpeed
###################################################################
Copy the panel URL, username and password from the output and save as text file. Keep this information somewhere save in your hard drive.
Reboot the server to take effect, use this command:
rebootNow open the login panel via URL. You can use the server IP or domain (in this tutorial I will login via cyberpanel.1337xda.me instead of the server IP). You will see an SSL error, just skip and proceed to website.
As per the cyberpanel blacklist, you can't use a hostname to setup the website. So we will fix it. This method shows a temporary change of the hostname.
-
Login to the server
-
Set the hostname
hostnamectl set-hostname cyberpanel -
To check the hostname
hostnamectl -
Restart the litespeed server
systemctl restart lscpd
Now login to CyberPanel.
-
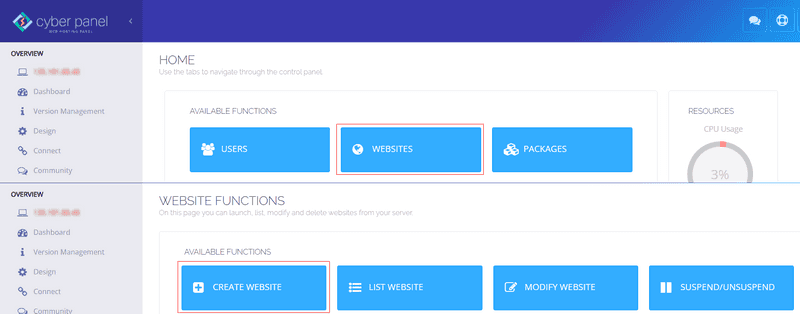
On home screen select "WEBSITES" » "+ CREATE WEBSITE"
Enter the following values:
Option Value Select Package Default Select Owner admin Domain Name (cyberpanel.1337xda.me) (replace with your domain) Email your@email Select PHP as you like Additional Features SSL (check box)
Output will be like below:
Now to issue SSL for hostname
-
On left side menu > Under MAIN section > SSL > Hostname SSL.
-
Select website : your website.
-
Issue SSL.
-
Now you can access CyberPanel at
https://<your_domain>:8090.
When you're done creating the website, we will change the hostname back to the original hostname.
-
Login to the server
-
Set the hostname
hostnamectl set-hostname cyberpanel.1337xda.me -
To check the hostname
hostnamectl -
Restart litespeed server
systemctl restart lscpd
Step 6 - Configure rewrite rules and install WordPress
On left side menu > Websites > List Websites.
Click "Manage" of your select website.
-
Under CONFIGURATIONS section > Rewrite Rules > Select Template >
Force HTTP -> HTTPS> Save Rewrite Rules. -
Under APPLICATION INSTALLER section > Select "WP + LSCache" > Fill your information > Install now.
It will automatically create a database .. so after WordPress is installed, we will find the database information.
-
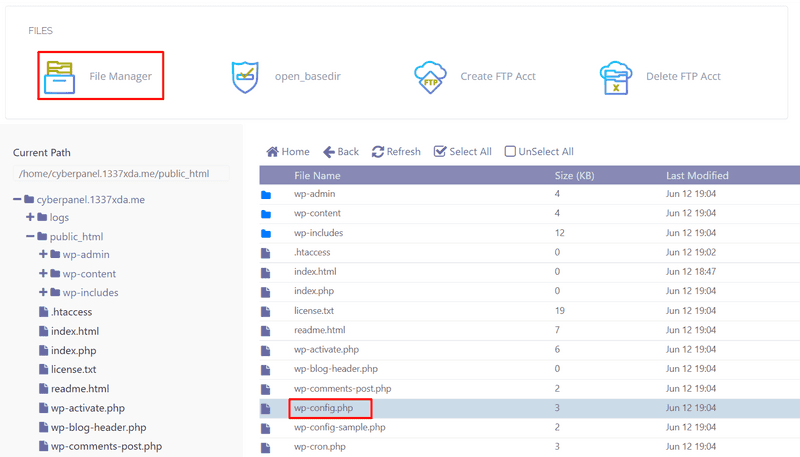
Under FILES section > open "File Manager" > Go to
public_html> selectwp-config.php> edit. You will see your database information. Copy and save it somewhere.
Step 7 - Configure PHP for upload_max_filesize & post_max_size
- Go to CyberPanel home.
- On left side menu > under SERVER section > PHP > Edit PHP configs.
- Select PHP version ( our WordPress install with PHP 8.3) so select PHP 8.3.
- Edit as you like.
- Save change
- Restart PHP.
Conclusion
Thank you for following my tutorial. While reading this, you should already be happy with your CyberPanel and WordPress installation on Ubuntu 20.04 / 22.04.
Now you can modify your WordPress site themes, plugins... etc. There are tons of great resources on the WordPress website.
The free version of CyberPanel includes a lot of features you might want to use. Just explore and learn it. Be happy with Linux Server.


