

Introduction
Disposable Kubernetes clusters are one of those problems everyone has and nobody fixes, mostly because waiting "only five minutes" never sounds that bad until you count how many times a day you do it. kind and k3d boot quickly, but they share your machine with everything else. A managed cloud cluster takes about ten minutes to create, and you pay for it as long as the control plane exists. So most teams end up back on one long-lived shared cluster, which is where the leftover namespaces and the "did someone touch staging?" messages come from.
There is a third option, and it is what this tutorial sets up: stop creating clusters on demand and start leasing them from a pool that is already warm. We provision one small Hetzner Cloud server (a CPX22, 2 vCPUs and 4 GB of RAM), run kobe on it, and from then on lease k3s clusters from that pool in a few seconds each.
kobe is an Apache-2.0 Kubernetes operator that manages fleets of ephemeral clusters. You declare a pool, the operator keeps a configured number of clusters pre-warmed, and clients lease one over an HTTP API and release it when finished. Released clusters are destroyed rather than reused, and the pool recycles fresh replacements in the background.
By the end of this tutorial you will have one server running the kobe operator alongside a pool of two pre-warmed k3s clusters, and a leased cluster with a workload deployed on it.
Prerequisites
-
A Hetzner Cloud project and an API token (Read & Write), exported as
HCLOUD_TOKEN. -
Installed on your local machine:
-
An Ed25519 SSH keypair at
~/.ssh/id_ed25519. The kobe operator rejects RSA keys. -
The
kobeCLI. Grab the prebuilt binary for your platform from the v0.37.0 release. For Linux (x86_64):curl -sSL https://github.com/kunobi-ninja/kobe/releases/download/v0.37.0/kobe-x86_64-unknown-linux-musl.tar.gz | tar xz sudo install kobe /usr/local/bin/ rm -rf kobe kobe --version(macOS and Windows builds are on the same release page.) Or build from source with
cargo install --path crates/kobectlif you prefer to use the Rust toolchain.
Step 1 - How it's put together
The kobe repository contains a Hetzner demo with two layers. An OpenTofu module provisions a k3s server (with only a single node) on Hetzner Cloud. This server has a Private Network and a Firewall to restrict SSH and the Kubernetes API to your own IP. The kobe operator is then installed with Helm, using the chart in that same repository, and two custom resources are applied on top: a ClusterPool that pre-warms two k3s clusters, and an AccessPolicy that authenticates the kobe API against your SSH public key. Then there's the demo script, ./demo, which you can think of as the conductor of the whole operation.
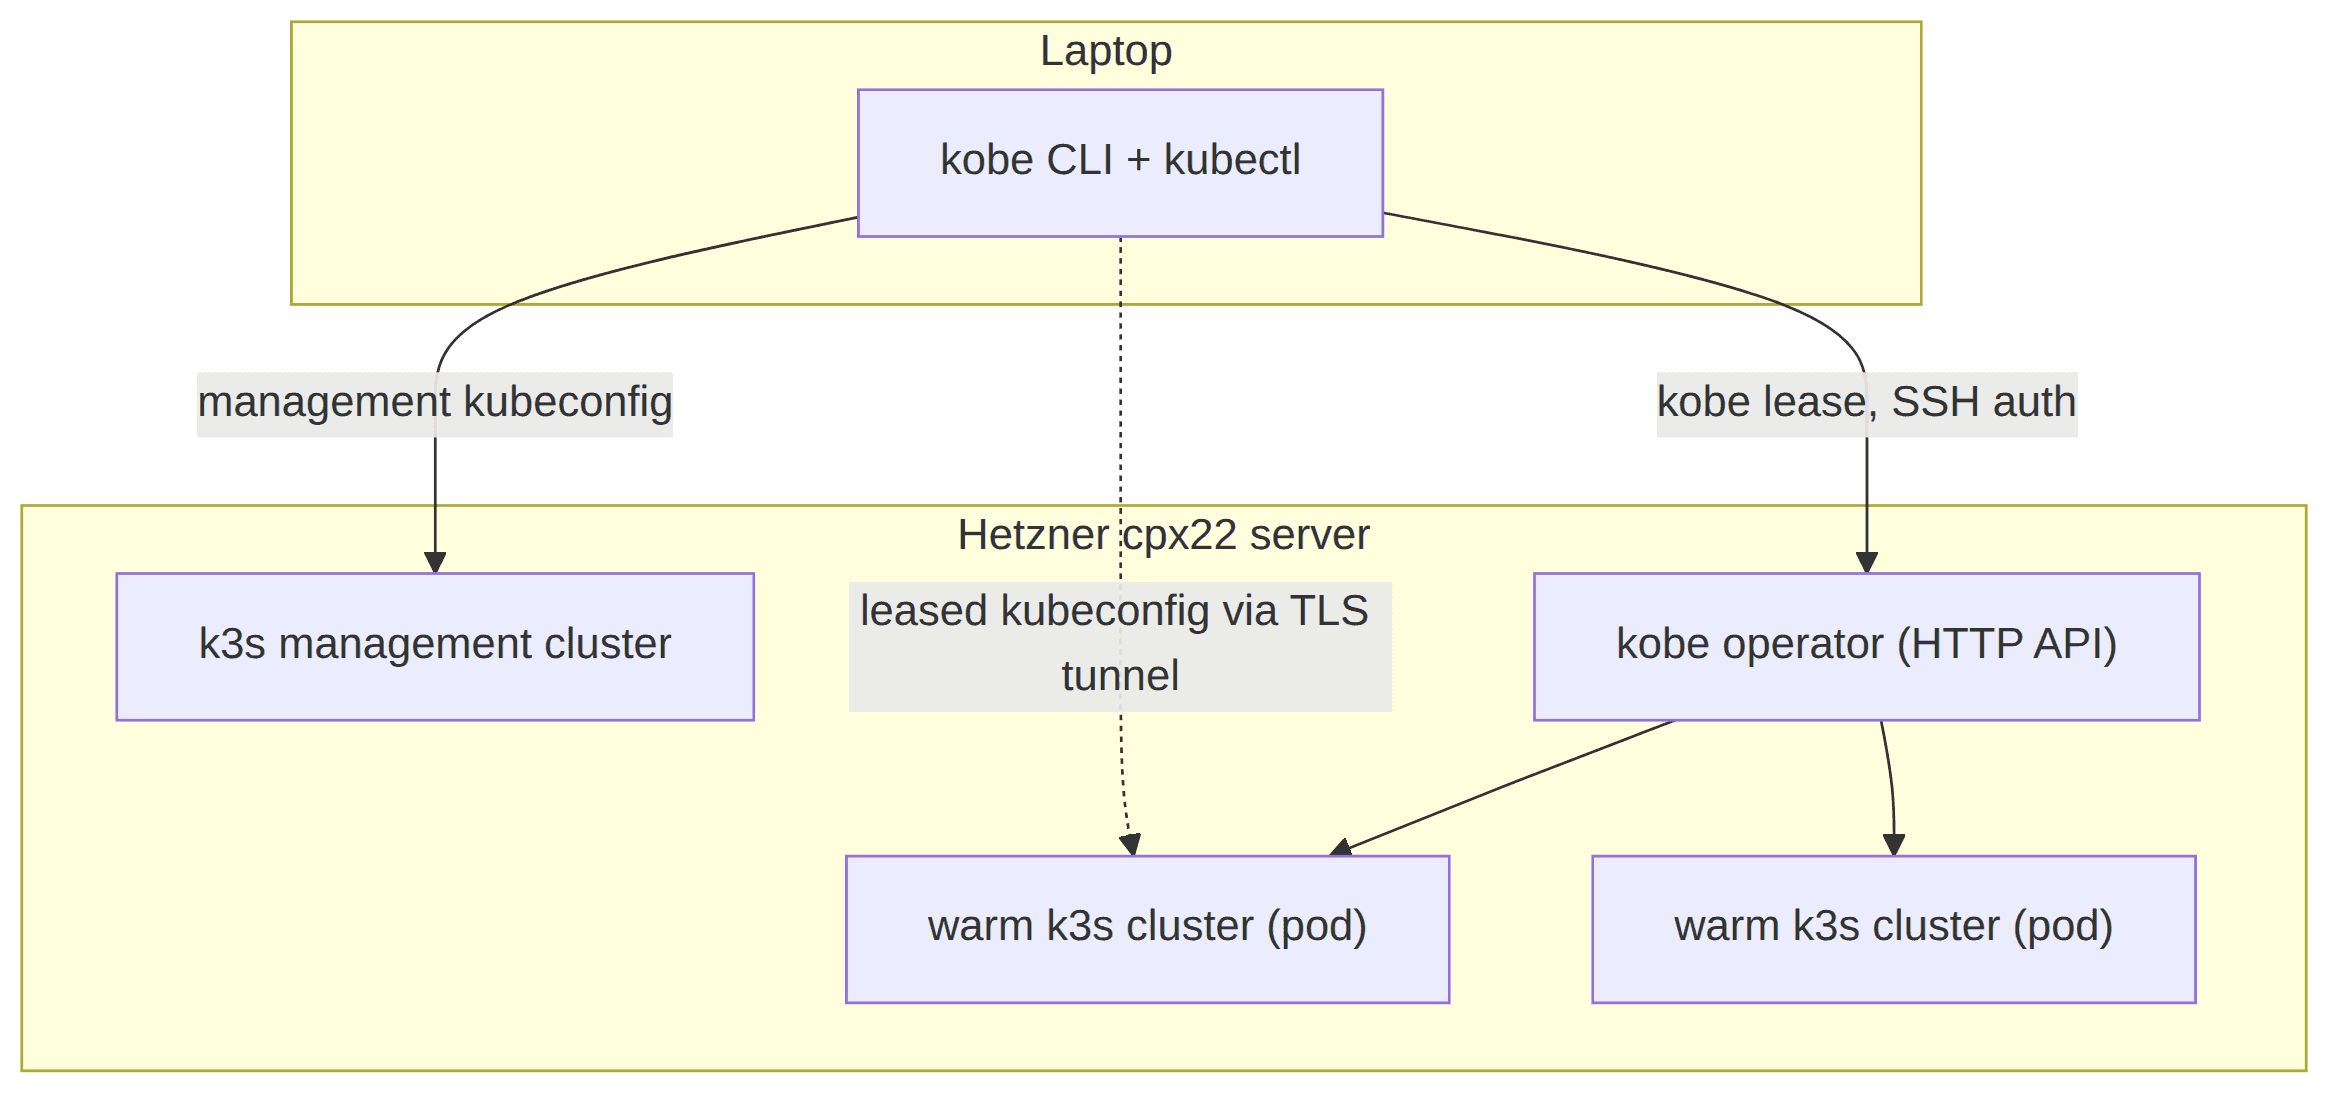
The "clusters" in the pool are pods on the management cluster. Each warm instance is a complete k3s control plane running in a container, with its own API server and its own state, and it is already running when a lease request arrives. Because the cluster is already up, binding it to a lease is only a matter of seconds.
Step 2 - Provision the management cluster
Clone the repo:
git clone https://github.com/kunobi-ninja/kobe
cd kobe/demo/hetzner
With the demo directory in place, provisioning is one command:
export HCLOUD_TOKEN=...   # from console.hetzner.cloud → Security → API Tokens
./demo tf up
This takes about 90 seconds: tofu init and apply create the server, the Private Network and the Firewall, cloud-init installs k3s v1.31.3, and the script fetches a kubeconfig to ~/.kube/hetzner-kobe-demo-config. When it finishes, point kubectl at that kubeconfig for a first look at the cluster: a single "Ready" node and nothing else.
Apply complete! Resources: 7 added, 0 changed, 0 destroyed.

Outputs:

agent_ips = []
join_token = "<redacted>"
kubeconfig_path = "/home/holu/.kube/hetzner-kobe-demo-config"
server_ip = "<10.0.0.1>"
ssh_command = "ssh root@<10.0.0.1>"

==> Outputs
$ /usr/bin/terraform -chdir=/home/holu/kobe/demo/hetzner/terraform output
agent_ips = []
join_token = "<redacted>"
kubeconfig_path = "/home/holu/.kube/hetzner-kobe-demo-config"
server_ip = "<10.0.0.1>"
ssh_command = "ssh root@<10.0.0.1>"
Done. Next:
  export HCLOUD_TOKEN=...                         # already set
  ./demo up                                       # helm install
  ./demo tunnel                                   # terminal B
export KUBECONFIG=~/.kube/hetzner-kobe-demo-config
kubectl get nodesThe kubeconfig uses insecure-skip-tls-verify: true because the k3s cert doesn't match the public IP. This is fine for a demo, since the Firewall only admits your IP. However, in case you want to keep it, you'll need to give it DNS and cert-manager for a proper certificate.
Step 3 - Install kobe
The operator is installed with Helm from the chart in the repository you cloned in Step 2, so it always matches your checkout. Then the pool and access policy are two manifests applied on top:
export KUBECONFIG=~/.kube/hetzner-kobe-demo-config

helm dependency build ../../charts/kobe
helm upgrade --install kobe-demo ../../charts/kobe \
  -f ../_shared/values.yaml --namespace kobe-system --create-namespace

kubectl apply -f ../_shared/manifests/kobe/clusterpool.yaml
SSH_PUBKEY="$(cat ~/.ssh/id_ed25519.pub)" \
  yq '.spec.auth.ssh.authorizedKeys[0] = strenv(SSH_PUBKEY)' \
  ../_shared/manifests/kobe/accesspolicy.yaml | kubectl apply -f -
These steps are run by ./demo up. The chart is also published to Docker Hub if you would rather install the operator on a cluster of your own, without cloning the repository:
helm install kobe-demo oci://registry-1.docker.io/zondax/kobe \
  --namespace kobe-system --create-namespace \
  --set replicas=1 --set operatorNamespace=kobe-system
You'll see you end up with a kobe-system namespace containing the operator, the demo-k3s-small ClusterPool (sized to keep two clusters warm with a ceiling of three), and the demo-ssh AccessPolicy with the public key. The operator deployment comes up first, then two pods appear, each a complete k3s cluster.
kubectl get ns kobe-system
kubectl get clusterpools -n kobe-system
kubectl get accesspolicies -n kobe-system

kubectl get all -n kobe-system
kobe's custom resources are plain Kubernetes objects. The ClusterPool reports how many instances are warm, and each ClusterInstance tracks one of the pods. ./demo status prints all of them.
./demo status

kubectl get clusterinstance -n kobe-system
kubectl get deployment -n kobe-system
kubectl get pods -n kobe-system
Step 4 - Lease a cluster
The kobe API speaks HTTP inside the cluster, so we first open a tunnel to it. This needs to stay running, so give it its own terminal and leave it alone:
./demo tunnelBesides the port-forward, the tunnel runs a small proxy that handles HTTPS on :8443, which is what lets kubectl reach leased clusters later. Then, back in the first terminal, we register the endpoint with the CLI and take a lease:
kobe config set demo --endpoint http://localhost:8080 --auth ssh
kobe config use demo
./demo lease
When you ask for a lease, the CLI signs the request with your Ed25519 key. kobe only accepts it if that key is listed in the AccessPolicy. The first time you connect, the CLI will ask whether you trust the endpoint. After that, a lease comes back (this happens rather quickly because the cluster is already warm). Moreover, you get a kubeconfig file that is already set up to reach the cluster through the tunnel at https://localhost:8443. By default, the lease is 30 minutes, and the cluster is freed automatically when that times out.
| Terminal 1 | Terminal 2 |
|
|
Point kubectl at that kubeconfig and you now have two clusters side by side: the management cluster on Hetzner, and a leased cluster that lives inside it. Over on the management side, the pool has already started replacing the instance we took, but on a CPX22 there is no room for a third k3s cluster, so the replacement stays Pending and the pool reports Backoff until the lease is released.
Step 5 - Deploy something
./demo deploy-ubuntuThis deploys a small Ubuntu pod into a demo-workloads namespace on the leased cluster. Open a shell inside it to confirm the cluster is real:
Replace
<leased-kubeconfig>with your actual path.
kubectl --kubeconfig <leased-kubeconfig> -n demo-workloads exec -it deploy/demo-ubuntu -- bashExample output:
holu@example:~/kobe/demo/hetzner$ ./demo deploy-ubuntu

==> Deploy Ubuntu pod into leased cluster (server-side apply via curl)
   Using leased kubeconfig: /home/holu/.kube/kobe-demo-k3s-small-533c10b1.yaml
   PATCH /api/v1/namespaces/demo-workloads  (Namespace /demo-workloads)
   PATCH /apis/apps/v1/namespaces/demo-workloads/deployments/demo-ubuntu  (Deployment demo-workloads/demo-ubuntu)
   Applied 2 document(s).
   Now point Kunobi at /home/holu/.kube/kobe-demo-k3s-small-533c10b1.yaml and exec into deploy/demo-ubuntu in 'demo-workloads'.

holu@example:~/kobe/demo/hetzner$ kubectl --kubeconfig /home/holu/.kube/kobe-demo-k3s-small-533c10b1.yaml -n
demo-workloads exec -it deploy/demo-ubuntu -- bash

root@demo-ubuntu-58bb7c8cfc-lnrwk:/# hostname && grep PRETTY /etc/os-release
demo-ubuntu-58bb7c8cfc-lnrwk
PRETTY_NAME="Ubuntu 24.04.4 LTS"
When we release the lease, this cluster will be destroyed, and the next lease will get a different, fresh instance. There is no cleanup step to run against the cluster itself.
Step 6 - Release and tear down
./demo release    # destroy the leased cluster; the pool re-warms
./demo down       # helm uninstall
./demo tf down    # destroy the Hetzner server
On release, the leased cluster's pod is deleted and the pool recycles a replacement in the background to get back to two. If you keep the management cluster around, the pool stays warm and you keep leasing from it whenever you need a cluster.
holu@example:~/kobe/demo/hetzner$ kubectl get clusterinstance -n kobe-system
NAME                    AGE
pool-demo-k3s-small-2   22m
pool-demo-k3s-small-3   15m
When you are done for good, run ./demo tf down. The Hetzner server keeps billing for as long as it exists, and uninstalling the chart doesn't remove it, so destroy the server too.
Conclusion
We've come to the end of the tutorial, and as you have seen, you can now get real Kubernetes clusters in seconds from a server you control. The pool will stay warm in the background, and every lease has an expiry, which means automatic cleanup.
Next steps:
- The kobe repository has the full reference, including a troubleshooting section for the known issues.
- Increase
pool.sizein the Helm values to keep more clusters warm, or point CI at the lease API.