Introduction
In today's fast-paced digital world, security and accessibility are two critical concerns for businesses and individuals alike. With the increasing number of cyber threats and the need for remote access to servers, it's essential to establish secure connections to your servers while maintaining ease of access. This tutorial will guide you through the process of connecting to a server over a private network using Cloudflare Access, a powerful tool that combines security and convenience.
Why Private Network Access?
An excerpt from /var/log/auth.log on my server exposed to the public Internet:
holu@<your_host>:~$ sudo grep -R "Failed password for root from" /var/log/auth.log | wc -l
24780
These failures are recorded within a few hours after I provisioned a VM. This means there are bad actors out there on the Internet trying to break into your network with a big list of random passwords. Most of them could have been leaked in previous data breaches.
Traditionally, server access relied on the public Internet, which poses security risks such as unauthorized access, data breaches, and distributed denial of service (DDoS) attacks. Private networks, on the other hand, provide a more secure environment by restricting access to authorized users only.
Differences compared to a traditional VPN
- Security: Cloudflare Access is a Zero Trust platform, which means that it only grants access to users who have been authenticated and authorized. This is different to a traditional VPN, which simply tunnels all traffic between the user and the corporate network, regardless of the user's identity or authorization. The same applies to the application you access over a private network as opposed to accessing various applications on a subnet with traditional VPN.
- Performance: Cloudflare Access is designed to be lightweight and have minimal impact on performance. This is because it does not require users to install any software or change their routing tables. In contrast, a traditional VPN can add latency and reduce bandwidth, especially for users who are connecting from a remote location.
- Scalability: Cloudflare Access is a cloud-based service, which means that it is scalable to meet the needs of any organization. This is in contrast to a traditional VPN, which may require the organization to purchase and manage its own hardware and software.
- Ease of use: Cloudflare Access is easy to set up and manage. It can be integrated with existing identity providers, such as Okta, Azure Active Directory and many others. In contrast, a traditional VPN can be more complex to set up and manage, especially for large organizations.
Here is a summary of the key differences between Cloudflare Access and a traditional VPN:
| Feature | Cloudflare Access | Traditional VPN |
|---|---|---|
| Security | Zero Trust | Tunnels all traffic |
| Performance | Minimal impact | Can add latency and reduce bandwidth |
| Scalability | Cloud-based | On-premises |
| Ease of use | Easy to set up and manage | Can be complex to set up and manage |
Prerequisites
Before we dive into the deployment process, make sure you have the following prerequisites in place:
-
Cloudflare account: You should have an account with Cloudflare. If you don't have one yet, you could create one here. Cloudflare offers many services as part of their free tier. Cloudflare Access is also one such offering.
-
Server: A server or Linux virtual machine.
-
WARP Client: You need to have a WARP client installed on your local machine. You can download the client for your operating system from the official Cloudflare portal here.
Example terminology
- Username:
holu - Email:
mail@example.com - Server
- Hostname:
<your_host> - IP address:
<10.0.0.2>
- Hostname:
Step 1 - Creating the Tunnel in Cloudflare dashboard
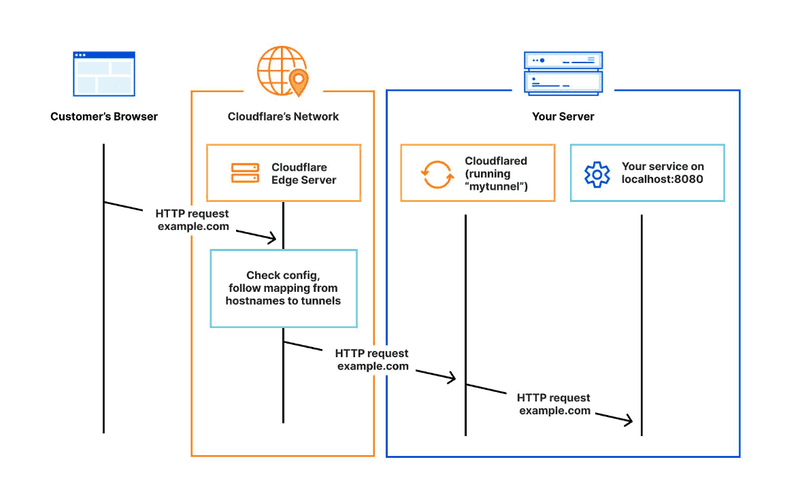
Cloudflare Tunnel provides you with a secure way to connect your resources to Cloudflare without a publicly routable IP address. With Tunnel, you do not send traffic to an external IP — instead, a lightweight daemon in your infrastructure (cloudflared) creates outbound-only connections to Cloudflare’s global network. Cloudflare Tunnel can connect HTTP web servers, SSH servers, remote desktops, and other protocols safely to Cloudflare. This way, your origins can serve traffic through Cloudflare without being vulnerable to attacks that bypass Cloudflare.
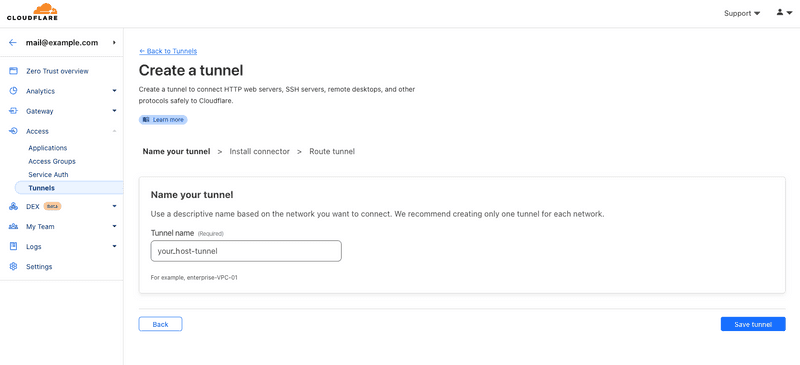
Step 1.1 - Create a tunnel
You can create a new tunnel with any name of your choice as shown below.
Step 1.2 - Choosing environment for cloudflared
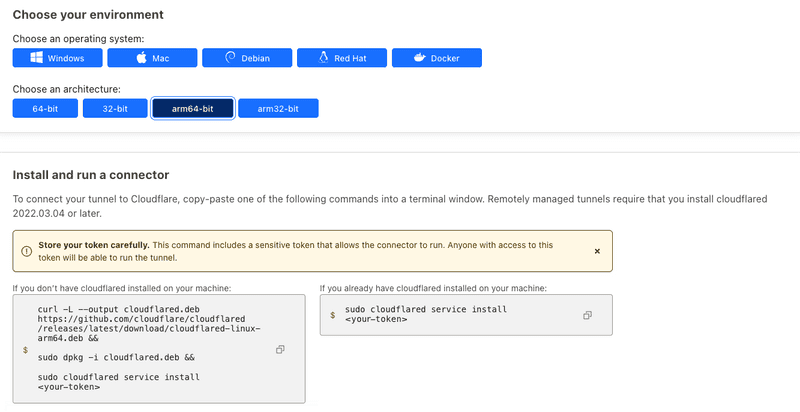
When you choose a name & hit Save, you will see few options of Choose your environment. Here you need to select an OS & the CPU architecture.
Based on these attributes, Cloudflare constructs the install commands accordingly which can be run directly on the target host. The screenshot below is an example for a server with Arm64 architecture and Debian as operating system.
Step 1.3 - Setting up Private Network
In the next phase, you will see other options such as Public Hostname & Private Network. As this demo is about accessing private services over the Internet via Cloudflare Access, we leave Public Hostname as is & focus more on Private Network. Here we need to input the CIDR of the private network where the VM is present. An example is shown below.
Step 2 - Installing & configuring cloudflared
Now that we have generated installation & configuration commands required for our host to connect to the Cloudflare Tunnel, we will start executing the commands generated in the step above.
Make sure the SSH support setting for your host is enabled if it's Linux.
Step 2.1 - Executing commands
Run the commands you just generated:
wget -O cloudflared.deb https://github.com/cloudflare/cloudflared/releases/latest/download/cloudflared-linux-amd64.deb
sudo dpkg -i cloudflared.deb
sudo cloudflared service install <your-token>
Note: In the screenshots and bash commands above, there is a token at the end of the command
sudo cloudflared service installindicated by the placeholder<your-token>. You must keep your token a secret.
Step 2.2 - Verifying the cloudflared service on target host
You could verify whether the cloudflared service is running by running the command systemctl status cloudflared.
holu@<your_host>:~$ systemctl status cloudflared
● cloudflared.service - cloudflared
     Loaded: loaded (/etc/systemd/system/cloudflared.service; enabled; vendor preset: enabled)
     Active: active (running) since Tue 2023-08-29 12:26:07 UTC; 3min 38s ago
   Main PID: 3223 (cloudflared)
      Tasks: 8 (limit: 4625)
     Memory: 27.9M
     CGroup: /system.slice/cloudflared.service
             └─3223 /usr/bin/cloudflared --no-autoupdate tunnel run --token <your-token>

Aug 29 12:26:07 <your_host> cloudflared[3223]: 2023-08-29T12:26:07Z INF ICMP proxy will use 10.48.138.201 as source for IPv4
Aug 29 12:26:07 <your_host> cloudflared[3223]: 2023-08-29T12:26:07Z INF ICMP proxy will use fe80::222:48ff:fe85:d275 in zone eth0 as source for IPv6
[...]
Step 2.3 - Check the agent health on Cloudflare dashboard
Now that the cloudflared daemon is running, we verify whether the agent is connected to the cloudflared edge network. It is shown in the same Tunnels tab.
If you have a firewall in the path filtering outbound traffic, you may need to whitelist cloudflared URLs over https protocol for the agent to establish communication with the Cloudflare edge network.
Step 3 - Setting up WARP client
The Cloudflare WARP client allows you to protect corporate devices by securely and privately sending traffic from those devices to Cloudflare’s global network, where Cloudflare Gateway can apply advanced web filtering. The WARP client also makes it possible to apply advanced Zero Trust policies that check for a device’s health before it connects to corporate applications.
In simple terms, it is analogous to a VPN client.
Step 3.1 - Install the client
As mentioned in the "Prerequisites" at the beginning of the tutorial, you can download & install the client for your operating system from the official Cloudflare portal here. In this demo I'm using MacOS.
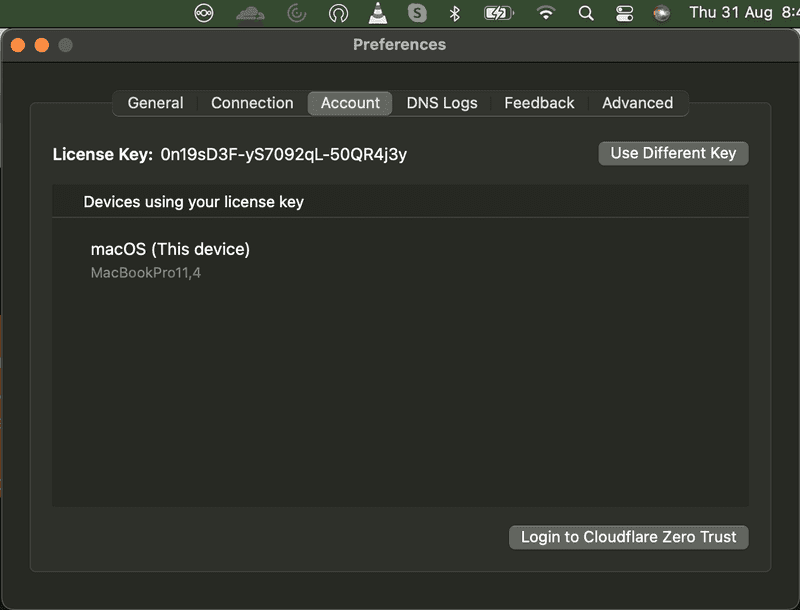
Step 3.2 - Login to your Cloudflare Zero Trust
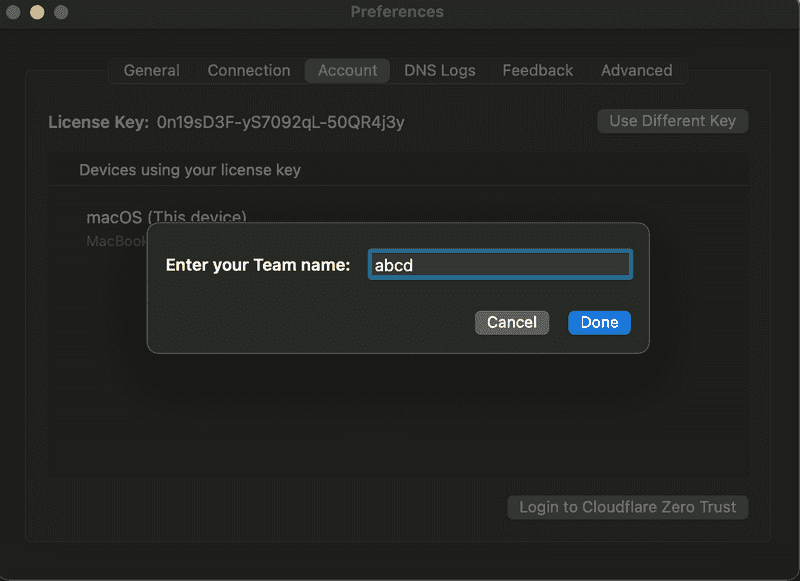
If you click on the WARP app & then another click on the Settings icon, you see Preferences. Once you click on Preferences, you see the Account tab. In there, you see the Login to Cloudflare Zero Trust button as shown in the screenshot below.
Step 3.3 - Authenticating with Cloudflare Access
When you click on the Login to Cloudflare Zero Trust button, a popup appears asking you to enter your Cloudflare team name. When you pass the team name you created on Cloudflare dashboard, you will be redirected to Cloudflare dashboard to challenge the authentication. If the authentication challenge is successful, your WARP client is connected to Cloudflare Edge & all is well.
Step 3.4 - Verifying the WARP device on Cloudflare dashboard
The moment WARP devices are connected to Cloudflare Edge, we see them on Cloudflare dashboard as shown below:
Step 3.5 - Connect to the target host over private IP
Now it's time to test our configuration! As part of this demo, we whitelisted the entire subnet, so we must be able to carry out lot of checks.
-
SSH: Test access via loginABC-MBP:Projects hello$ ssh holu@10.0.0.2 Welcome to Ubuntu 22.04.2 LTS (GNU/Linux 5.15.0-79-generic aarch64) ... Last login: Wed Aug 23 06:12:45 2023 from 10.0.0.2 holu@<your_host>:~$
-
ICMP: Test access with "ping"In the next phase, we use
pingas shown below:Hello-MBP:Projects hello$ ping 10.0.0.2 PING 10.0.0.2 (10.0.0.2): 56 data bytes 64 bytes from 10.0.0.2: icmp_seq=0 ttl=253 time=248.381 ms 64 bytes from 10.0.0.2: icmp_seq=1 ttl=253 time=30.464 ms 64 bytes from 10.0.0.2: icmp_seq=2 ttl=253 time=30.477 ms 64 bytes from 10.0.0.2: icmp_seq=3 ttl=253 time=29.127 ms ^C --- 10.0.0.2 ping statistics --- 4 packets transmitted, 4 packets received, 0.0% packet loss round-trip min/avg/max/stddev = 29.127/84.612/248.381/94.554 ms
-
HTTP: Test access with NGINXAnother test would be to install a webserver like NGINX & try to access it from the WARP client browser.
sudo apt update && sudo apt install nginx
sudo systemctl status nginx
We tested SSH, ICMP & HTTP protocols & all worked as expected. If you want to, you can test UDP protocols as well but it's not enabled by default. So you would need to enable it in the Cloudflare Access dashboard.
Step 3.6 - Additional checks (Optional)
In case one of the tests in Step 3.5 failed, you need to do below checks.
-
Check private network exclusion
Verify your private network is not excluded locally by
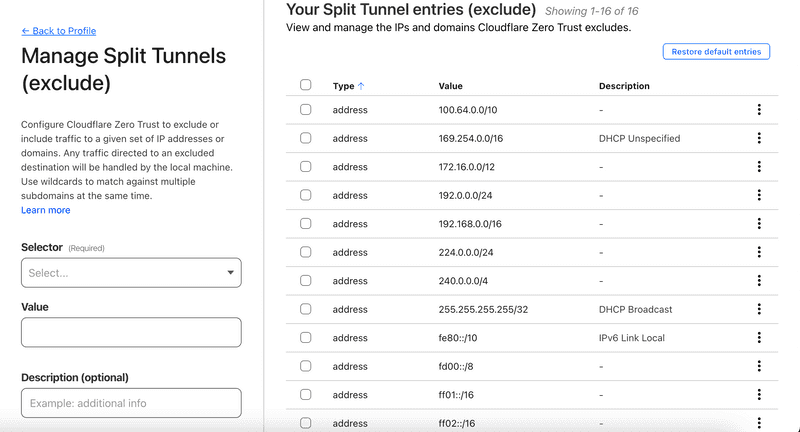
WARP. Certain private IP networks are locally excluded so that they don't interfere with your local home network. Nevertheless, you can override such networks & force them to go viaCloudflare Tunnel. In the screenshot below,192.168.0.0/16CIDR is excluded. The defaultWARPconfiguration overrides10.0.0.0/8CIDR too. If your private network falls in one of the above CIDRs, you might need to remove that exclusion.
-
Check protocol exclusion
Only TCP protocol is tunneled by default.
ICMP&UDPwill fail unless it's enabled on the portal as shown below.
The above checks aren't exhaustive but listed with an intention that it would help viewers from spending a lot of time investigating why tunneling isn't working as desired.
Step 4 - Tightening Hetzner Firewall rules
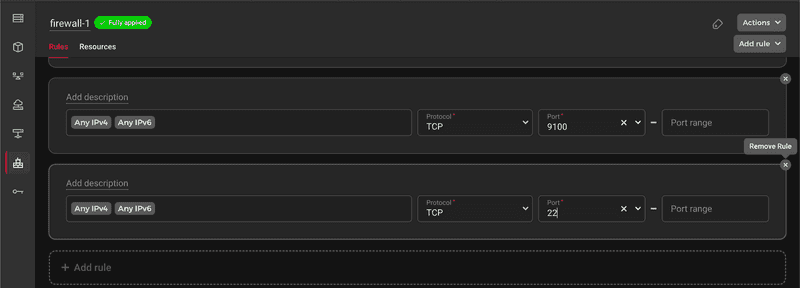
If you have a Hetzner Cloud server, you can add a Hetzner Firewall. Now that we have successfully connected to our server over private network, we can disable ports we don't need. In the screenshot below I disabled port SSH(22).
Conclusion
Securing your server with Cloudflare Access over a private network is a wise investment in your server's security and accessibility. By implementing a Zero Trust approach, you can ensure that only authorized users can access your server resources, all while benefiting from Cloudflare's performance and reliability. Give it a try and enjoy the peace of mind that comes with a robust security solution like Cloudflare Access.
