

Introduction
In this tutorial, we install and set up the DNS software "Blocky" on a Hetzner cloud server with Debian 13 (trixie). Afterwards, we expose Blocky's DNS-over-HTTPS endpoint (DoH) via Caddy and, finally, we create a WireGuard tunnel so that the DNS server can also be used while on the go.
If you are looking for a container-based alternative for ad-blocking at home, have a look at the Pi-hole tutorial by Miroslav Minárik.
Tested with these versions:
| Component | Version |
|---|---|
| Debian | 13.7 (trixie) |
| Blocky | v0.35.0 |
| Caddy | v2.11.7 |
| wireguard-tools | v1.0.20210914 |
Prerequisites
- An activated Hetzner account
- A server of at least type "CX23" with Debian 13 (trixie)
- A public IPv4 address
- Root access via SSH
- Optional, but recommended: A (sub)domain whose A and AAAA record point to the server IP.
Without a domain: Simply skip step 7 (Caddy). Blocky still runs and filters, but you can then only reach the DNS server through the WireGuard tunnel from step 8, DoH without a tunnel is not possible without a domain.
Example terminology
- Server IPv4:
<10.0.0.1> - Server IPv6:
<2001:db8:1234::1> - (Sub)domain:
<doh.example.com> - Mail for Let's Encrypt:
<mail@example.com> - WireGuard network:
10.66.0.0/24
Values in angle brackets like <10.0.0.1> are placeholders. Replace them with your real values, the brackets are removed.
Ports
| Port | Protocol | Purpose | Open externally? |
|---|---|---|---|
| 53 | UDP + TCP | DNS for your devices | no, reachable only through the WireGuard tunnel |
| 80 | TCP | Caddy: Let's Encrypt challenge and HTTP-to-HTTPS redirect | yes |
| 443 | TCP + UDP | Caddy: HTTPS/DoH (HTTP/2 and HTTP/3) | yes |
| 51820 | UDP | WireGuard | yes |
| 4000 | TCP | Blocky API and metrics | no, listens only on 127.0.0.1 |
Port 53 must never be reachable from the internet. How to set up the Firewall is explained in step 1.
Step 1 - Set up the Hetzner Cloud Firewall
A new Hetzner cloud server has no Firewall by default, so all ports are reachable from the internet. Since Blocky listens on port 53 on all interfaces, the server would become an open DNS resolver after step 6, which is abused for amplification attacks very quickly. Therefore, we create a Firewall first and only open the ports that are actually needed.
In the Hetzner Console, create a Firewall under "Firewalls" and add these inbound rules:
| Port | Protocol | Purpose |
|---|---|---|
| 22 | TCP | SSH |
| 80 | TCP | Caddy: Let's Encrypt challenge and HTTP-to-HTTPS redirect |
| 443 | TCP + UDP | Caddy: HTTPS/DoH (HTTP/2 and HTTP/3) |
| 51820 | UDP | WireGuard |
Port 53 stays closed. Devices reach Blocky either through the WireGuard tunnel or through the DoH endpoint on port 443. Leave the outbound rules at "allow all", so that the server can download the blocklists and obtain certificates.
Finally, apply the Firewall to your server. For port 22, restrict "Sources" to your own IP if possible.
Step 2 - Prepare the server
To keep everything up to date, we update the server and install a few more tools that we need:
sudo apt update -y && sudo apt upgrade -y && sudo apt install -y curl ca-certificates dnsutilsStep 3 - Install the Blocky binary
There is no official Debian package for Blocky, so we download the binary directly from the GitHub release. In the following code block, the CPU used (x86/ARM) is detected automatically and the correct binary is downloaded. In addition, it is checked whether the download is genuine and nothing is damaged.
cd /tmp
case "$(uname -m)" in
  x86_64)  BARCH="Linux_x86_64" ;;
  aarch64) BARCH="Linux_arm64" ;;
  *) echo "Unsupported architecture: $(uname -m)" ;;
esac
VER="v0.35.0"
curl -fsSL -O "https://github.com/0xERR0R/blocky/releases/download/${VER}/blocky_${VER}_${BARCH}.tar.gz"
curl -fsSL -O "https://github.com/0xERR0R/blocky/releases/download/${VER}/blocky_checksums.txt"
sha256sum -c --ignore-missing blocky_checksums.txt
tar -xzf "blocky_${VER}_${BARCH}.tar.gz"
sudo install -m 0755 blocky /usr/local/bin/blocky
blocky version
sha256sum -c must report OK, otherwise the download is broken! blocky version shows the version and the matching architecture at the end.
Blocky should not run as root, because this can pose a risk. Therefore, we create a system user along with the directories Blocky needs.
sudo useradd --system --no-create-home --shell /usr/sbin/nologin blocky
sudo mkdir -p /etc/blocky /var/cache/blocky/lists /var/log/blocky
sudo chown -R blocky:blocky /var/cache/blocky /var/log/blocky
Blocky needs the CAP_NET_BIND_SERVICE capability to bind port 53 as a non-root user. We do not set it with setcap, because the systemd unit uses NoNewPrivileges=true, which drops file capabilities on start. Instead, systemd grants the capability as an ambient capability, more on that in the next step.
Step 4 - Create the systemd unit with hardening
There is no ready-made unit package, so we have to write our own. Here is a template that can be inserted directly via command.
sudo tee /etc/systemd/system/blocky.service > /dev/null <<'EOF'
[Unit]
Description=Blocky DNS Server
Documentation=https://0xerr0r.github.io/blocky/
After=network-online.target
Wants=network-online.target

[Service]
Type=simple
User=blocky
Group=blocky
WorkingDirectory=/etc/blocky
ExecStart=/usr/local/bin/blocky --config /etc/blocky/config.yaml
Restart=on-failure
RestartSec=5s

NoNewPrivileges=true
CapabilityBoundingSet=CAP_NET_BIND_SERVICE
AmbientCapabilities=CAP_NET_BIND_SERVICE
ProtectSystem=strict
ProtectHome=true
PrivateTmp=true
PrivateDevices=true
ProtectKernelTunables=true
ProtectKernelModules=true
ProtectControlGroups=true
RestrictAddressFamilies=AF_INET AF_INET6 AF_NETLINK
RestrictNamespaces=true
LockPersonality=true
RestrictRealtime=true
SystemCallArchitectures=native
ReadWritePaths=/var/cache/blocky /var/log/blocky

[Install]
WantedBy=multi-user.target
EOF
Briefly about the most important lines:
| Description | |
|---|---|
User/Group=blocky |
No root. |
NoNewPrivileges=true |
The process can no longer gain additional privileges at runtime. This also drops file capabilities on start, which is why we do not use setcap and systemd grants NET_BIND_SERVICE as an ambient capability instead. |
ProtectSystem=strict |
The file system is mounted read-only, Blocky may only write to ReadWritePaths. |
ProtectHomePrivateTmpPrivateDevicesProtectKernel*ProtectControlGroups |
A common isolation for a network service that needs to touch neither the kernel nor home. |
RestrictAddressFamilies=AF_INET AF_INET6 AF_NETLINK |
Only IPv4, IPv6, and AF_NETLINK. |
Step 5 - Choose blocklists and write config.yaml
As upstreams, we use encrypted DNS-over-TLS (DoT) resolvers such as Cloudflare, Quad9, and Digitalcourage. Blocky queries two of them in parallel and takes the fastest answer.
For the blocklists, we stay with one provider: "HaGeZi". Five lists from five projects hardly help us, because they overlap heavily, and duplicate entries only cost RAM and traffic. "HaGeZi Pro" covers ads, trackers, malware, and scams, tif.medium adds fresh phishing and malware domains.
Nothing works without errors. For example, HaGeZi Pro blocks the domain p.typekit.net, the font CDN of Adobe Fonts, which is why the domain is in the allowlist, which takes precedence over the denylist.
As the block type, we use zeroIp: blocked domains then answer with 0.0.0.0. We do not use refused, because many clients then simply ask the next DNS server and thus bypass the filter.
sudo tee /etc/blocky/config.yaml > /dev/null <<'EOF'
# yaml-language-server: $schema=https://raw.githubusercontent.com/0xERR0R/blocky/main/docs/config.schema.json

upstreams:
  init:
    strategy: failOnError
  groups:
    default:
      - tcp-tls:1.1.1.1:853#cloudflare-dns.com
      - tcp-tls:9.9.9.9:853#dns.quad9.net
      - tcp-tls:5.9.164.112:853#dns3.digitalcourage.de
  strategy: parallel_best
  timeout: 3s

bootstrapDns:
  - https://1.1.1.1/dns-query

blocking:
  denylists:
    ads:
      - https://raw.githubusercontent.com/hagezi/dns-blocklists/main/wildcard/pro.txt
    security:
      - https://raw.githubusercontent.com/hagezi/dns-blocklists/main/wildcard/tif.medium.txt
  allowlists:
    ads:
      - |
        p.typekit.net
  clientGroupsBlock:
    default:
      - ads
      - security
  blockType: zeroIp
  blockTTL: 1m
  loading:
    refreshPeriod: 24h
    strategy: blocking
    concurrency: 4
    downloads:
      timeout: 60s
      attempts: 5
      cachePath: /var/cache/blocky/lists

caching:
  minTime: 5m
  maxTime: 30m

ports:
  dns: 53
  http: 127.0.0.1:4000
  dohPath: /dns-query

prometheus:
  enable: true

queryLog:
  type: sqlite
  target: /var/log/blocky/querylog.db
  logRetentionDays: 7

log:
  level: info
  format: text
EOF
blocky validate --config /etc/blocky/config.yaml
blocky validate must report Configuration is valid!
Here again is what the most important lines do:
blocking.denylists: our two groups,adsis HaGeZi Pro,securityis HaGeZi TIF medium.clientGroupsBlock.default: all clients get both groups. Without this mapping, the lists would not apply at all!loading.downloads.cachePath: lists are cached on disk. If GitHub is ever unreachable on start, Blocky uses the last version.ports.dns: 53listens on all interfaces (including the WireGuard interface later),ports.http: 127.0.0.1:4000binds the API, metrics, and DoH endpoint only locally, Caddy can still reach it because both run on the same host.queryLog.type: sqlite: writes every query to/var/log/blocky/querylog.db, so that you can later check what was blocked or allowed.
Step 6 - Start and test Blocky
Start Blocky and check the status:
sudo systemctl daemon-reload
sudo systemctl enable --now blocky
systemctl status blocky --no-pager
The status MUST show active (running). Blocky then loads the two lists on start, this can take a while (usually max. 1 min.). Check with this command whether they are really loaded.
curl -s http://127.0.0.1:4000/metrics | grep blocky_denylist_cache_entriesThe output shows how many entries are loaded per group (typically several hundred thousand). The exact numbers depend on the current state of the HaGeZi lists and change with every list update, so your values will differ. What matters is that both groups appear:
blocky_denylist_cache_entries{group="ads"} <number>
blocky_denylist_cache_entries{group="security"} <number>
Now the actual test, three queries in a row:
dig @127.0.0.1 example.com A +short
dig @127.0.0.1 googlesyndication.com A +short
dig @127.0.0.1 p.typekit.net A +short
example.com returns real IPs, googlesyndication.com returns 0.0.0.0 (the filter applies), p.typekit.net returns real IPs again (the allowlist applies). For p.typekit.net, the answer may additionally contain CNAME records.
Step 7 - Caddy as reverse proxy for DoH
Blocky can also provide DoH itself, but then you have to take care of your own certificate completely by yourself and then always renew it yourself as well. With Caddy, which we use, this task is done automatically. Blocky then stays restricted to 127.0.0.1:4000 and only Caddy talks to the outside.
Install Caddy and check the version:
sudo apt install -y debian-archive-keyring apt-transport-https gnupg
curl -1sLf 'https://dl.cloudsmith.io/public/caddy/stable/gpg.key' | sudo gpg --dearmor -o /usr/share/keyrings/caddy-stable-archive-keyring.gpg
curl -1sLf 'https://dl.cloudsmith.io/public/caddy/stable/debian.deb.txt' | sudo tee /etc/apt/sources.list.d/caddy-stable.list
sudo apt update
sudo apt install -y caddy
caddy version
caddy version shows the installed version (see the table at the top). Before continuing, the A and AAAA record of <doh.example.com> must point to the IPv4 and IPv6 address of your server! If you use Cloudflare as your DNS provider, the entry must be set to "DNS only" (grey cloud, not proxied), otherwise Caddy will not get a certificate. Check this briefly:
dig +short <doh.example.com> AIf nothing is returned, the record is not yet active and the test further below will fail. In that case, wait a few minutes and check again.
Now the Caddyfile, again via heredoc (completely overwrites the file, no manual deletion needed):
sudo tee /etc/caddy/Caddyfile > /dev/null <<'EOF'
{
	email <mail@example.com>
}

<doh.example.com> {
	reverse_proxy 127.0.0.1:4000 {
		header_up -Forwarded
	}
}
EOF
caddy validate --config /etc/caddy/Caddyfile
sudo systemctl restart caddy
systemctl status caddy --no-pager
In the upper block, you must set your contact mail for Let's Encrypt so that a free SSL certificate can be created for you.
Once you are done with that, we test with kdig (Knot DNS utils) whether DoH works.
sudo apt install -y knot-dnsutils
kdig @<doh.example.com> +https example.com A +short
kdig @<doh.example.com> +https googlesyndication.com A +short
The first query should return a real IP, the second one then 0.0.0.0 again. This proves that the DNS query runs encrypted via Caddy and Blocky filters it. Enter the same URL https://<doh.example.com>/dns-query in Firefox, Chrome, or directly in the DNS settings of Android and iOS. Keep in mind that anyone who knows this URL can use the endpoint as well, so it is effectively a public service.
Step 8 - Set up WireGuard
For on the go, we build a WireGuard tunnel so that you can always use the DNS. The kernel module is already included in the Debian kernel, the tool package is enough.
Install the tool package:
sudo apt install -y wireguard-toolsNow we generate key pairs in order to fill both configuration files directly via heredoc with the keys.
umask 077
SERVER_KEY=$(wg genkey)
SERVER_PUB=$(echo "$SERVER_KEY" | wg pubkey)
CLIENT_KEY=$(wg genkey)
CLIENT_PUB=$(echo "$CLIENT_KEY" | wg pubkey)

sudo tee /etc/wireguard/wg0.conf > /dev/null <<EOF
[Interface]
Address = 10.66.0.1/24
ListenPort = 51820
PrivateKey = $SERVER_KEY

[Peer]
PublicKey = $CLIENT_PUB
AllowedIPs = 10.66.0.2/32
EOF

sudo tee /etc/wireguard/client1.conf > /dev/null <<EOF
[Interface]
Address = 10.66.0.2/24
PrivateKey = $CLIENT_KEY
DNS = 10.66.0.1

[Peer]
PublicKey = $SERVER_PUB
Endpoint = <10.0.0.1>:51820
AllowedIPs = 10.66.0.0/24
PersistentKeepalive = 25
EOF

sudo chmod 600 /etc/wireguard/wg0.conf /etc/wireguard/client1.conf
umask 077 stays active for the rest of the session, so newly created files are only readable by root.
Replace <10.0.0.1> in the Endpoint with the real IP of your server.
Enable the server:
sudo systemctl enable --now wg-quick@wg0
sudo wg show
wg show shows the interface wg0 and the peer with allowed ips: 10.66.0.2/32. The handshake only happens once the client connects.
Thanks to the DNS line (DNS = 10.66.0.1), only DNS queries are sent to the server, but your actual traffic (e.g. loading websites) bypasses it and is sent via the connected Wi-Fi or mobile network.
You can transfer the config to your phone most easily via QR code:
sudo apt install -y qrencode
sudo cat /etc/wireguard/client1.conf | qrencode -t ansiutf8
Scan the code in the WireGuard app via "Add tunnel" and "Scan from QR code".
For the test from the client (if you have the tools for it), three commands:
ping -c 2 10.66.0.1
dig @10.66.0.1 example.com A +short
dig @10.66.0.1 googlesyndication.com A +short
The first dig query returns real IPs, the second one 0.0.0.0. As soon as DNS = 10.66.0.1 is active in the profile, every DNS query automatically runs through your filter, even in foreign Wi-Fi.
Troubleshooting
- If the command
dig +short <doh.example.com> Areturns nothing, the record is not yet active. Wait a few minutes and check again. - If Caddy gets no certificate and you use Cloudflare as your DNS provider, set the entry to "DNS only" (grey cloud, not proxied), otherwise Caddy will not get a certificate.
- If
wg showshows no handshake, port51820/UDPis most likely missing in your Hetzner Cloud Firewall. Enter the port and check withwg showagain.
How well does it actually filter?
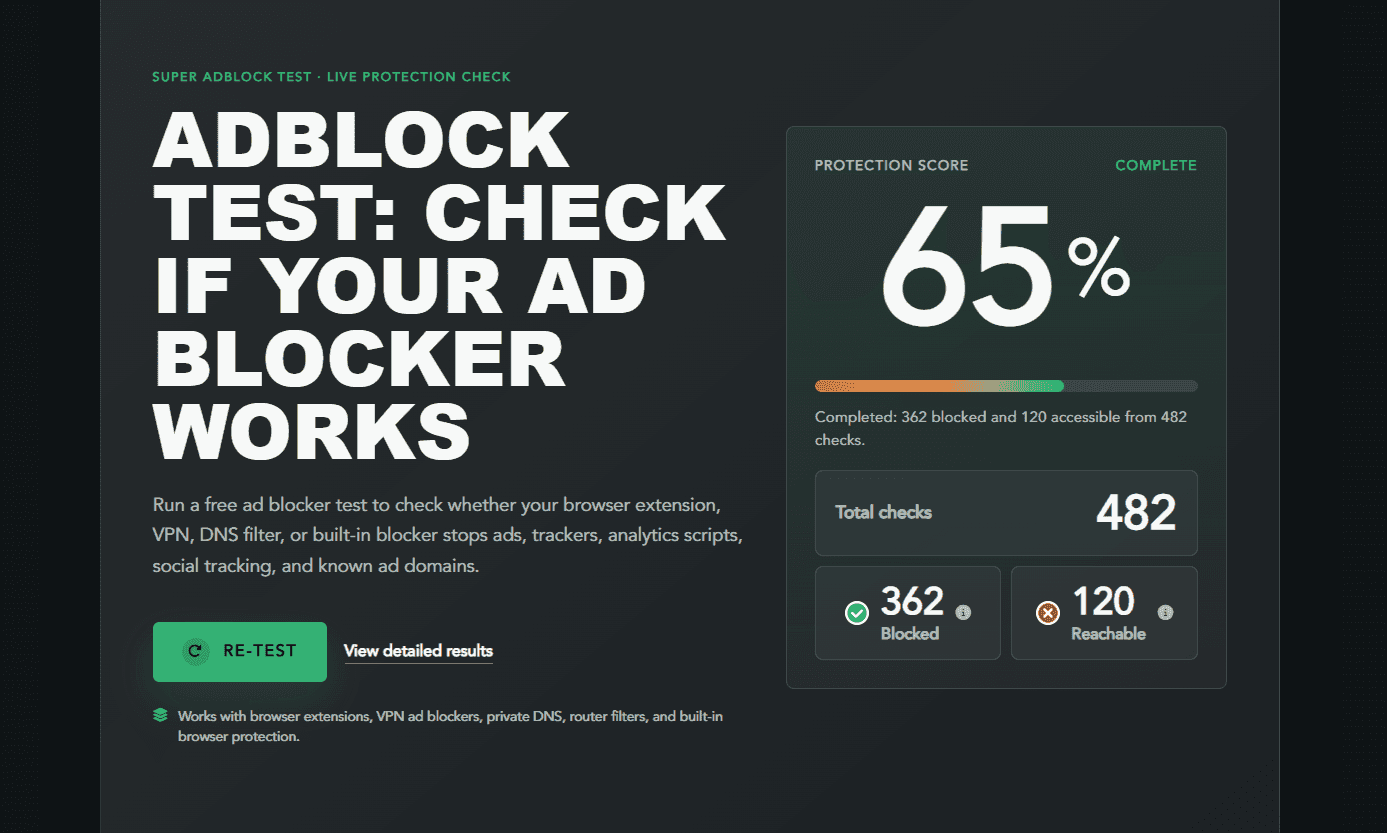
A good tool for checking how many domains get blocked is superadblocktest.com. As of 19/09/2026, this setup reached 65% there: 362 of 482 checked ad and tracker requests were blocked, 120 got through.
Conclusion
Blocky now runs as a hardened systemd service on port 53, it filters via the HaGeZi lists and writes the queries to a SQLite database. Caddy now provides the DoH endpoint at https://<doh.example.com>/dns-query with an automatic Let's Encrypt certificate. Via the WireGuard tunnel, you also use the same filter while on the go, and the Hetzner Cloud Firewall only exposes the ports you actually need.
Next steps:
- Blocky update: new binary to
/usr/local/bin/blocky, thensudo systemctl restart blocky. - More HaGeZi lists and formats: https://github.com/hagezi/dns-blocklists
- Domain wrongly blocked? Add it to the
allowlistsof the same group in/etc/blocky/config.yamland restart Blocky. - Statistics and query log in detail: https://0xerr0r.github.io/blocky/latest/