Introduction
This tutorial will help you to automount local or remote filesystems on systemd Linux distributions. AutoFS is like deprecated (but working) method on a systemd machine. It's a long tutorial compared to the real work needed for the task itself. But I want you to understand the configuration process and be able to go further on your own with systemd mounts. And after this tutorial, maybe you will love the magics of the sometime controversial systemd...
"automount" means that a filesystem will be mounted on demand when the mount point directory is accessed (by a user or any system request). After a configurable period of non-use, the filesystem is automatically unmounted.
There are different reasons to use automounting. For example mechanical hard-drives may easily go to sleep when there are not mounted, so that it consumes less power. Remote filesystems mount like StorageBox (using SSHFS, WebDAV, Samba, etc) will use network connection just when needed, and will not maintain a perpetual connection with keep alive mechanisms. Welcome in the eco-friendly computing best practices!
In this tutorial I will explain step by step how to mount a SSHFS StorageBox drive as an example, because it's a bit more useful and complicated than a local drive. But it works the same way for a local drive, without any adaptation.
Prerequisites
You may need to get some basic information about systemd, but you can continue safely the tutorial without reading these resources. The systemd wikipedia page is a good start. To go further, you can take a look a the linux.com tutorials for systemd. If you want to experiment with systemd commands safely, you can do it online here: https://systemd-by-example.com
If you want to mount a SSHFS drive as shown in this tutorial, you need to have or install fuse and the corresponding filesystem:
apt install sshfsNote bash-completion works well with all the commands and manipulations that you need in this tutorial. If you enter
systemctl <TAB><TAB>you should see all commands available. Completion works also for filenames involved in systemd later configuration, so think<TAB><TAB>to avoid headache.
Note In this tutorial commands runnable as unprivileged user start with the
$prompt. Commands that need to run as root user start with the#prompt.
Step 0 - Confirm your system runs systemd
Before starting this tutorial you have to check if your system runs systemd. This page lists the main distributions that adopted it. Most of the Linux images provided at Hetzner use systemd.
The formal way to check it is to run the command systemctl --version in a terminal session. It should return something like:
~$ systemctl --version
systemd 247 (247.3-7)
+PAM +AUDIT +SELINUX +IMA +APPARMOR +SMACK +SYSVINIT +UTMP +LIBCRYPTSETUP +GCRYPT +GNUTLS +ACL +XZ +LZ4 +ZSTD +SECCOMP +BLKID +ELFUTILS +KMOD +IDN2 -IDN +PCRE2 default-hierarchy=unified
If you don't have it, you should see:
~$ systemctl --version
systemctl: command not found

# or if you are a lucky user of the command-not-found package:

Command 'systemctl' not found, but can be installed with:
sudo apt install systemd
Installing systemd is totally out of topic of this tutorial, so you can give up now if your system is not systemd ready. DO NOT run the command apt insta11 systemd.
Step 1 - Ensure that the filesystem to automount is ready
The filesystem we want to automount needs an entry in the file /etc/fstab. systemd then parse it and generate a configuration file for us. It's also possible to write a custom configuration file and avoid the fstab definition. But the easy method is to use the existing fstab.
First we create and check that the filesystem can be mounted and umounted by hand. Add this one-line in /etc/fstab:
# /etc/fstab
# .../...

holu@your_host:/path/on/remote/server /mnt/mymountpoint fuse.sshfs IdentityFile=/home/holu/.ssh/id_rsa,noauto,nofail 0 0
This is a standard way to declare a SSHFS mount:
holu@your_host: SSH user and server address./path/on/remote/server: the path on the remote system that you want as the root of your local mount./mnt/mymountpoint: this is the local path where you want to plug the remote filesystem. Thus to be clear, after the mount, a file of the remote server located at/path/on/remote/server/sub-directory/file-example.txtwill be located at/mnt/mymountpoint/sub-directory/file-example.txton the local server.
Note This path has to be an existing directory to mount the filesystem with the
mountcommand. But with the systemd automount method, you don't need that this directory exists! It's created and deleted on-the-go by systemd when the automount/auto-umount occurs. After the automount setup is done, you could remove it, but be sure that the filesystem is NOT mounted! (else you could erase the files on the mounted filesystem...)
IdentityFile: to avoid any password prompt, use a private key (out of the scope of this tutorial, but search the web for "ssh login without password")
You may check other useful mount options depending of your needs:
uid=valueandgid=value: to set the owner and group of the root of the filesystem.noatime: to not update inode access times, for faster access (and eventually less bandwidth).workaround=rename: in case some software has problem when renaming files on SSHFS mount, look at this option.
Now create the mount point (see note above), then mount and umount the filesystem to check that it works well:
# as root user
cd /mnt
mkdir mymountpoint
mount mymountpoint
df mymountpoint
ls mymountpoint
umount mymountpoint
The full workflow could be:
~# cd /mnt
/mnt# mkdir mymountpoint
mkdir: created directory 'mymountpoint'
/mnt# mount mymountpoint
/mnt# df mymountpoint
Filesystem                                      Type        Size  Used Avail Use% Mounted on
holu@your_host:/path/on/remote/server fuse.sshfs  455G  308G  124G  72% /mnt/mymountpoint
total                                           -           455G  308G  124G  72% -
/mnt# ls mymountpoint
lost+found  mydir  myfiles  etc
/mnt# umount mymountpoint
/mnt# ### Optional step: remove the mount point. See note above ###
/mnt# rm -ri mymountpoint
If you have errors during this workflow, check and recheck, until the mount works well. Try with a local drive as a first test, it's probably less error-prone that a remote connection.
Now that the mount works well by hand, let's go for the systemd machinery.
Step 2 - Setup the mount for systemd automount
systemd needs to know which fstab entry it has to manage. Edit again /etc/fstab and add these parameters to the mount definition:
x-systemd.automount,x-systemd.idle-timeout=60sThese parameters could be applied to any mount entry. They are related to systemd not SSHFS.
The fstab of the above example becomes:
# /etc/fstab

holu@your_host:/path/on/remote/server /mnt/mymountpoint fuse.sshfs IdentityFile=/home/holu/.ssh/id_rsa,noauto,nofail,x-systemd.automount,x-systemd.idle-timeout=60s 0 0
Explanation:
x-systemd.automount: to delegate this mount to systemd.x-systemd.idle-timeout=60s: Configures an idle timeout. Once the mount has been idle for the specified time, systemd will attempt to unmount. So after 60 seconds of non-use of the mount point, it will be umounted. Understand that a simplecdcommand in a shell on that mountpoint will avoid the idle timeout, even if no apparent activity occurs.lsof /mnt/mymountpointhelps to see what processes are using the mountpoint and make it alive. Seex-systemd.idle-timeoutin manpage for details.
Note
noautois useless now that systemd manages the mount (reference). But you can keep it in case you decide to go back for a manual mount.
Most of the job is done... now profit of the magics.
Step 3 - Reload the systemd daemon
Reload systemd as root, so that it knows about your mount:
systemctl daemon-reloadCheck that the mount is well managed with the status command:
systemctl status mnt-mymountpoint.automountReturns:
Note You can use shell completion
systemctl status mnt<TAB><TAB>
If you see more or less the same result, it's ok. Don't be afraid about the line Active: inactive (dead)! But if you see:
Unit mnt-mymountpoint.automount could not be found....something is wrong.
It's probably that you didn't use the same /mnt/mymountpoint as me in this tutorial. No panic. The mnt-mymountpoint.automount parameter that we use is called a "unit" in systemd world, and it's created dynamically in this case. The name comes directly from the mount point path /mnt/mymountpoint that we had chosen earlier in the fstab. If the mount point name changes, this configuration handle will change too. You can easily find what is the proper unit name by browsing the available units:
~$ systemctl list-unit-files --type=automount
UNIT FILE                         STATE     VENDOR PRESET
mnt-mymountpoint.automount        generated -
home-holu-storagebox.automount    generated -
proc-sys-fs-binfmt_misc.automount static    -

3 unit files listed.
In the example above, you can see the mount point of the tutorial, and another mount point at /home/holu/storagebox.
Note The
--type=automountargument used to filter the units type. If you remove it you will dive into the heart of your old loved SysV system...
Now that you know the name of your unit, you can go to the next step. We assume that mnt-mymountpoint.automount is the unit name.
For advanced users (optional section)
systemd creates two units for you with the information grabbed in the fstab: mnt-mymountpoint.mount and mnt-mymountpoint.automount. The first unit manages the mount itself and must be stopped (in automounting use case). The second unit manages the automount feature and has to be started if you want that automount occurs.
Try the systemctl command cat to look at these files:
~$ systemctl cat mnt-mymountpoint.mount
# /run/systemd/generator/mnt-mymountpoint.mount
# Automatically generated by systemd-fstab-generator

[Unit]
Documentation=man:fstab(5) man:systemd-fstab-generator(8)
SourcePath=/etc/fstab

[Mount]
Where=/mnt/mymountpoint
What=holu@your_host:/path/on/remote/server
Type=fuse.sshfs
Options=IdentityFile=/home/holu/.ssh/id_rsa,noauto,nofail,x-systemd.automount,x-systemd.idle-timeout=60s

~$ systemctl cat mnt-mymountpoint.automount
# /run/systemd/generator/mnt-mymountpoint.automount
# Automatically generated by systemd-fstab-generator

[Unit]
SourcePath=/etc/fstab
Documentation=man:fstab(5) man:systemd-fstab-generator(8)

[Automount]
Where=/mnt/mymountpoint
TimeoutIdleSec=60s
These runtime unit files exist and their paths are /run/systemd/generator/mnt-mymountpoint.*mount. Do not modify here, it's Automatically generated by systemd-fstab-generator. But you can customize the units this way:
# to override some parameters

~# systemctl edit mnt-mymountpoint.automount
~# systemctl edit mnt-mymountpoint.mount

# to replace the full unit file

~# systemctl edit --full mnt-mymountpoint.automount
~# systemctl edit --full mnt-mymountpoint.mount
These commands open a editor and save the modifications in /etc/systemd/system/.
The *.mount unit may be started/stopped with systemctl if you want to mount/umount the filesystem manually. It is still possible to use the usual mountand umount commands to manage the fstab filesystems as usual, event with the systemd options we added.
Step 4 - Enable and test the mount
Now that your mount is known by the system, you have to activate it, because as seen above it's status is inactive.
Run the start command as root:
systemctl start mnt-mymountpoint.automountAnd now check again it's status:
systemctl status mnt-mymountpoint.automountReturns:
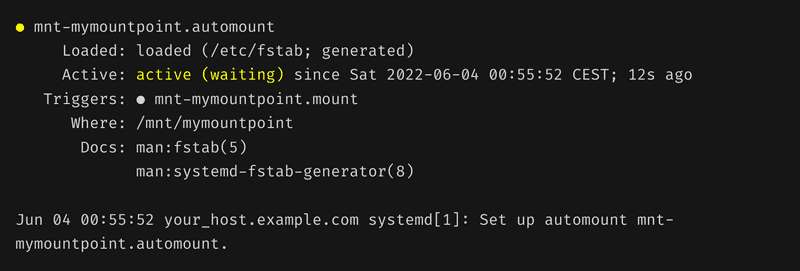
Note that the first bullet is yellow now, if your terminal supports colors. It was grey when inactive. It means it's active and should work. The second bullet is still grey, because the mount is not currently active.
Browse the mount to check that automount occurred:
~$ ls /mnt/mymountpoint
lost+found  mydir  myfiles  etc
Great! The SSHFS has been mounted and it works well. Check again the status:
systemctl status mnt-mymountpoint.automountReturns:
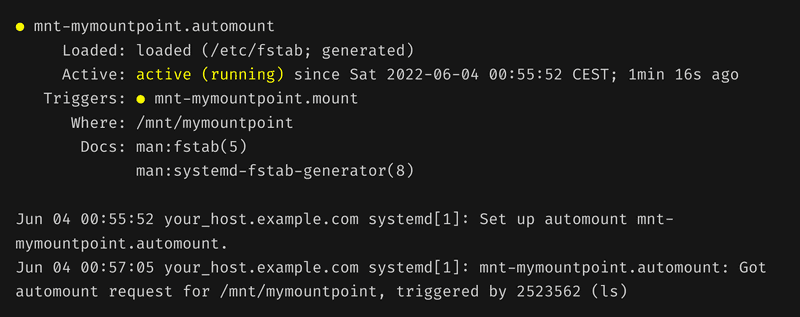
Look at the the result: now all bullets are yellow to show that the mount is active and currently mounted. The command returns also a log of the operations on the mount, with the commands that triggered the automount. Here the ls command (with PID number 2523562). The triggers log is shown only to the root user. If you launch the status command as a normal user, you will just see the unit status, but not the events log.
So, now you are on your own and you should know what to do in 60 seconds to check that everything is OK :)
If the automount is not required anymore or if you regret this tutorial, just run:
systemctl stop mnt-mymountpoint.automount... and it will fall again asleep (but not really dead) until you start it again. And if you remove the systemd parameters in the fstab, it will forget it forever after a daemon reload.
Conclusion
In this tutorial you learnt how to setup a SSHFS mount to a storagebox, how to setup an automount of this drive managed by the systemd subsystem, and how to do basic operations on units and deal with common problems. You may want to dive deeper into the systemd layer of your system, automount being only a small part of its work.
Hope it helps.
J.


